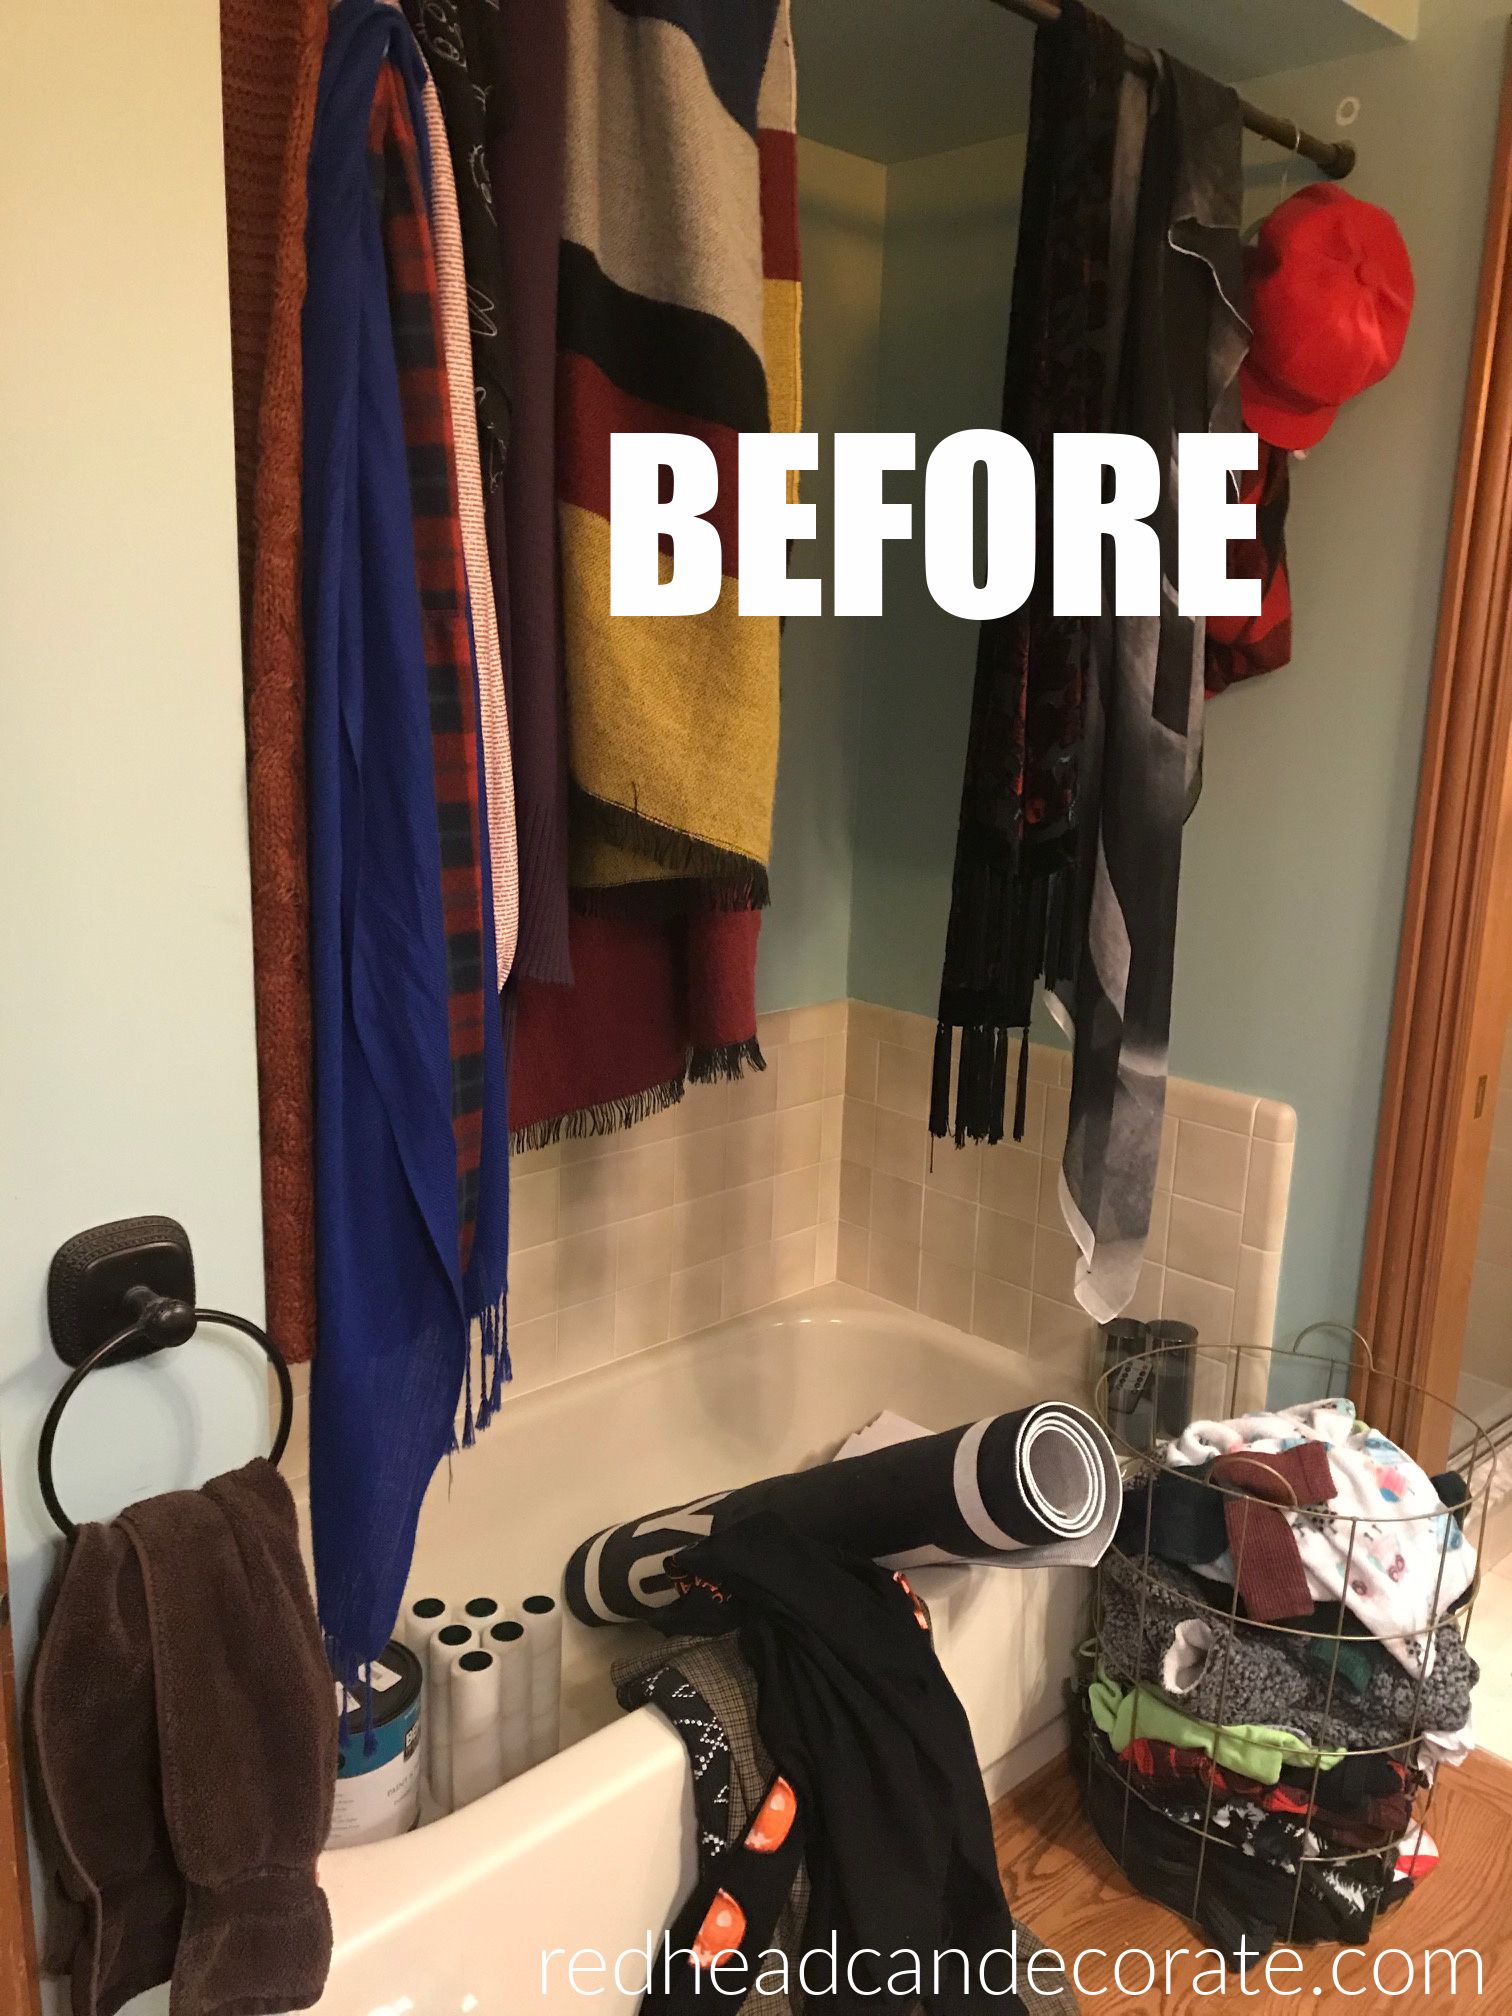
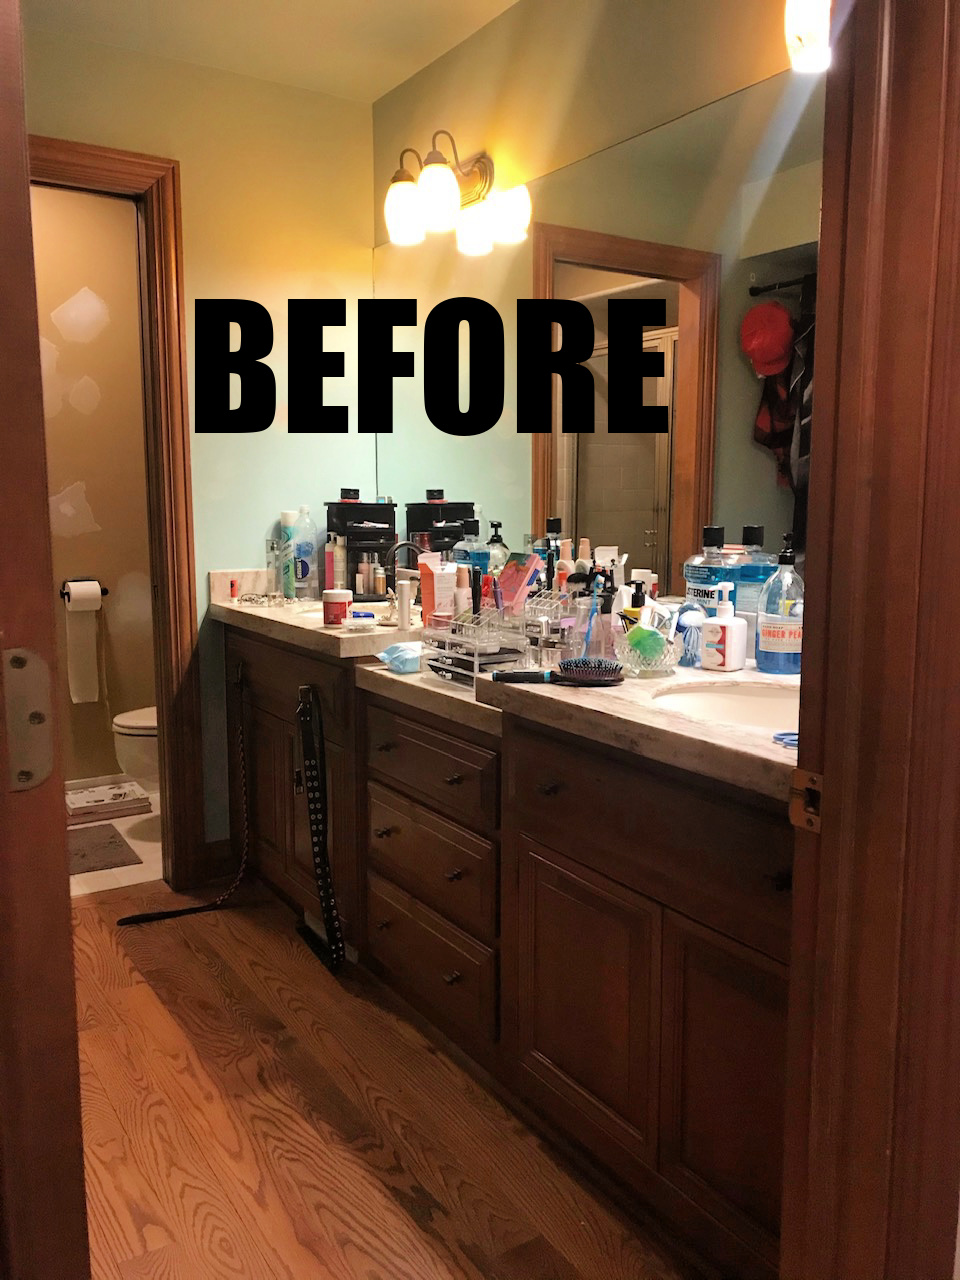
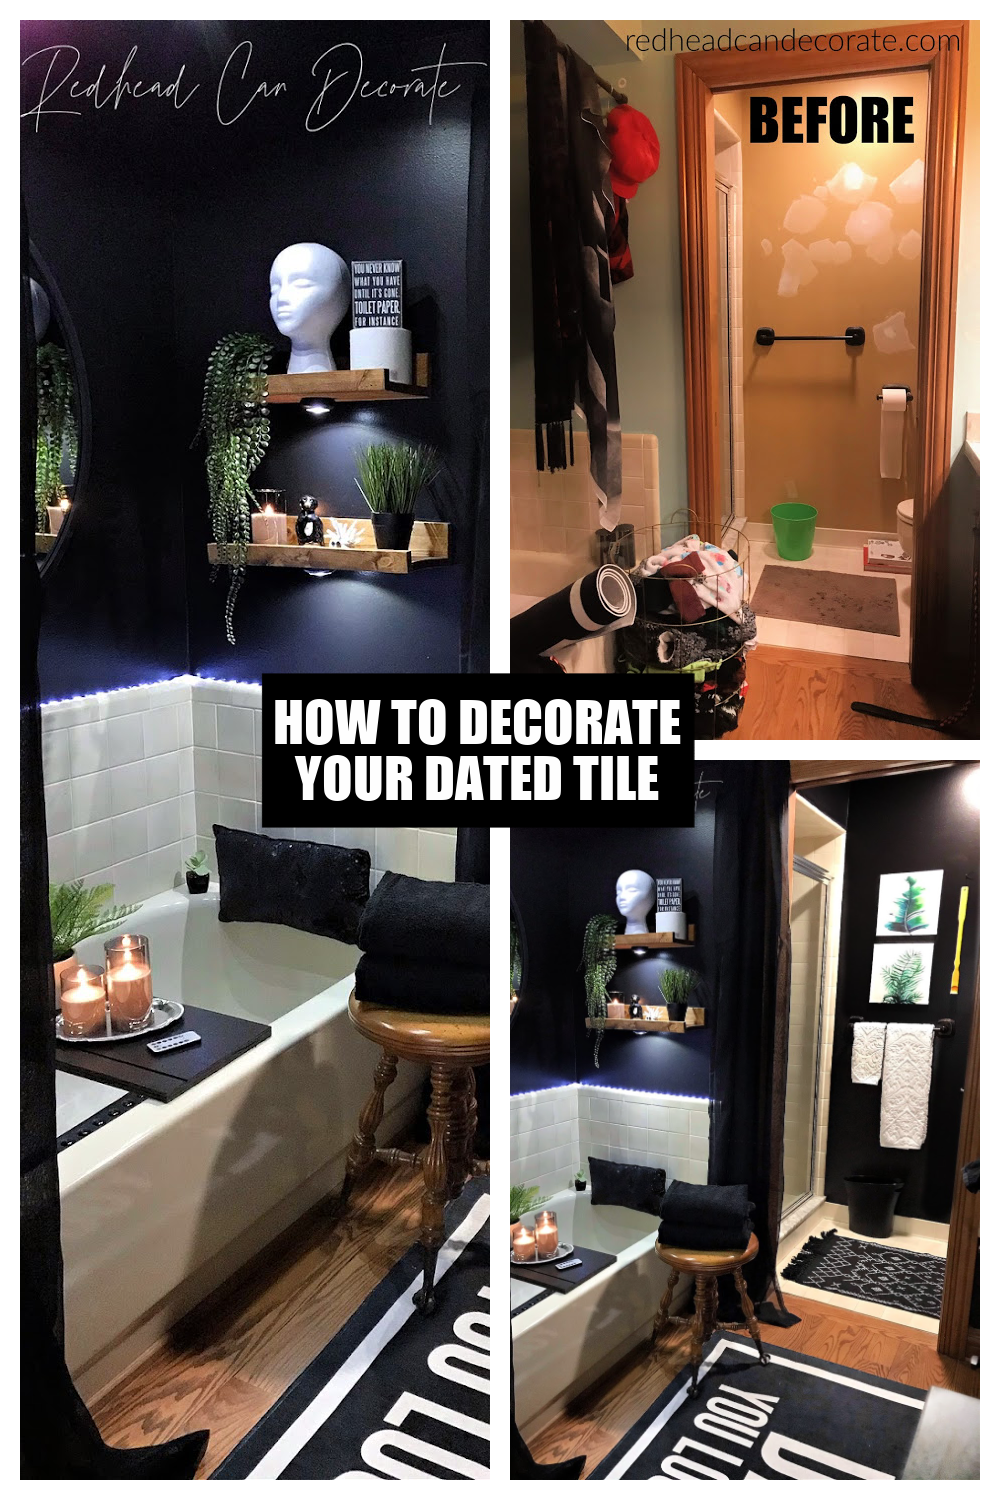
Our “upstairs bathroom” is like a little family secret no one talks about, or wants to talk about 😆. Our kiddos have used the dark “window-less”, dated bathroom for over 11 years now, and have literally grown up in this bathroom you’re about to see. This is certainly one of the reasons why I am so excited to share “How to Update and Decorate Your Dated Bone Tile Bathroom”. To be honest, this could be the most shocking makeover on this blog besides our DIY Kitchen Makeover. Here’s a few before photos to start us out…

This double sink full bathroom had fantastic bones when we moved in, in 2008. It was hardly touched since 1994 when the house was built, and was perfect for our young children whom were only 7 & 9 at the time. Now a days, our kids are in college, but due to the pandemic this is still their bathroom (and I love having them home).
After we settled in, and started updating a few things (that was when I started redheadcandecorate.com), we decided to replace the old counter top with the same neutral marble looking Corian we had installed in our master bathroom, and the laundry room. I must say, I have been very happy with our 2 inch wide Corian counter tops in all of those rooms, for all of these years.
As time went on, we replaced the light fixtures, shower head, faucets, and I switched out the cabinet knobs. Aside from that, we painted the walls a sandy brown, and a beachy blue and tried to get away with a coastal theme. It worked for a while, but that bone colored tile, up against the orange Oak wood floor, doors, and trim really seemed dated.
For all these years I just didn’t know how to make it look any better, and always thought we may need to gut the entire bathroom 😖. I am so happy it didn’t get that far. I should have known… how to update and decorate my dated bone tile bathroom!
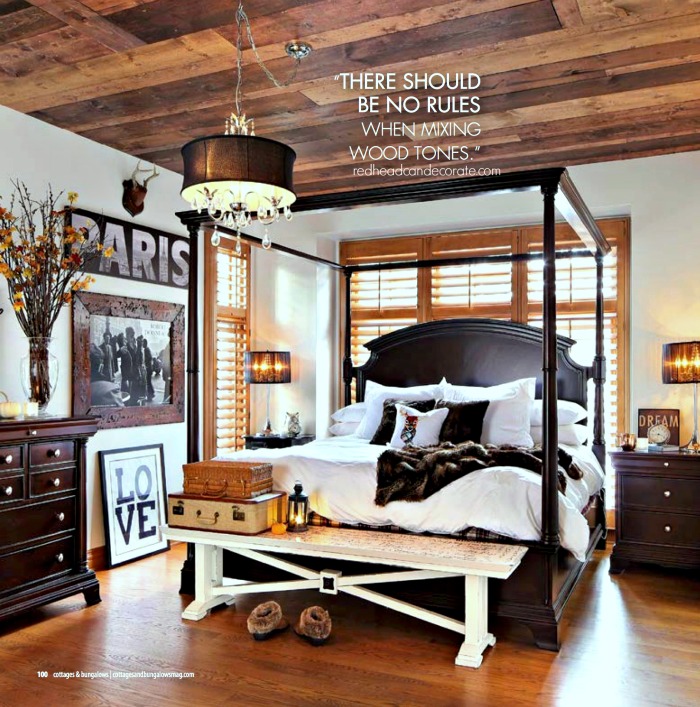
How Black Paint Instantly Updates Bone Tile in Your Bathroom
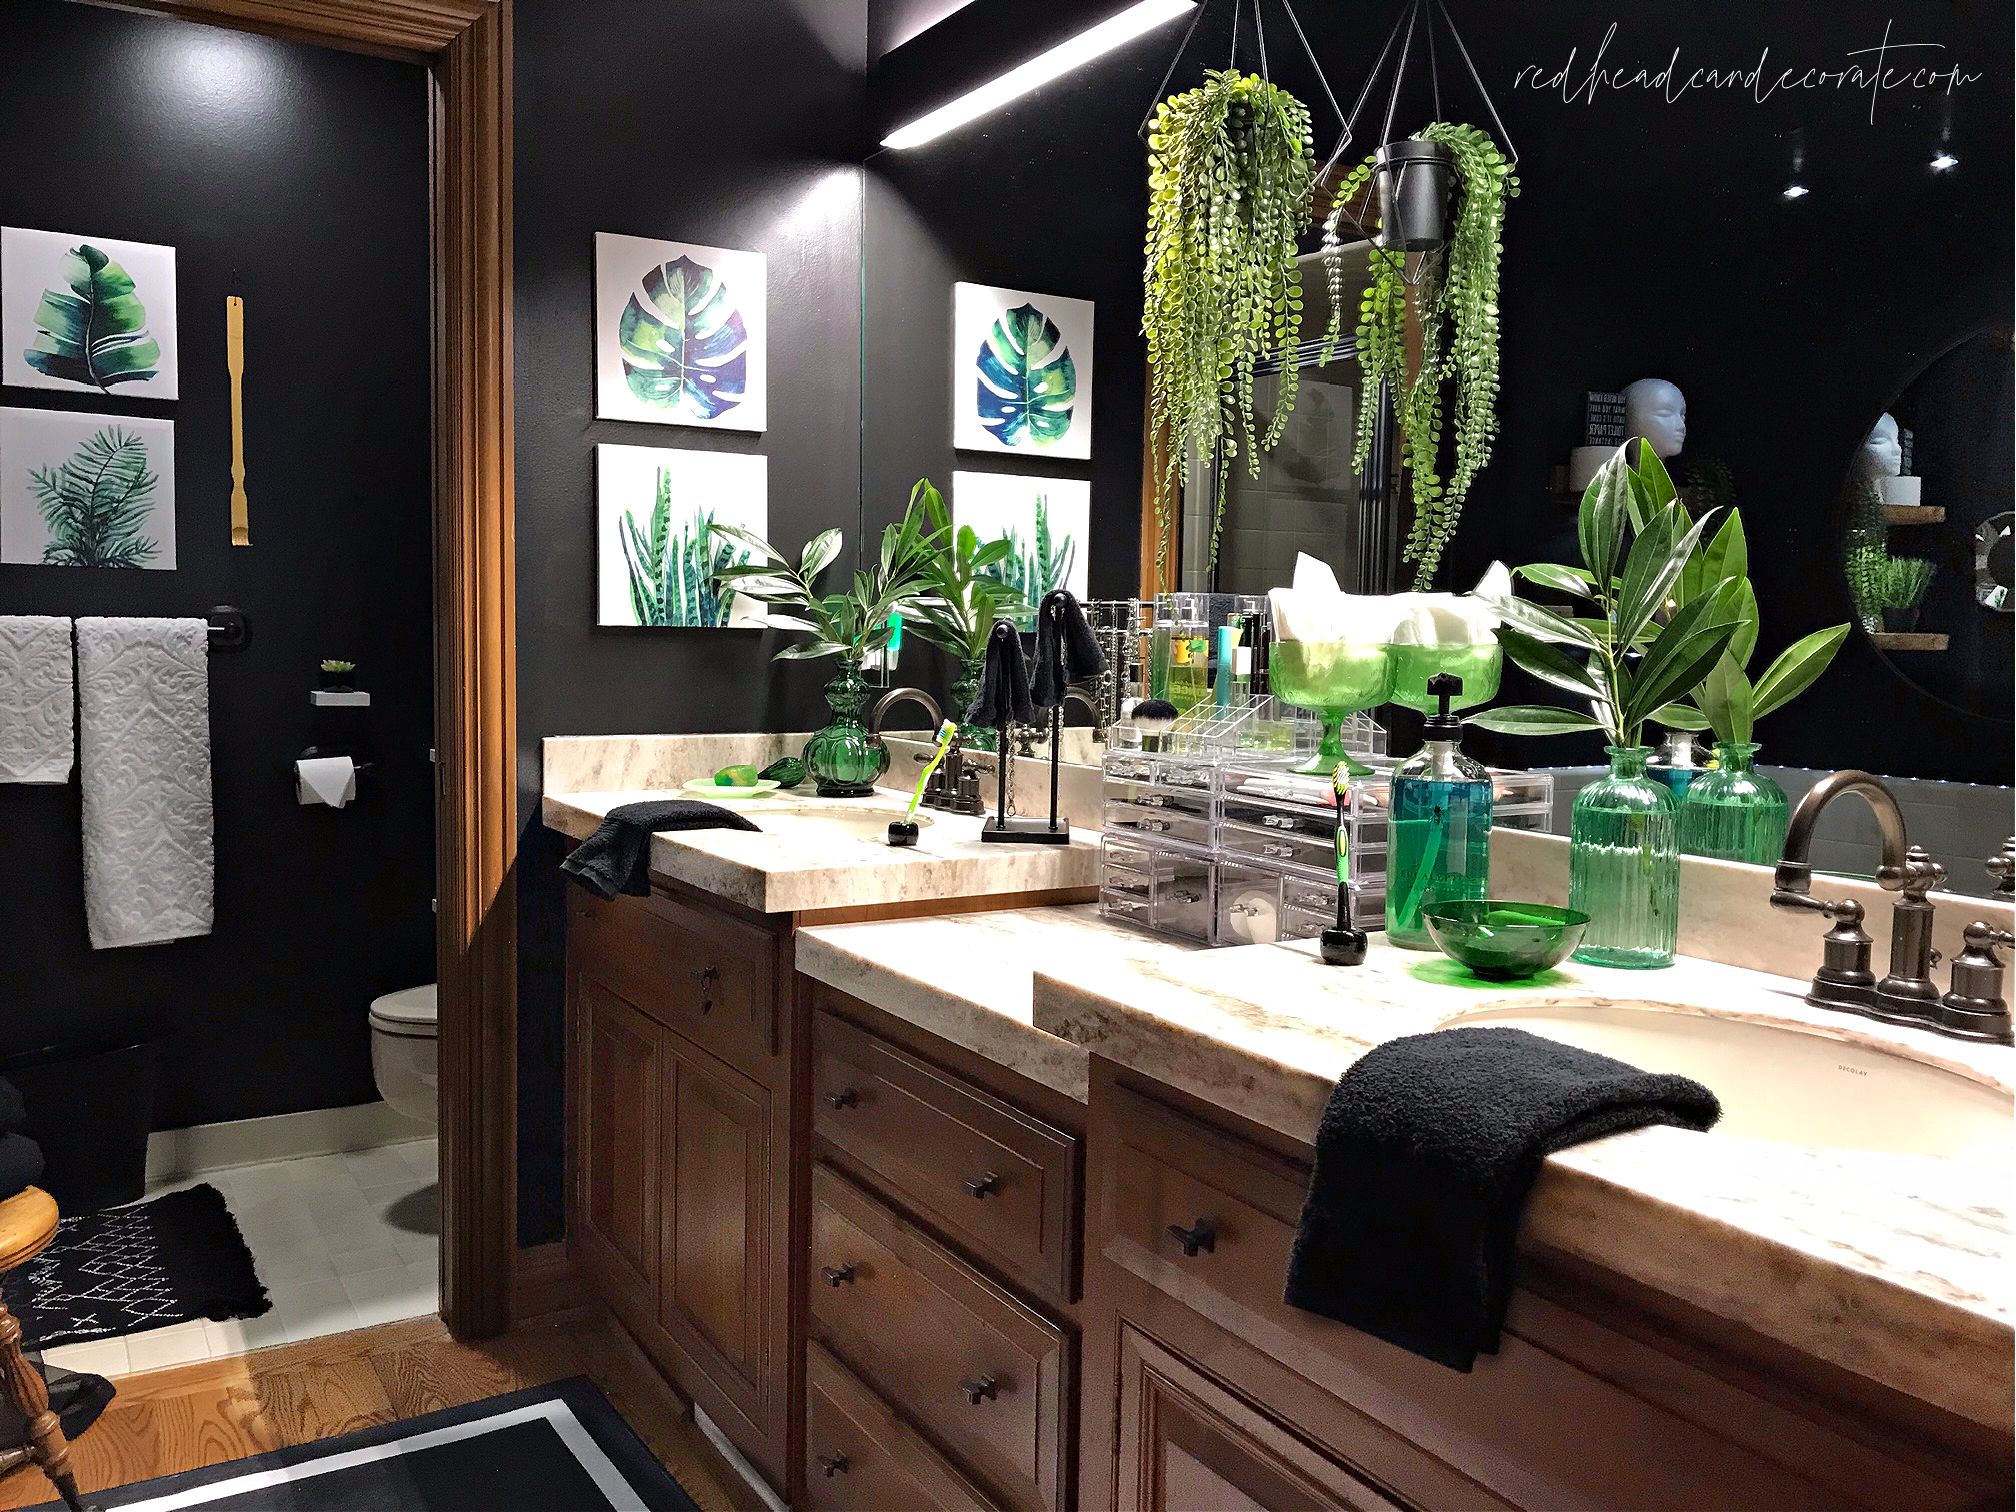
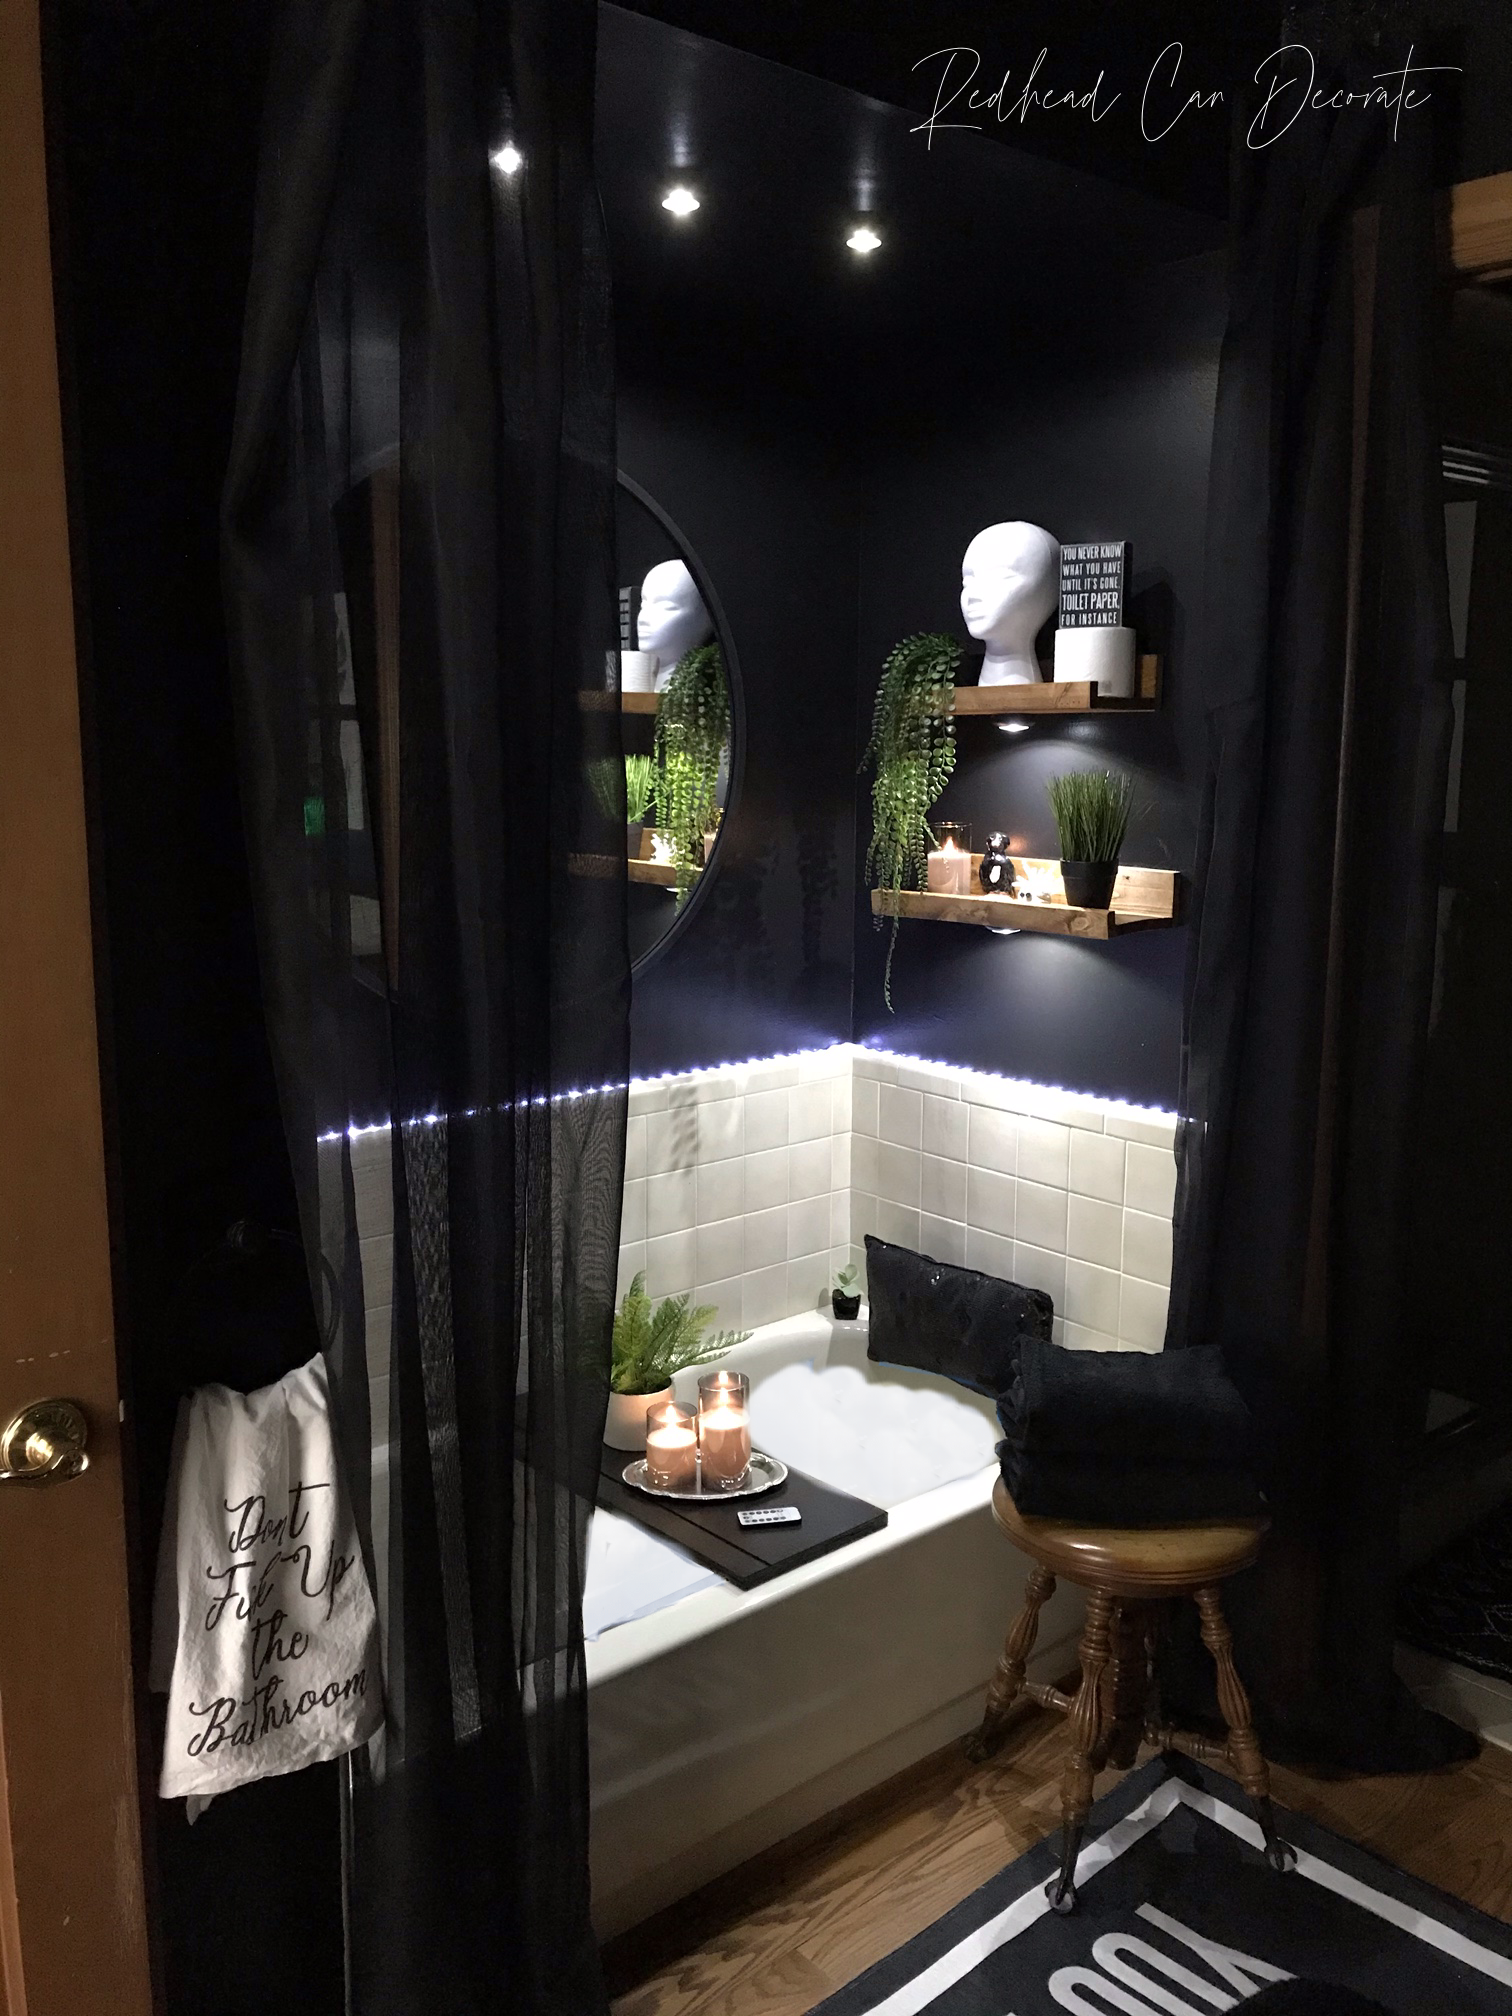
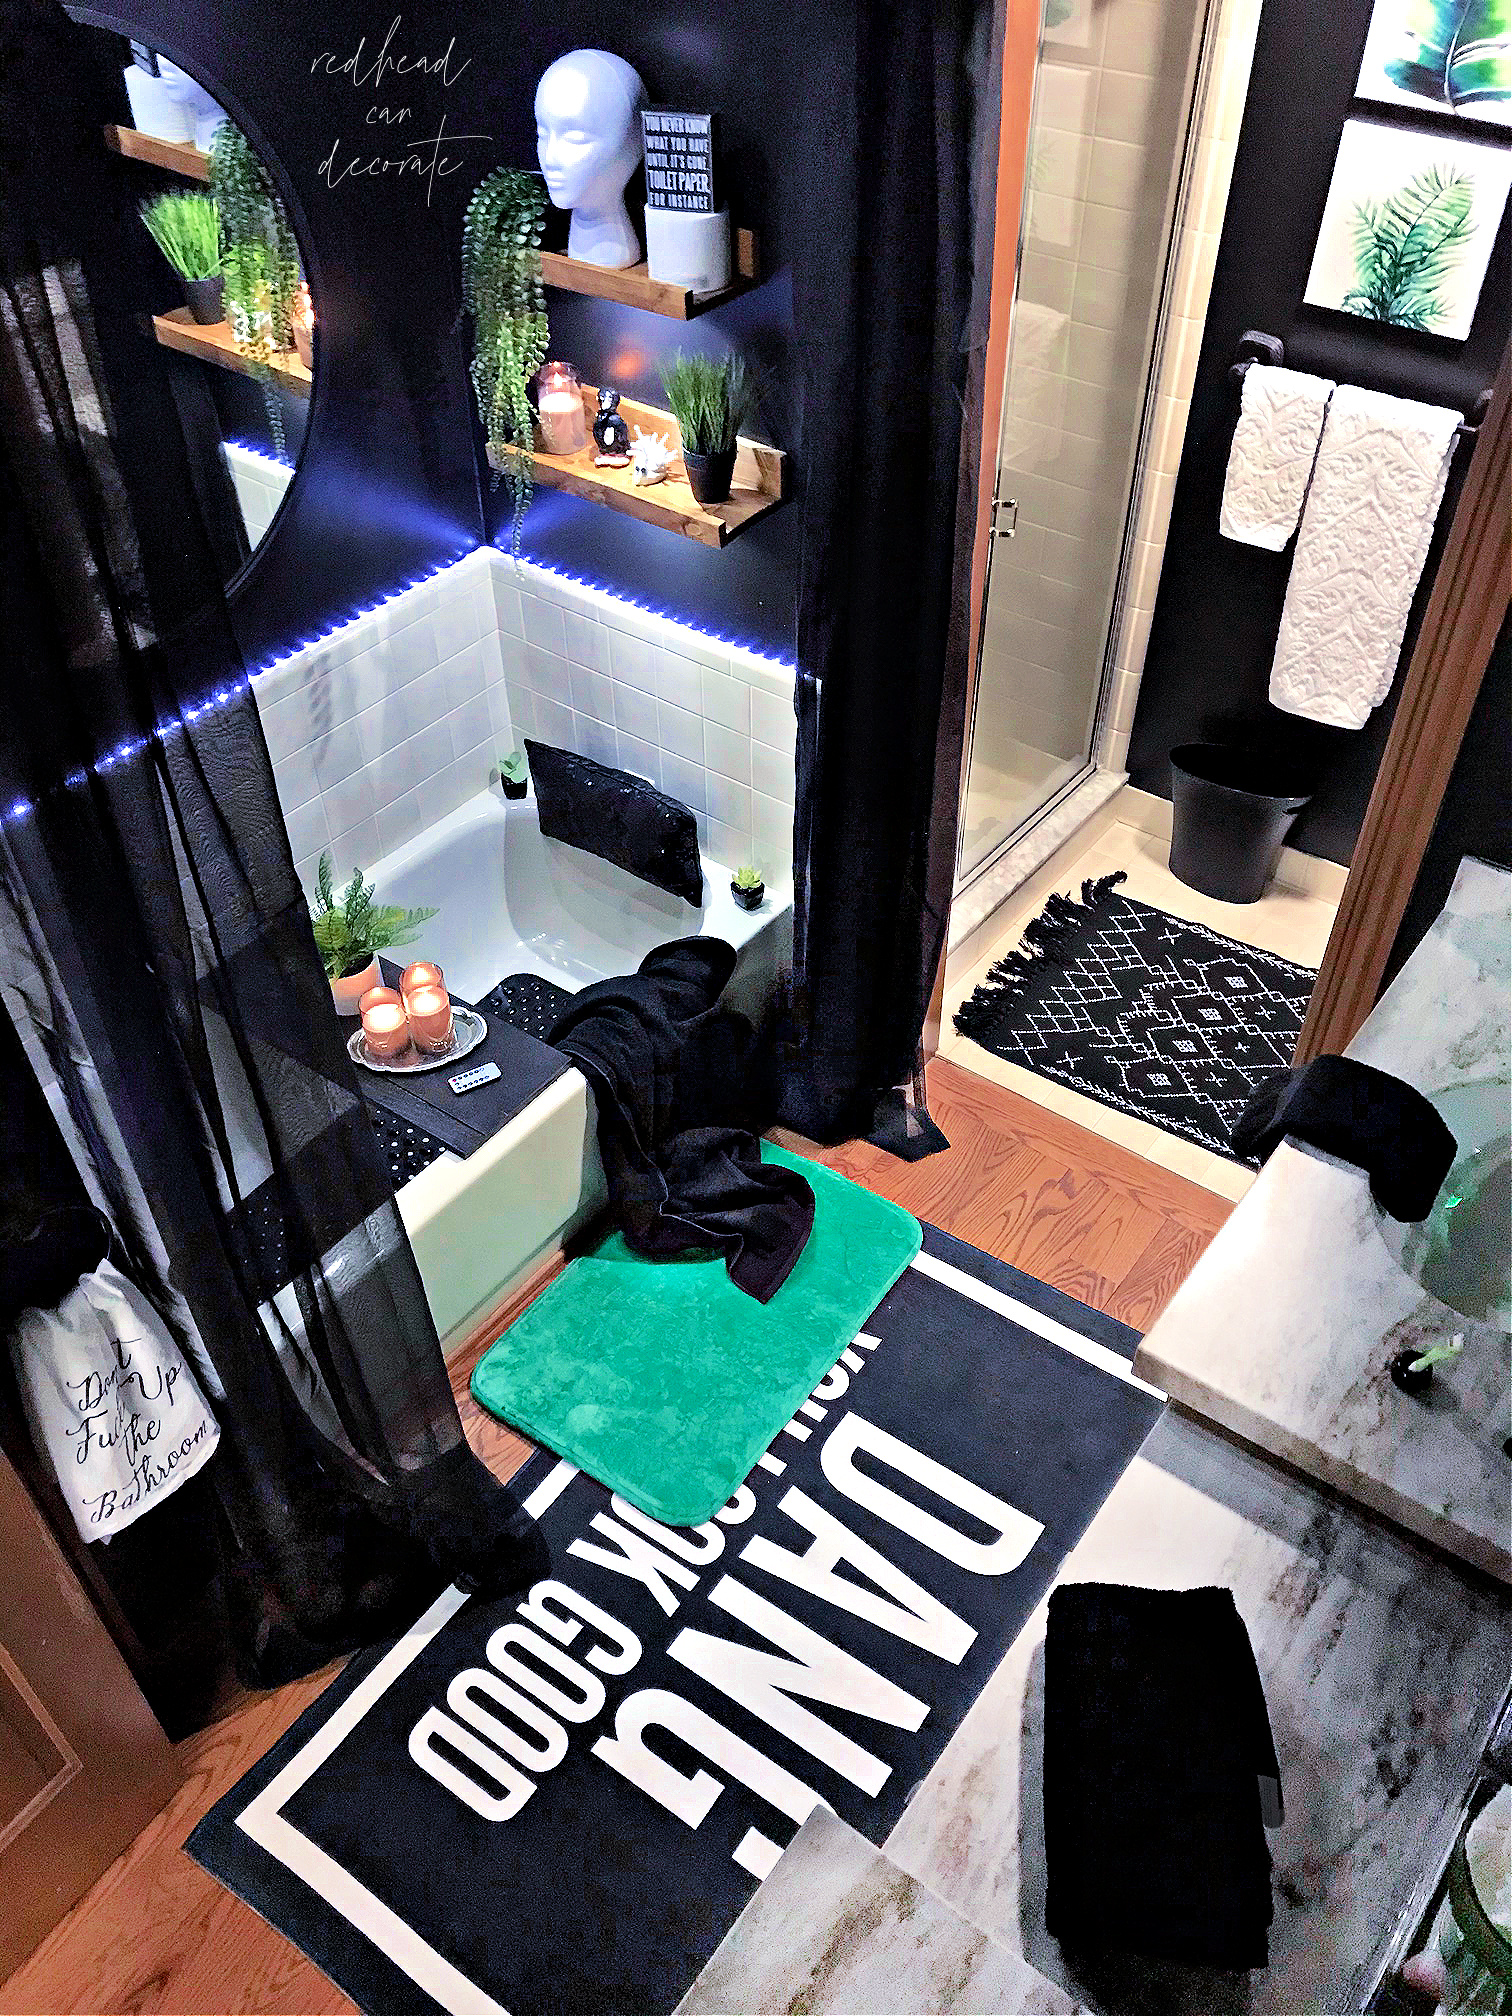
After painting the exterior of our home a darker shade of blue/grey (get a sample mailed to you), and doing the same in our family room, I began to visualize things in this bathroom that I hadn’t seen before. Those new thoughts triggered me to ask the kids what they thought about painting the walls black (I totally trust their judgement because they are both artists). It took them 2 seconds to say, “YHAS! I think it would look so cool!” That was all it took, and I was ordering 2 gallons of black paint. Just look how the black paint instantly updates not only the bone tile, but it also brought out the beautiful tones in our wood door, trim, floors, and cabinets.
TIP: Paint the ceiling the same color as the walls to make the room look even larger.
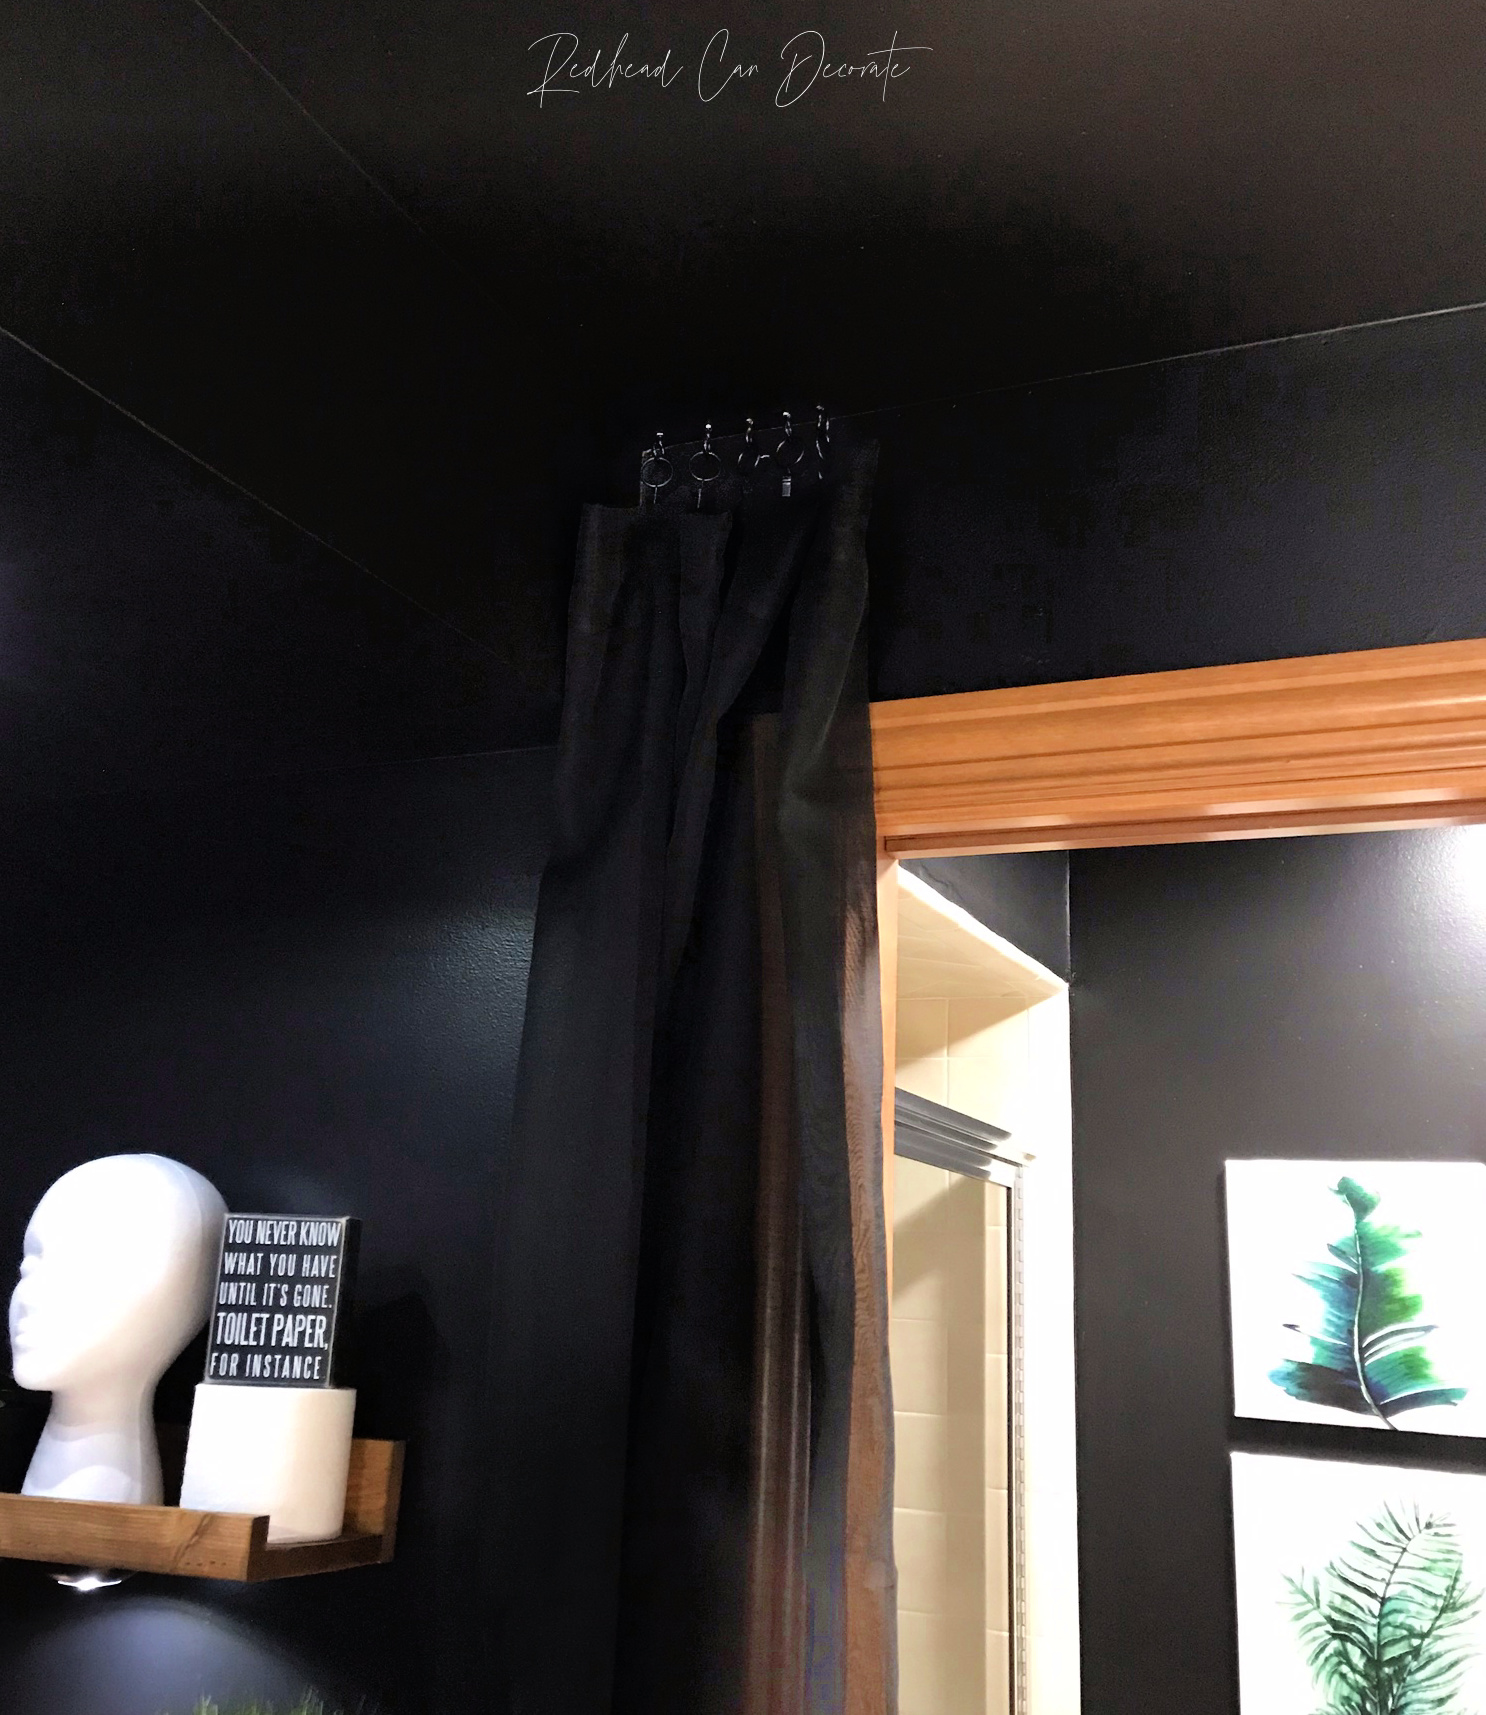
After we painted, I was blown away at how all of the sudden, the tub walls existed, where before it was like a deep hole of nothing that made the room feel so small and narrow. Painting the walls black, and taking down the shower curtain rod that held nothing but scarves, made the room look twice as big. And wowsers, look at the wood.
The biggest surprise of all…our dated bone tile above the tub and in the shower looked like a movie star shining on stage. It was then I knew we were on to something. The dated dark bathroom with the creamy blah tile I hated was going places, and I was going along with it in my black pumps, and diamond earrings 😆.


The Best Lighting for Bone Tile Bathroom
Now that we nailed it with the black paint on the walls, I began looking at the light fixtures above the 2 sinks and tried to think of ways to updated them without removing them. No matter what I tried, they just looked dated. Like I mentioned earlier, we had updated the old fixtures shortly after we moved in, but that was 11 years ago 🤯.
So, I got real busy, real fast and spent close to 4 hours researching for modern led light fixtures that would cover up where the present light fixtures were, and light up the room bright.
*** Some of the links in this post may contain affiliate links for your convenience. Read full disclosure policy here.
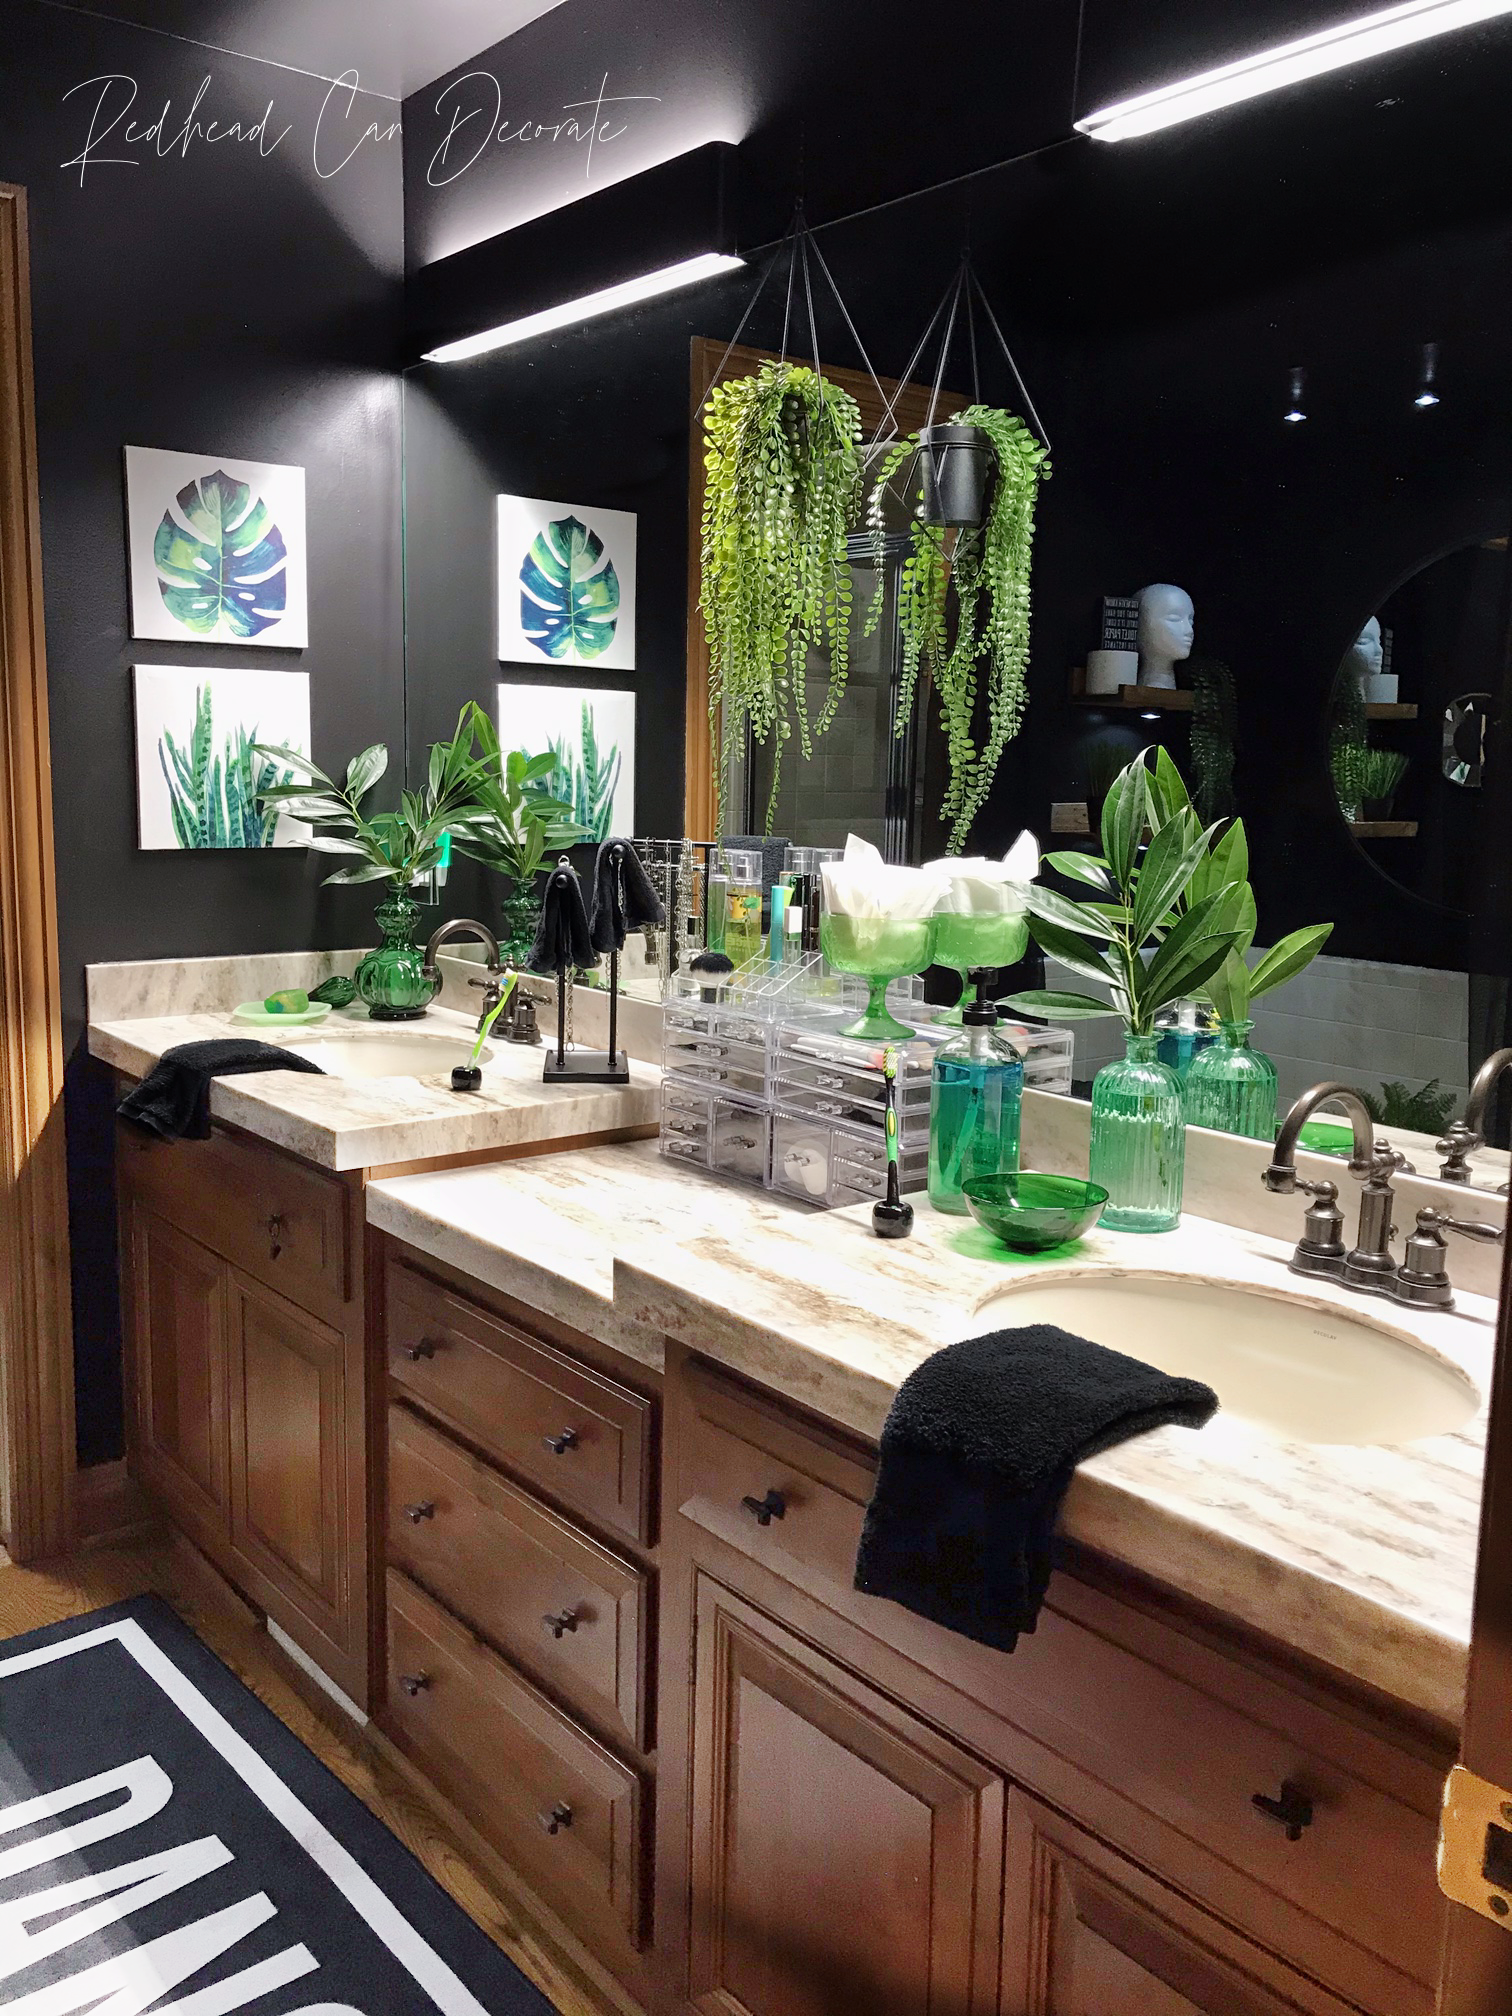
Luck was on my side, and these modern sleek led light fixtures were the absolute perfect touch. They were also easy to install, (my husband did each one in about 1 hour). You can tell in this next 3 photos how they really light up the mirror for make-up and hair styling. I should also mention that the price was amazing too (see all sources below, or click on the word).
Lighting up the long rectangular mirror over the vanity was a fantastic move (the kids LOVE IT!), but what about the dark area above the shower-less tub behind us? This is where I had to really dig deep into my crypt of decorating tricks. I had to really think-think-think 🧠 for this Dated Bone Tile Bathroom!
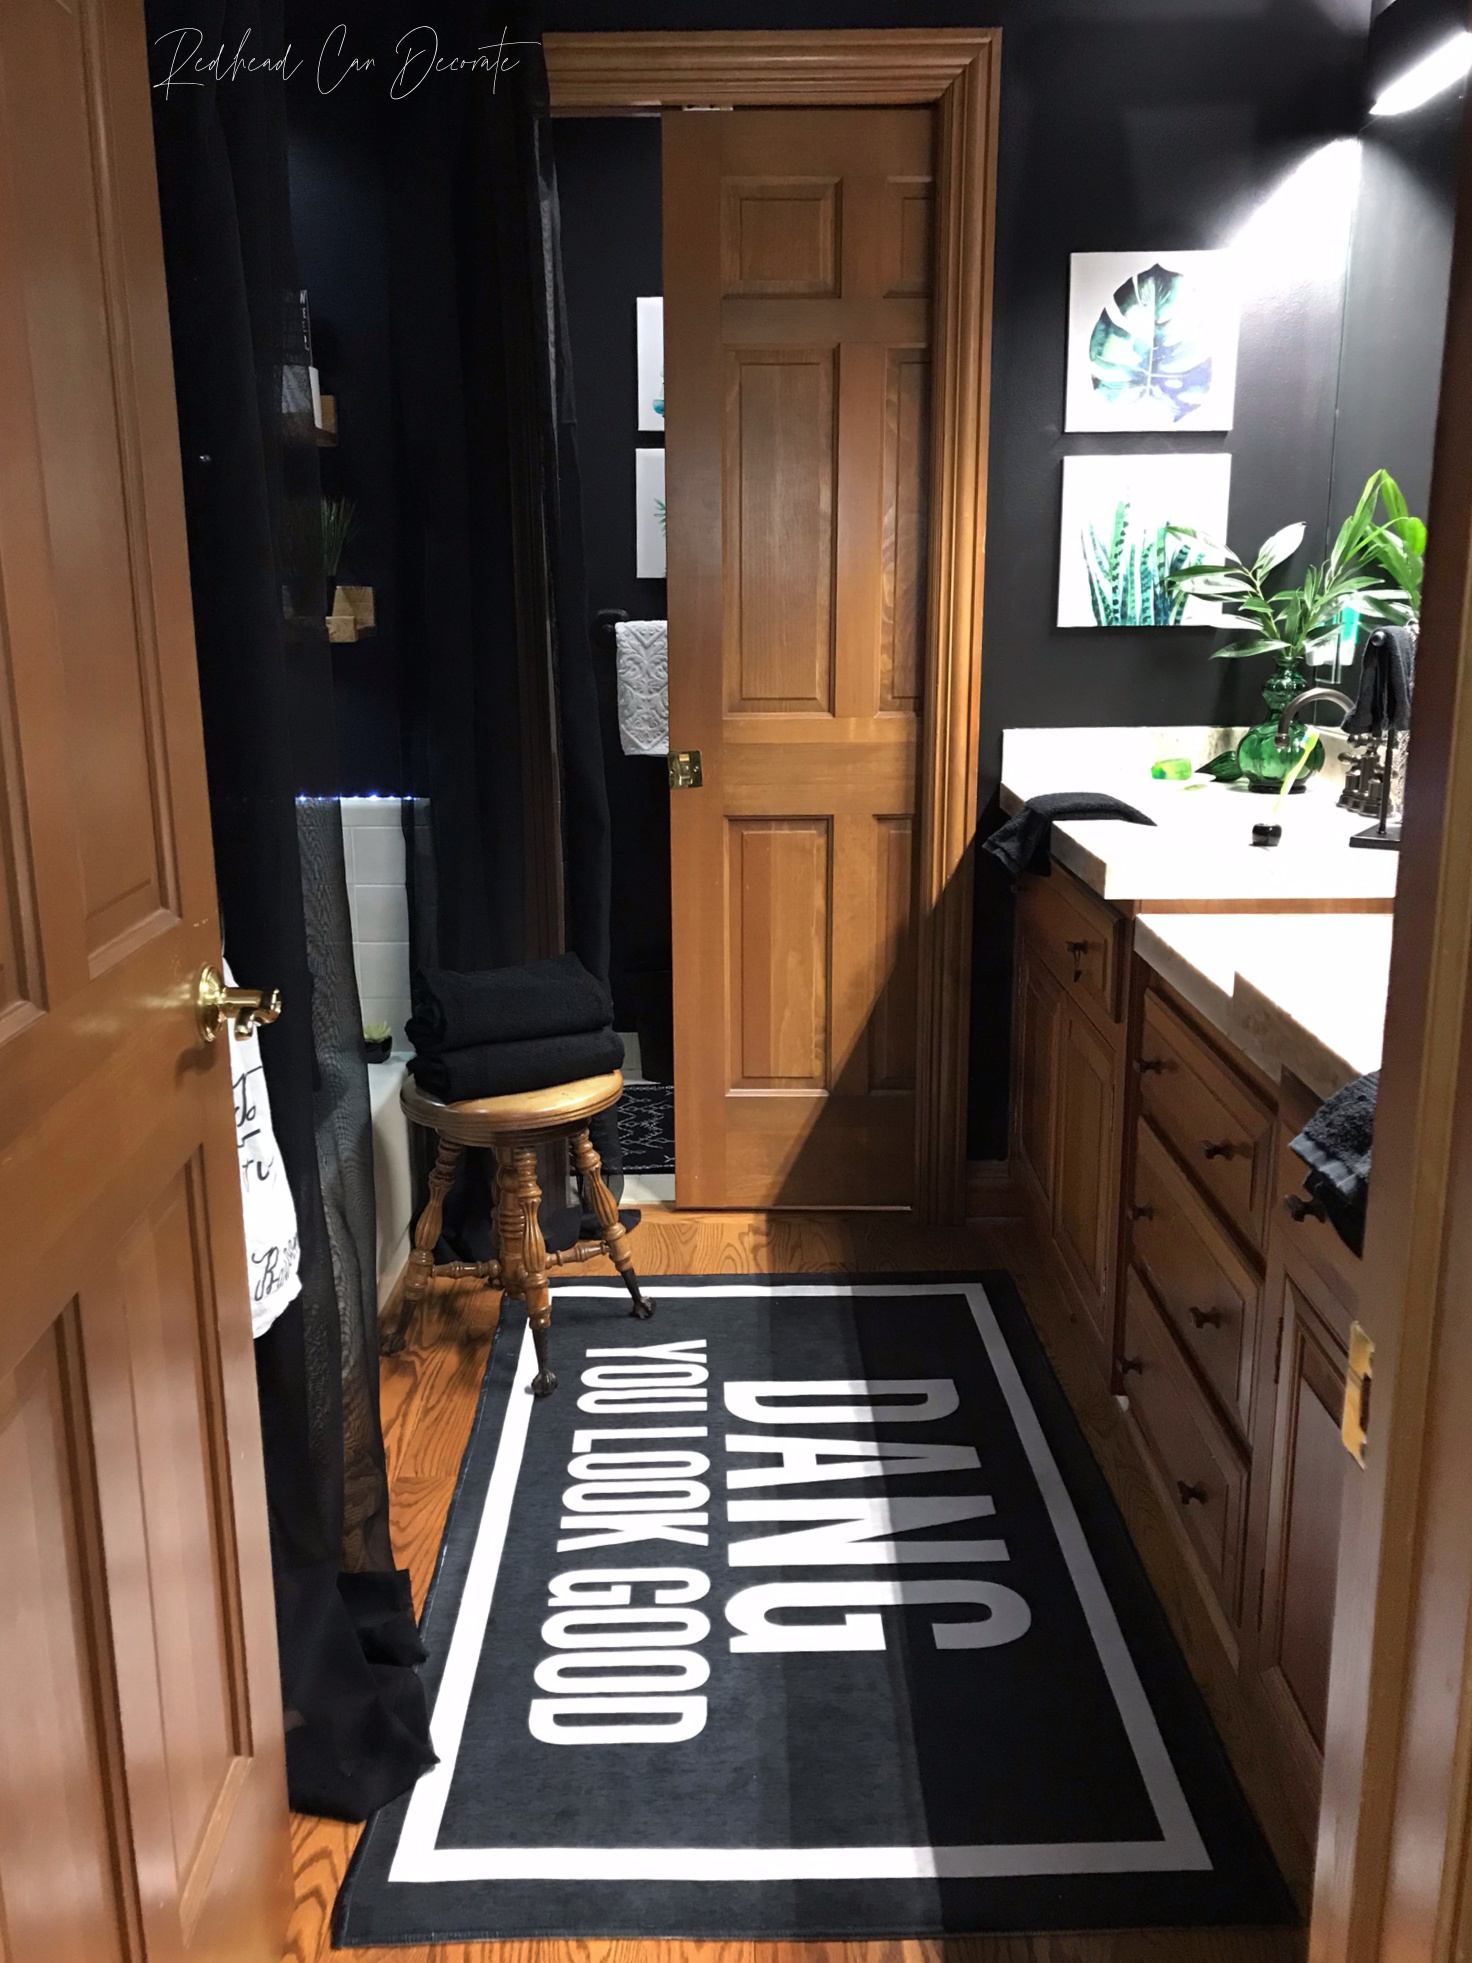
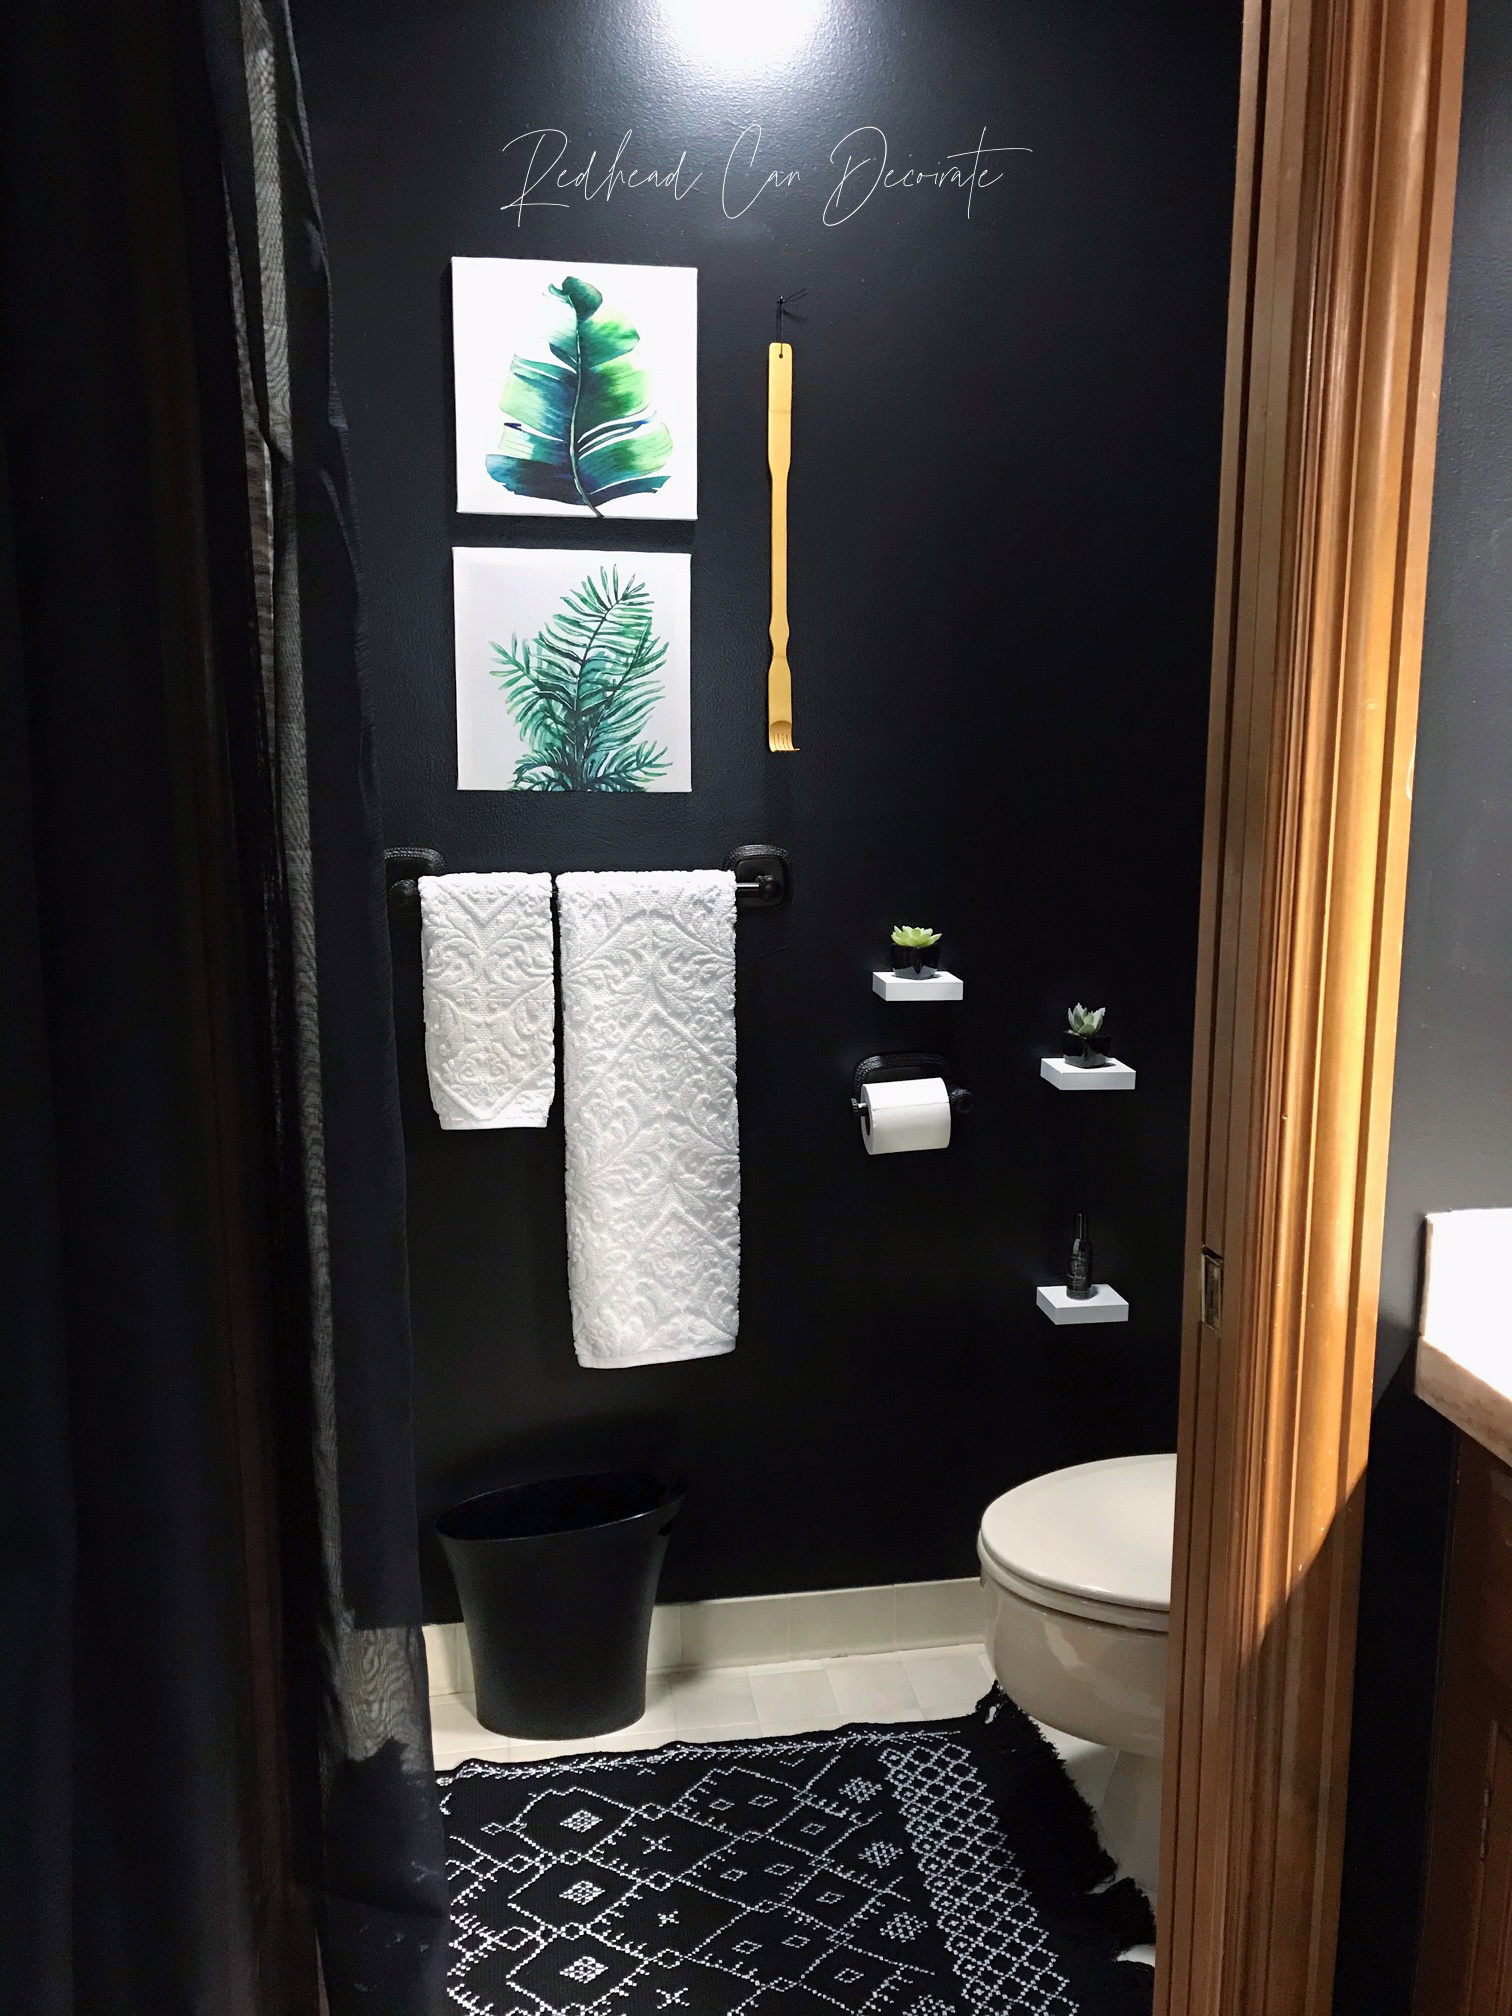
Adding the large black framed round mirror above the shower-less tub was first, and truly makes it seem like there is an actual window there. When you look into it, it just keeps going, and going.
Then, boom…it happened. The angels sang, music played, and adhesive lights entered my life forever. I think I need a bubble bath, how about you?
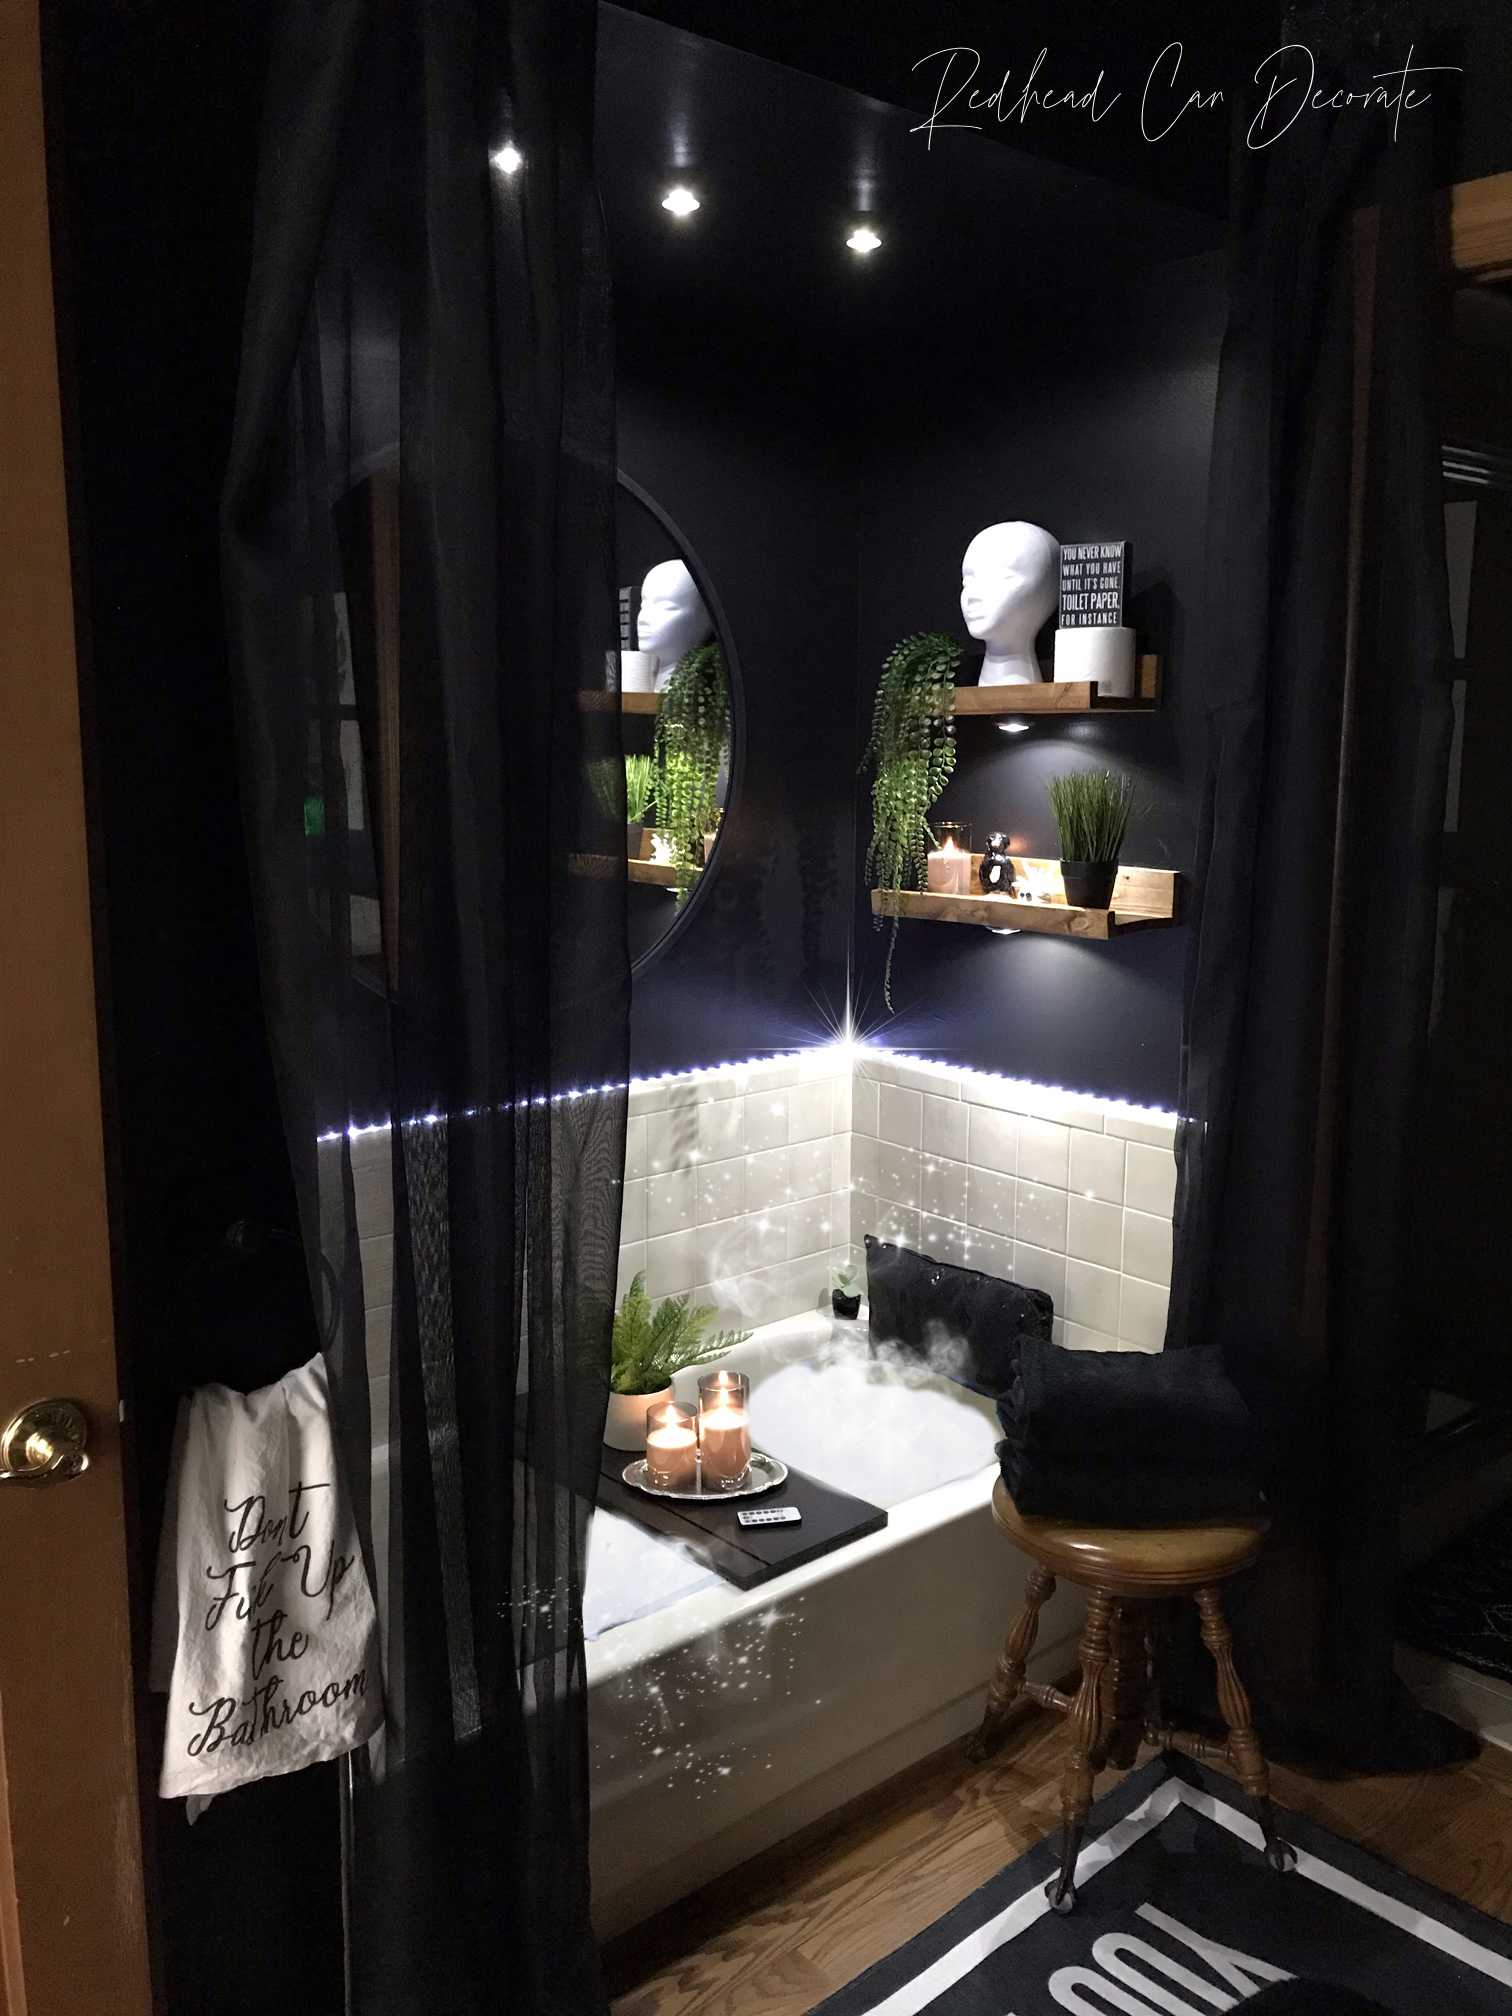
Can you believe how beautiful this 1994 dated bone tile tub looks now? I just can’t believe it. I am literally in shock (Obviously, this would only work if your tub is just a tub, and not a shower.)
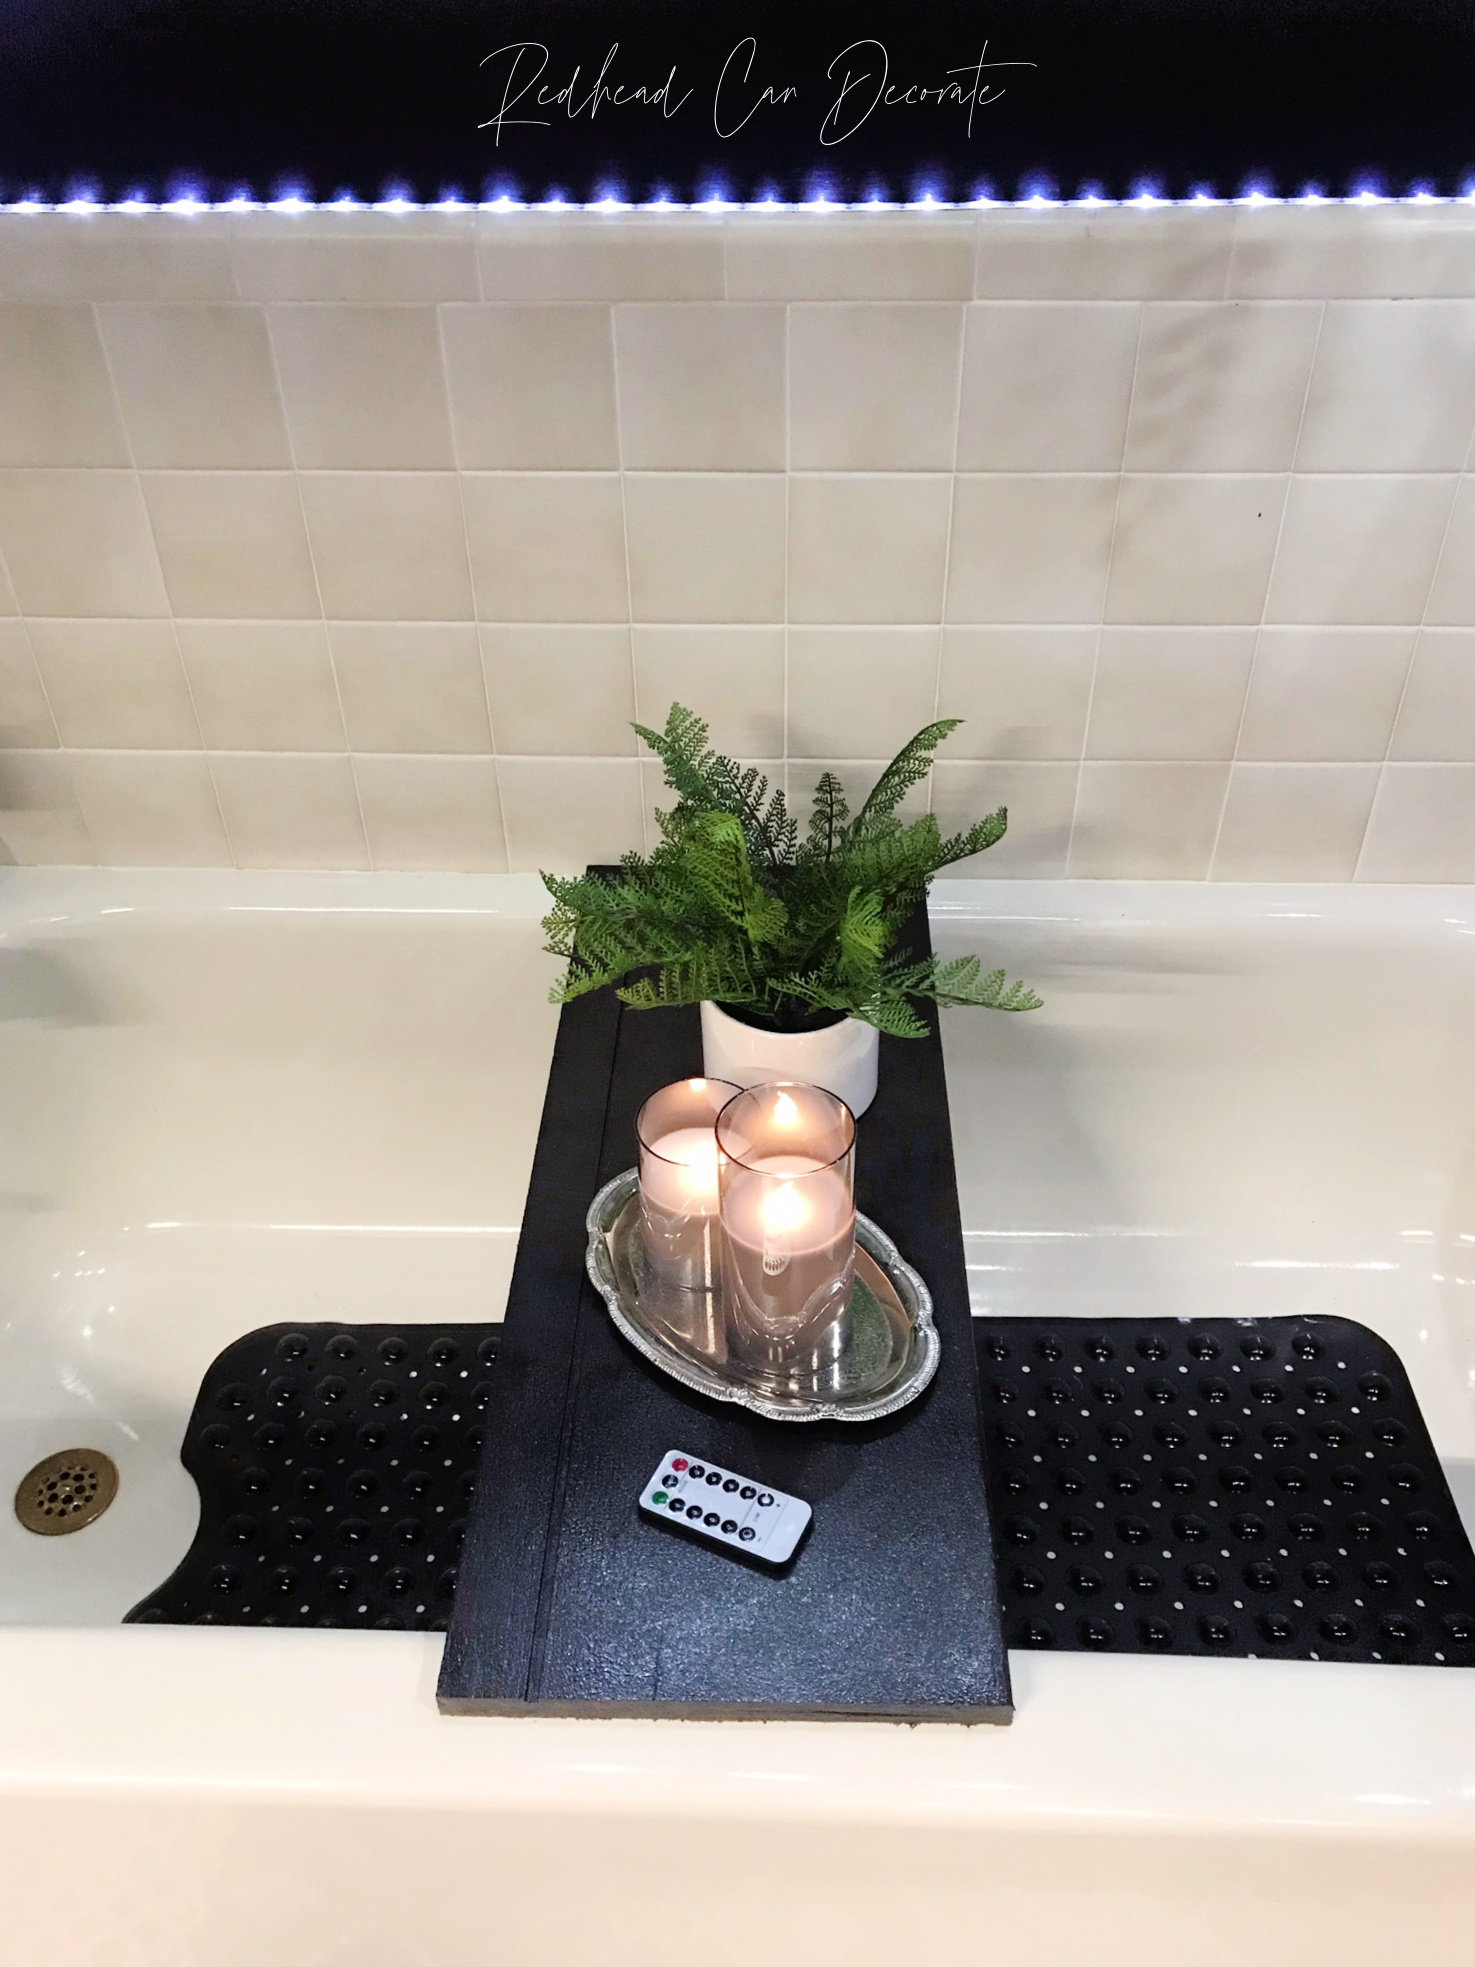
First, I want tell you that these adhesive string lights around the tub are battery operated/remote controlled and completely safe near water (not in a shower though-please always read warnings and recommendations). They are so simple to install (took me 10 minutes with no tools), have several mood settings, and can go anywhere (I chose white so they don’t stand out when they aren’t on). We now have these adhesive lights up in the kid’s rooms too. Wouldn’t they work great for under cabinets? FYI: All sources are below, or just click the word.

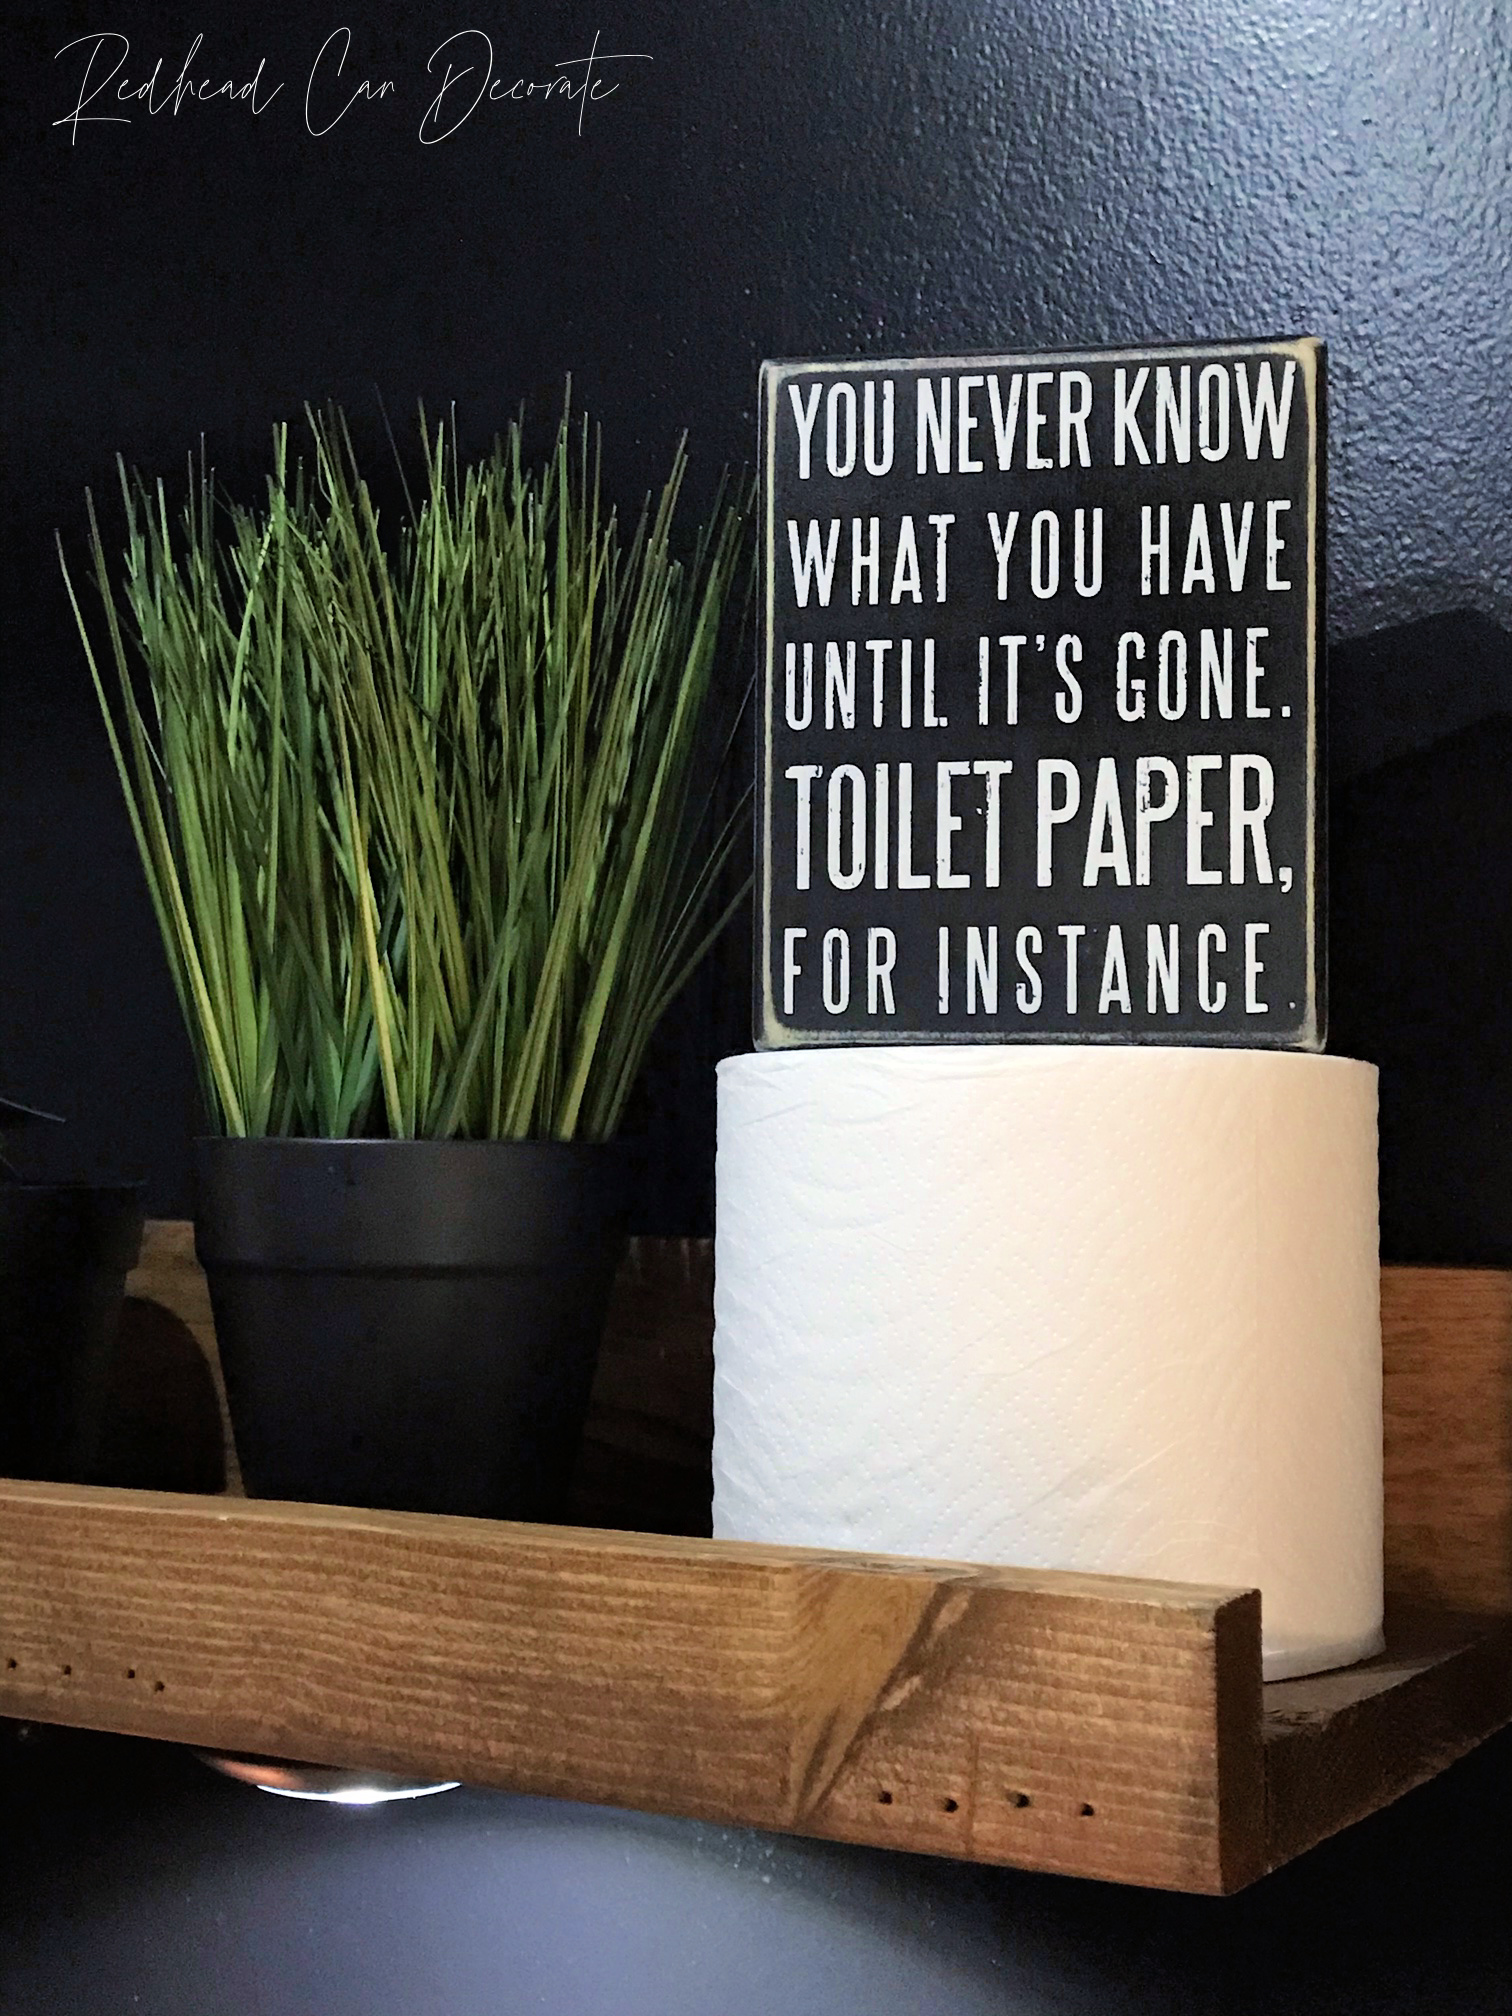
I almost stopped there with the adhesive lights, until I came across the single larger disc lights and though they would look great on the bottom of the wood shelves. Holy wig heads, was I right (our kids make costumes/wigs for Cosplay so we own many wig heads so putting 1 on the shelf was a funky twist).
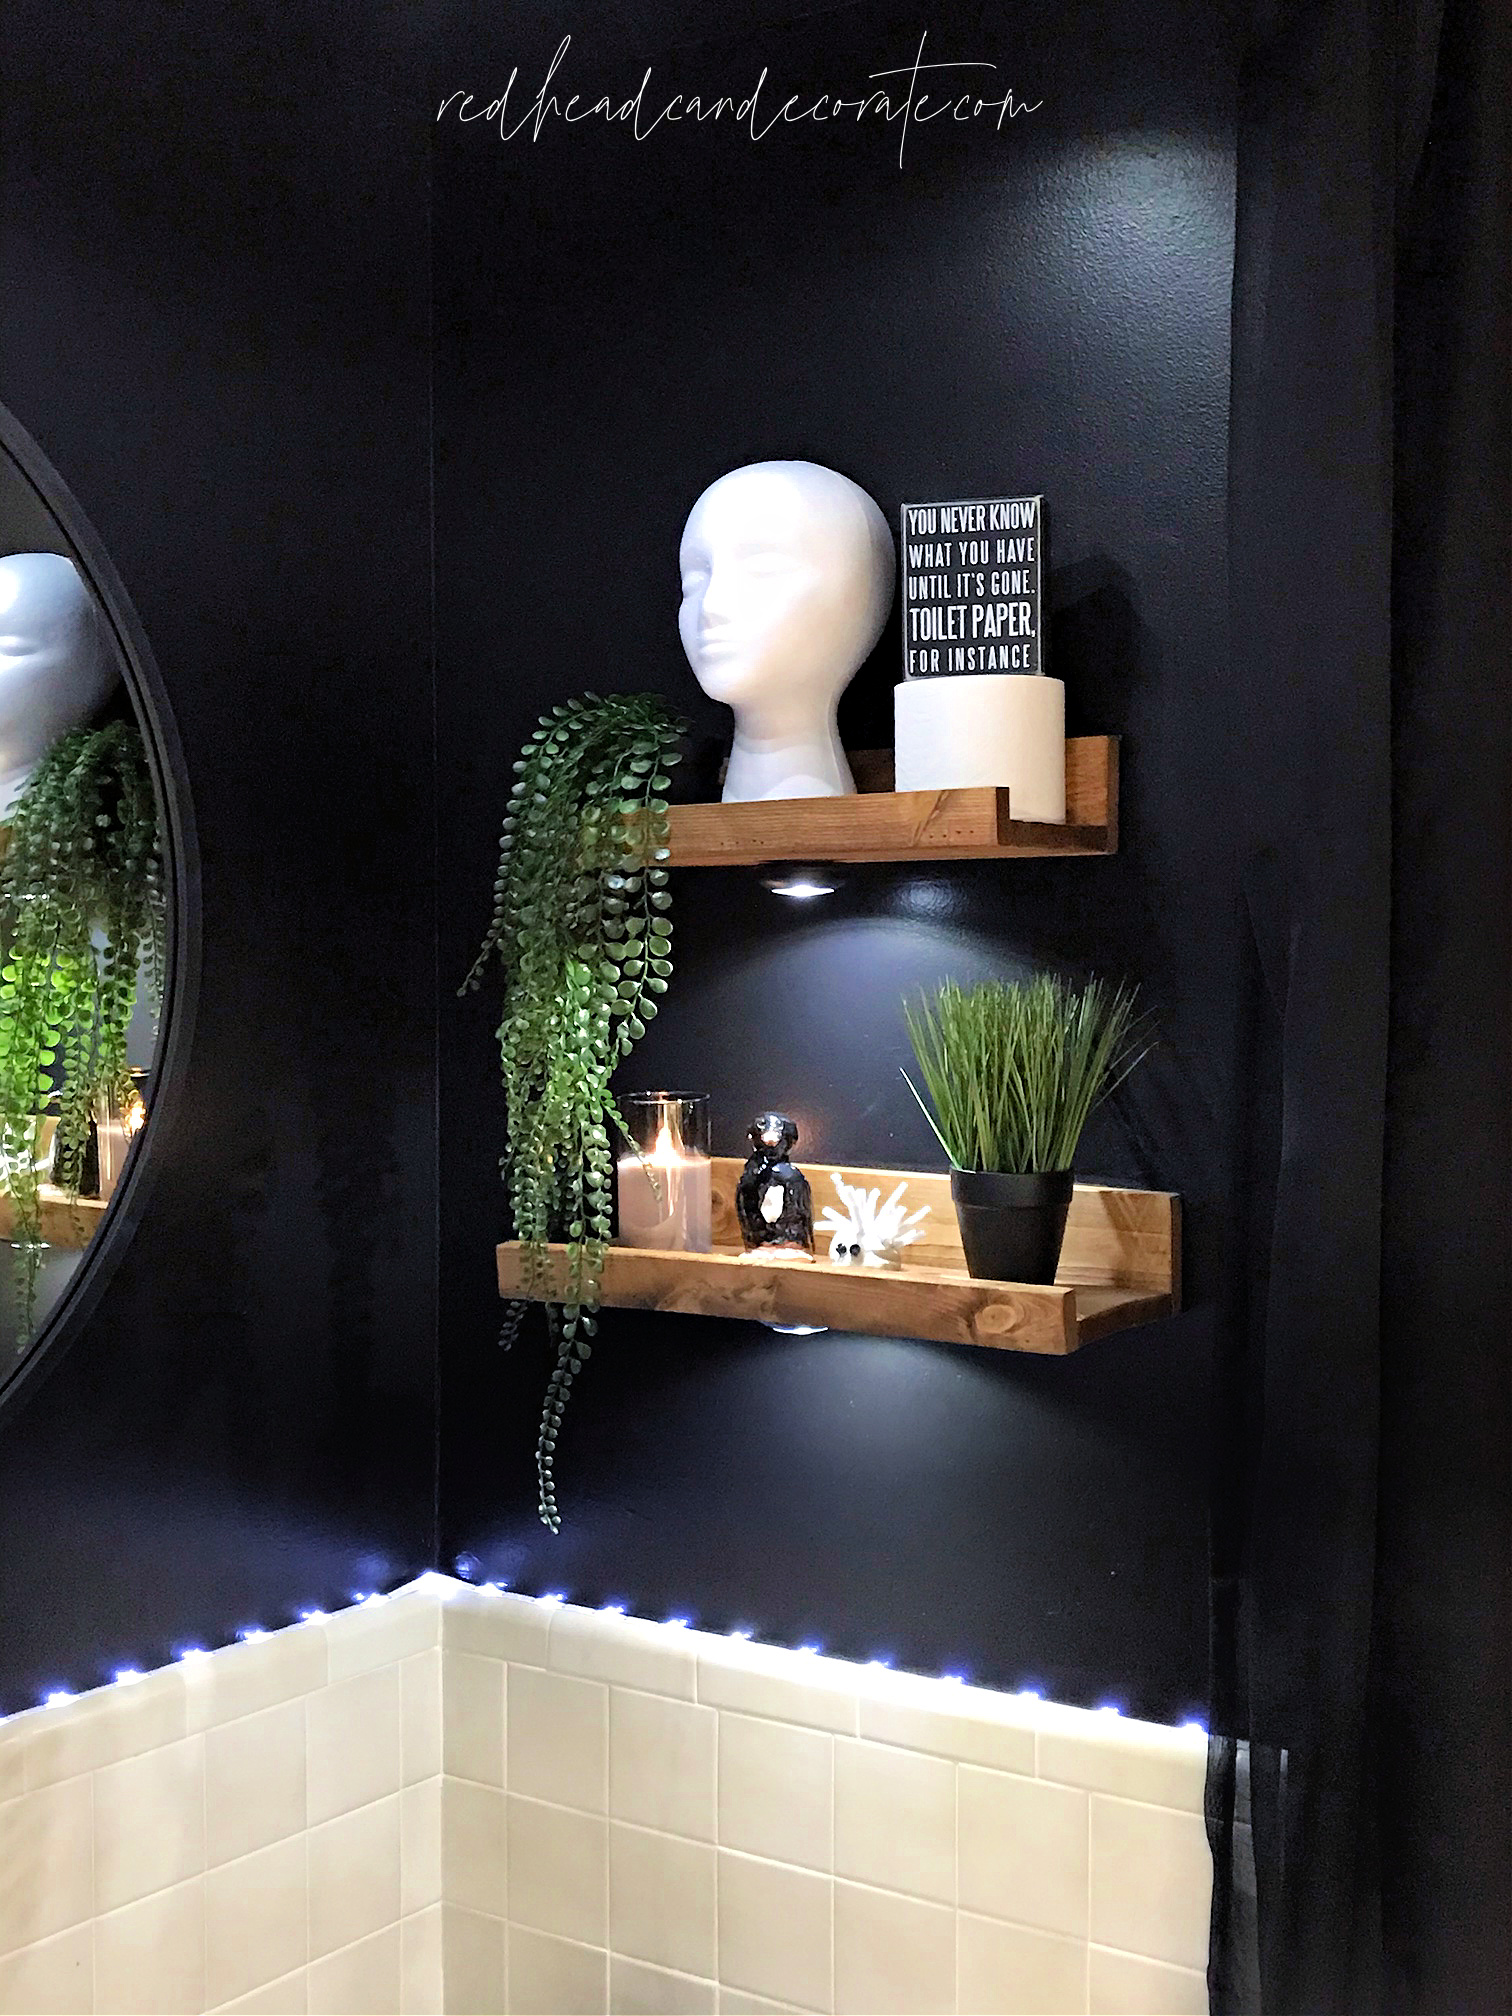
If you keep scrolling below you’ll also see how I stuck 3 more adhesive lights to the ceiling above the tub to make it look like recessed lighting… which brings me to the decorating, my favorite part 👩🦰 .
How to Update and Decorate Your Creamy White Tiled Bath
Well, I’m certainly relieved I realized I had gorgeous bone tile before it was gone! Seriously, what a blessing to be able to save all this money while still giving our older kids a gorgeous private space for them to really feel good…almost like an botanical oasis, right?
Let’s get to the decor…
Honestly, the black paint, amazing led lighting, and now gorgeous wood tones made the decorating easy. If the green botanical vibe is a bit too much for you, I think black walls and light tile can work with many themes including boho, farmhouse, or even retro/vintage.
For us, I know how much our kids love plants, so I went with mostly botanical (a little boho) green accents. FYI: All sources are below, or just click the word.
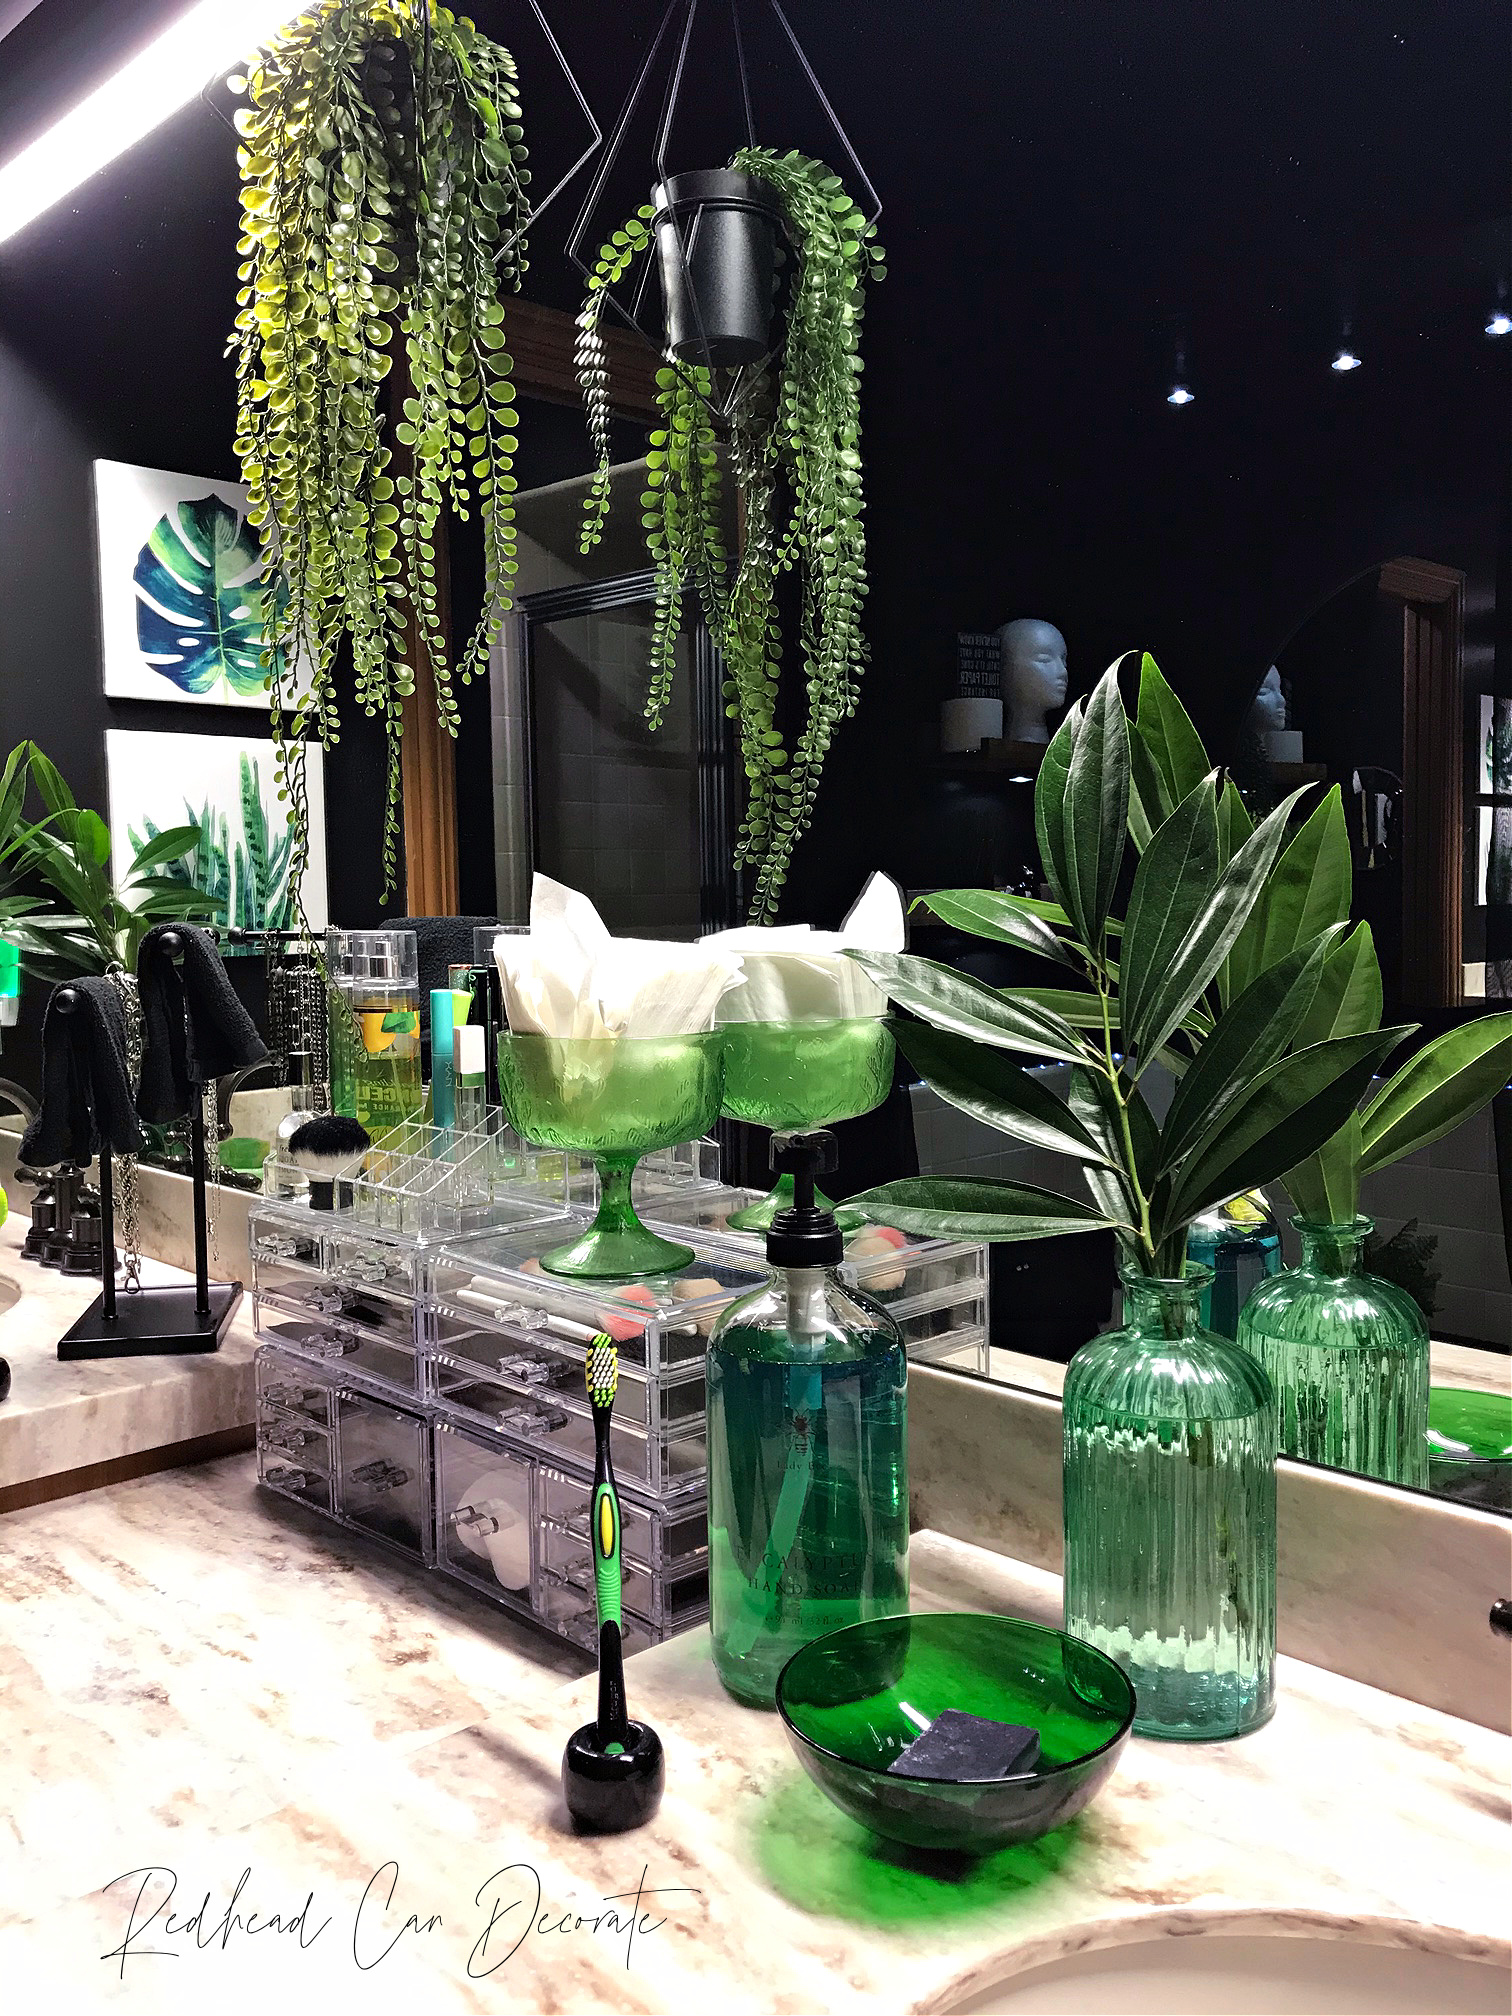
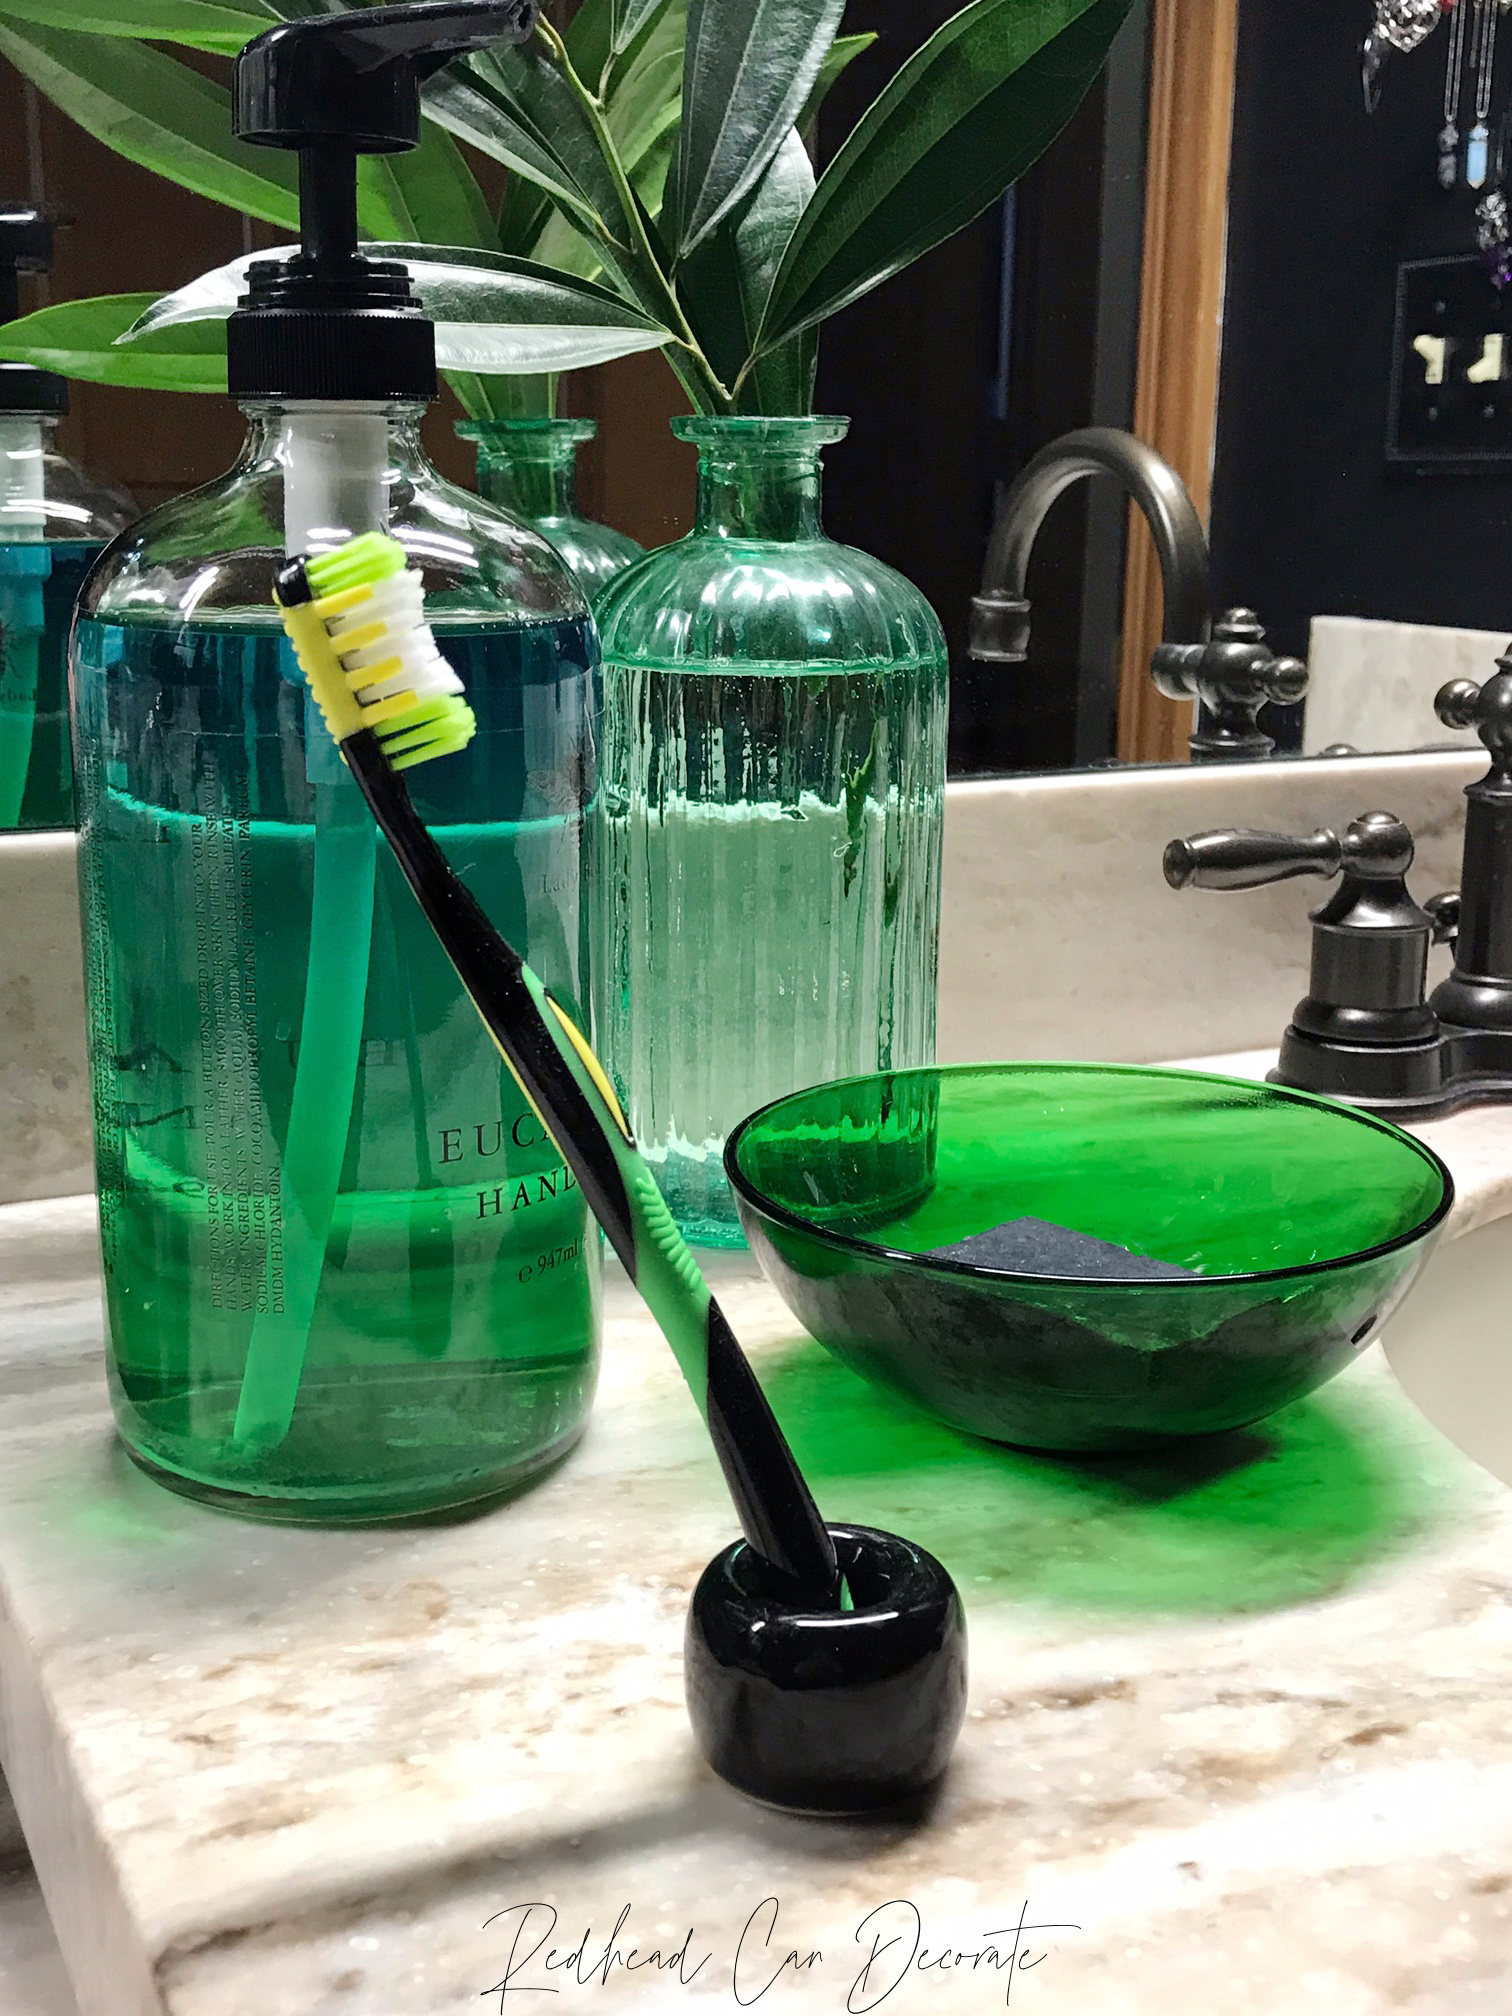
Most of the plants are faux, but I did manage to use left over greens from a bouquet I recently bought. Have you ever noticed how the greens last longer than the flowers when you buy flowers? I just added a few big stems to some thrift store vases at each sink. In addition, I used a thrift store bowl for a soap dish, and a thrift store pedestal bowl for a simple tissue dispenser. The large liquid soap dispenser filled with mixed liquid soaps is originally from HomeGoods, but I just keep refilling that monster.
Find pretty green night light here.
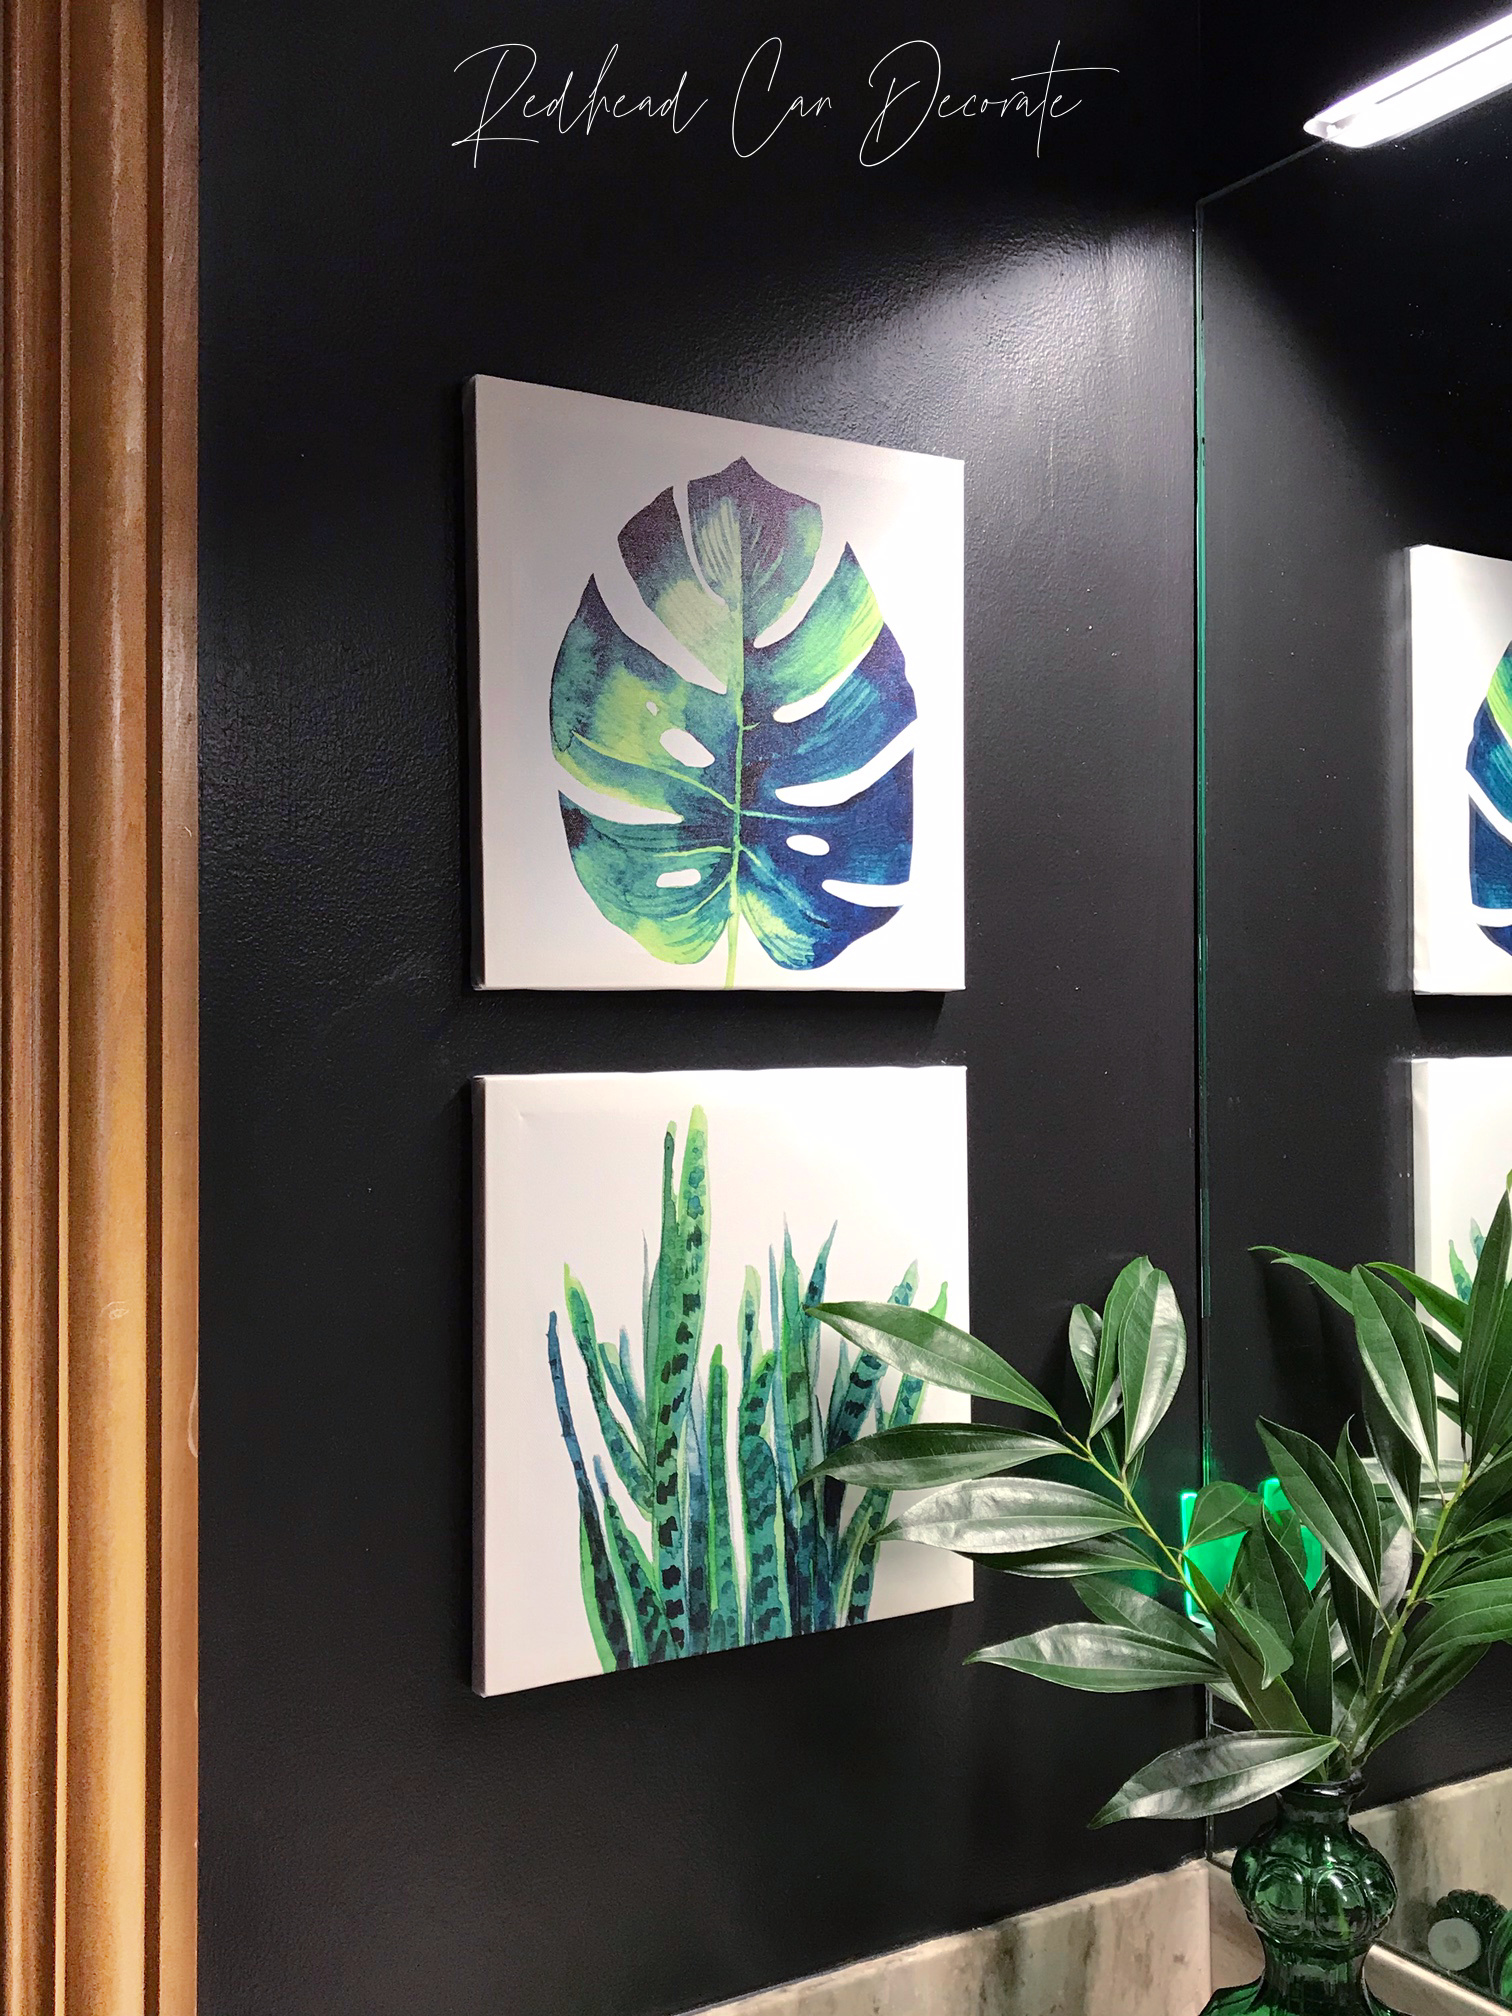
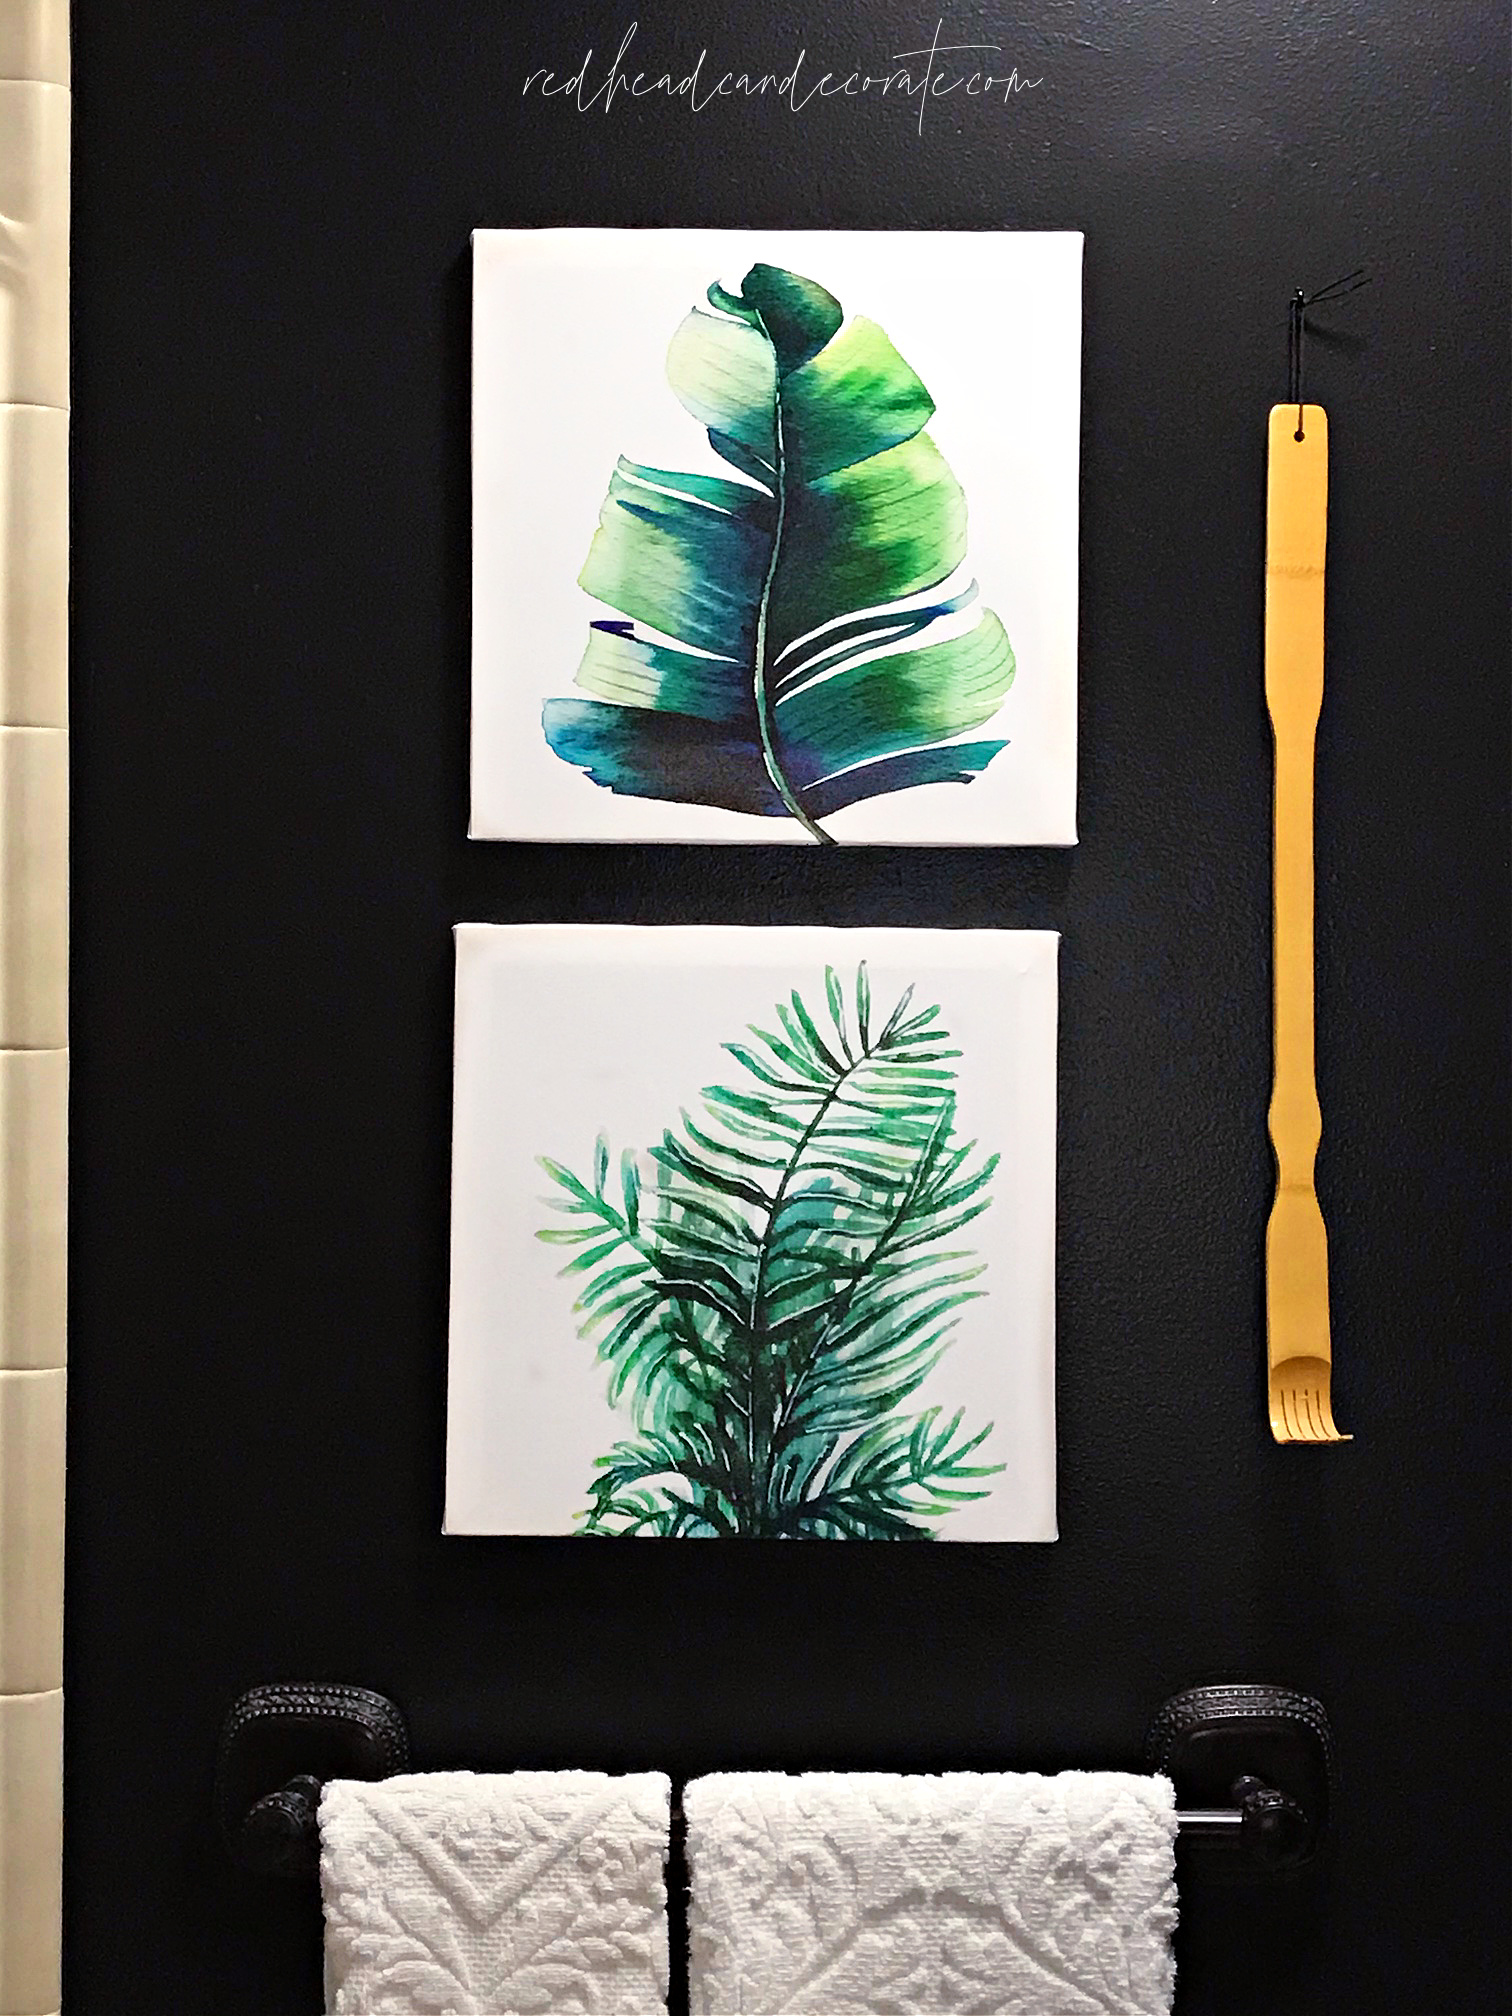
Find botanical art canvases here.
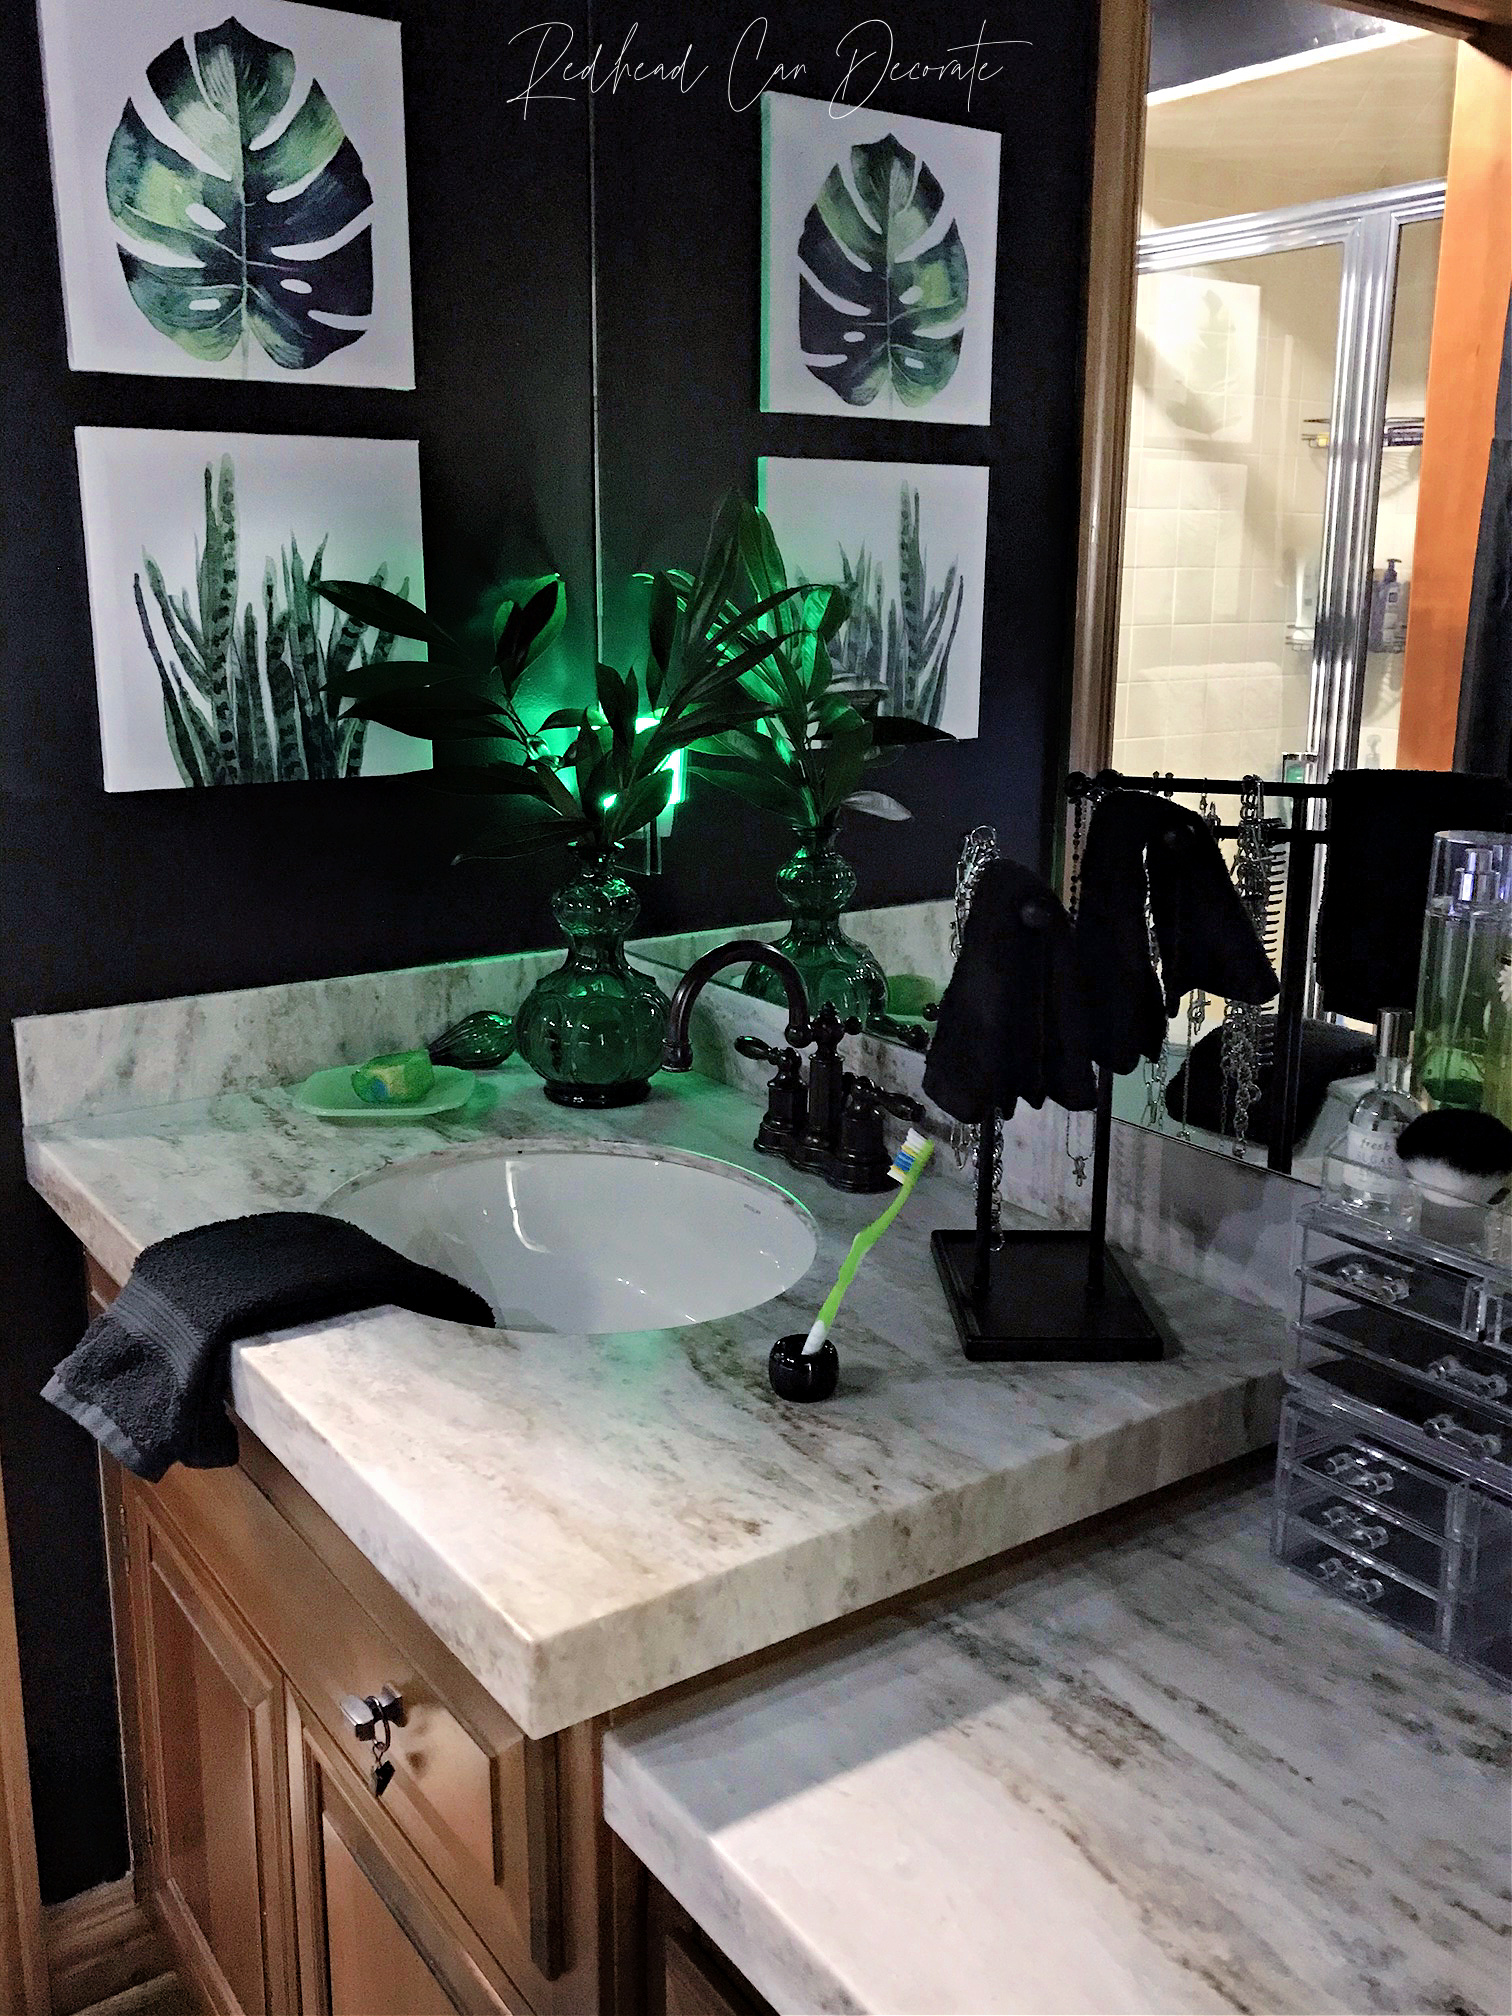
One of the best updates in this dated bathroom makeover are the tooth brush holders. Hands down, the best tooth brush holders I have ever used (I bought some for all of us, and I use one for my pencil at my desk).
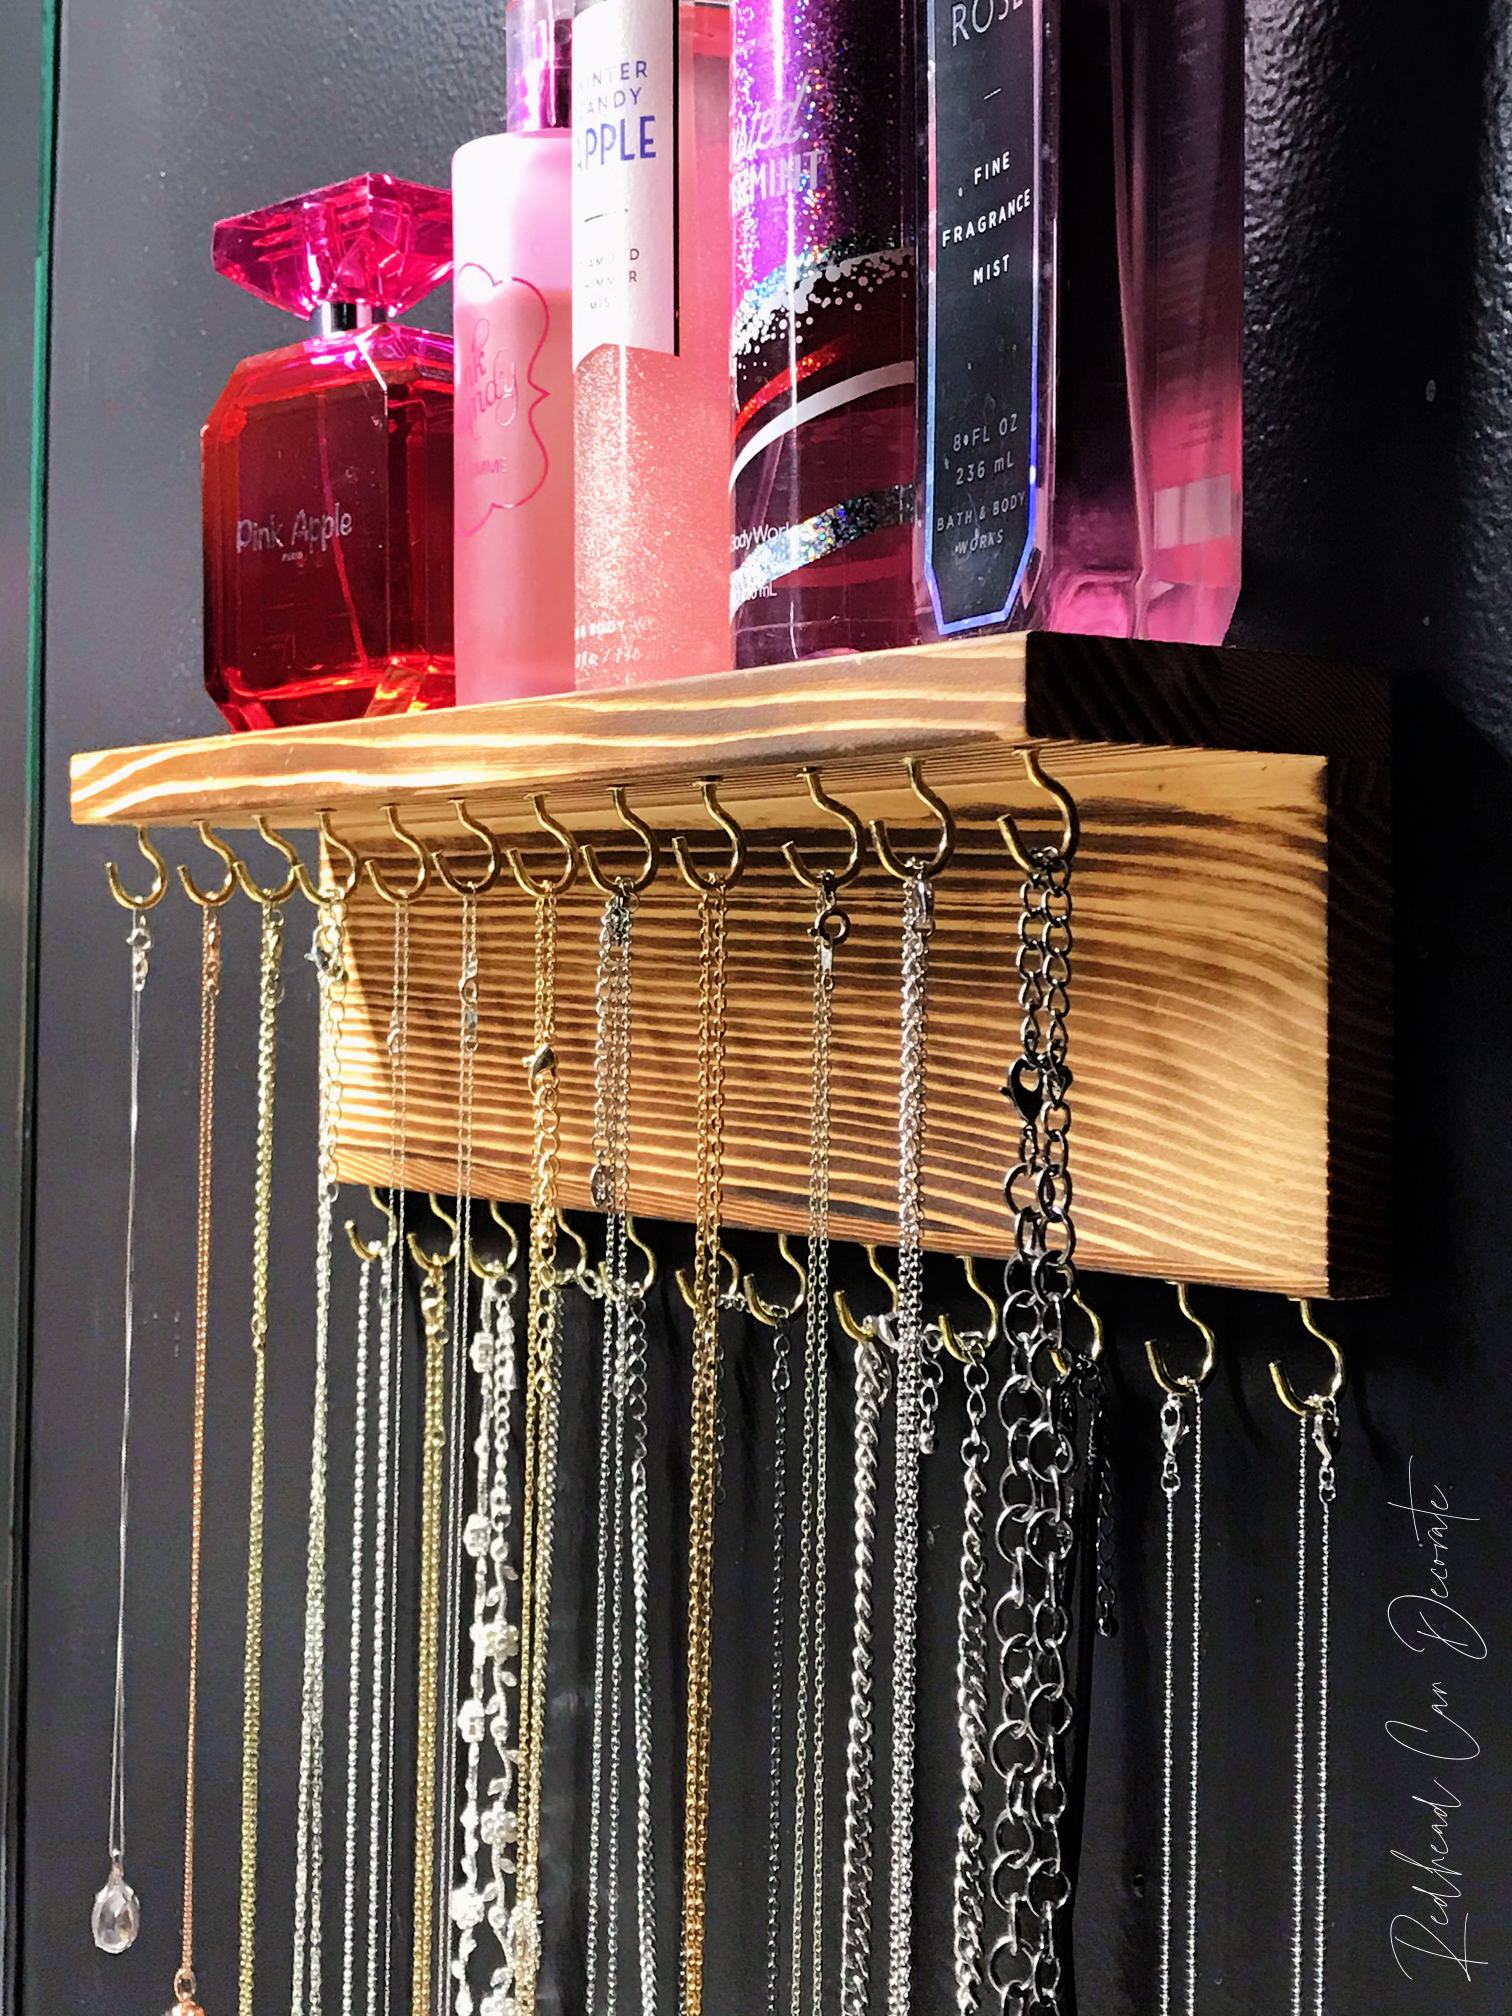
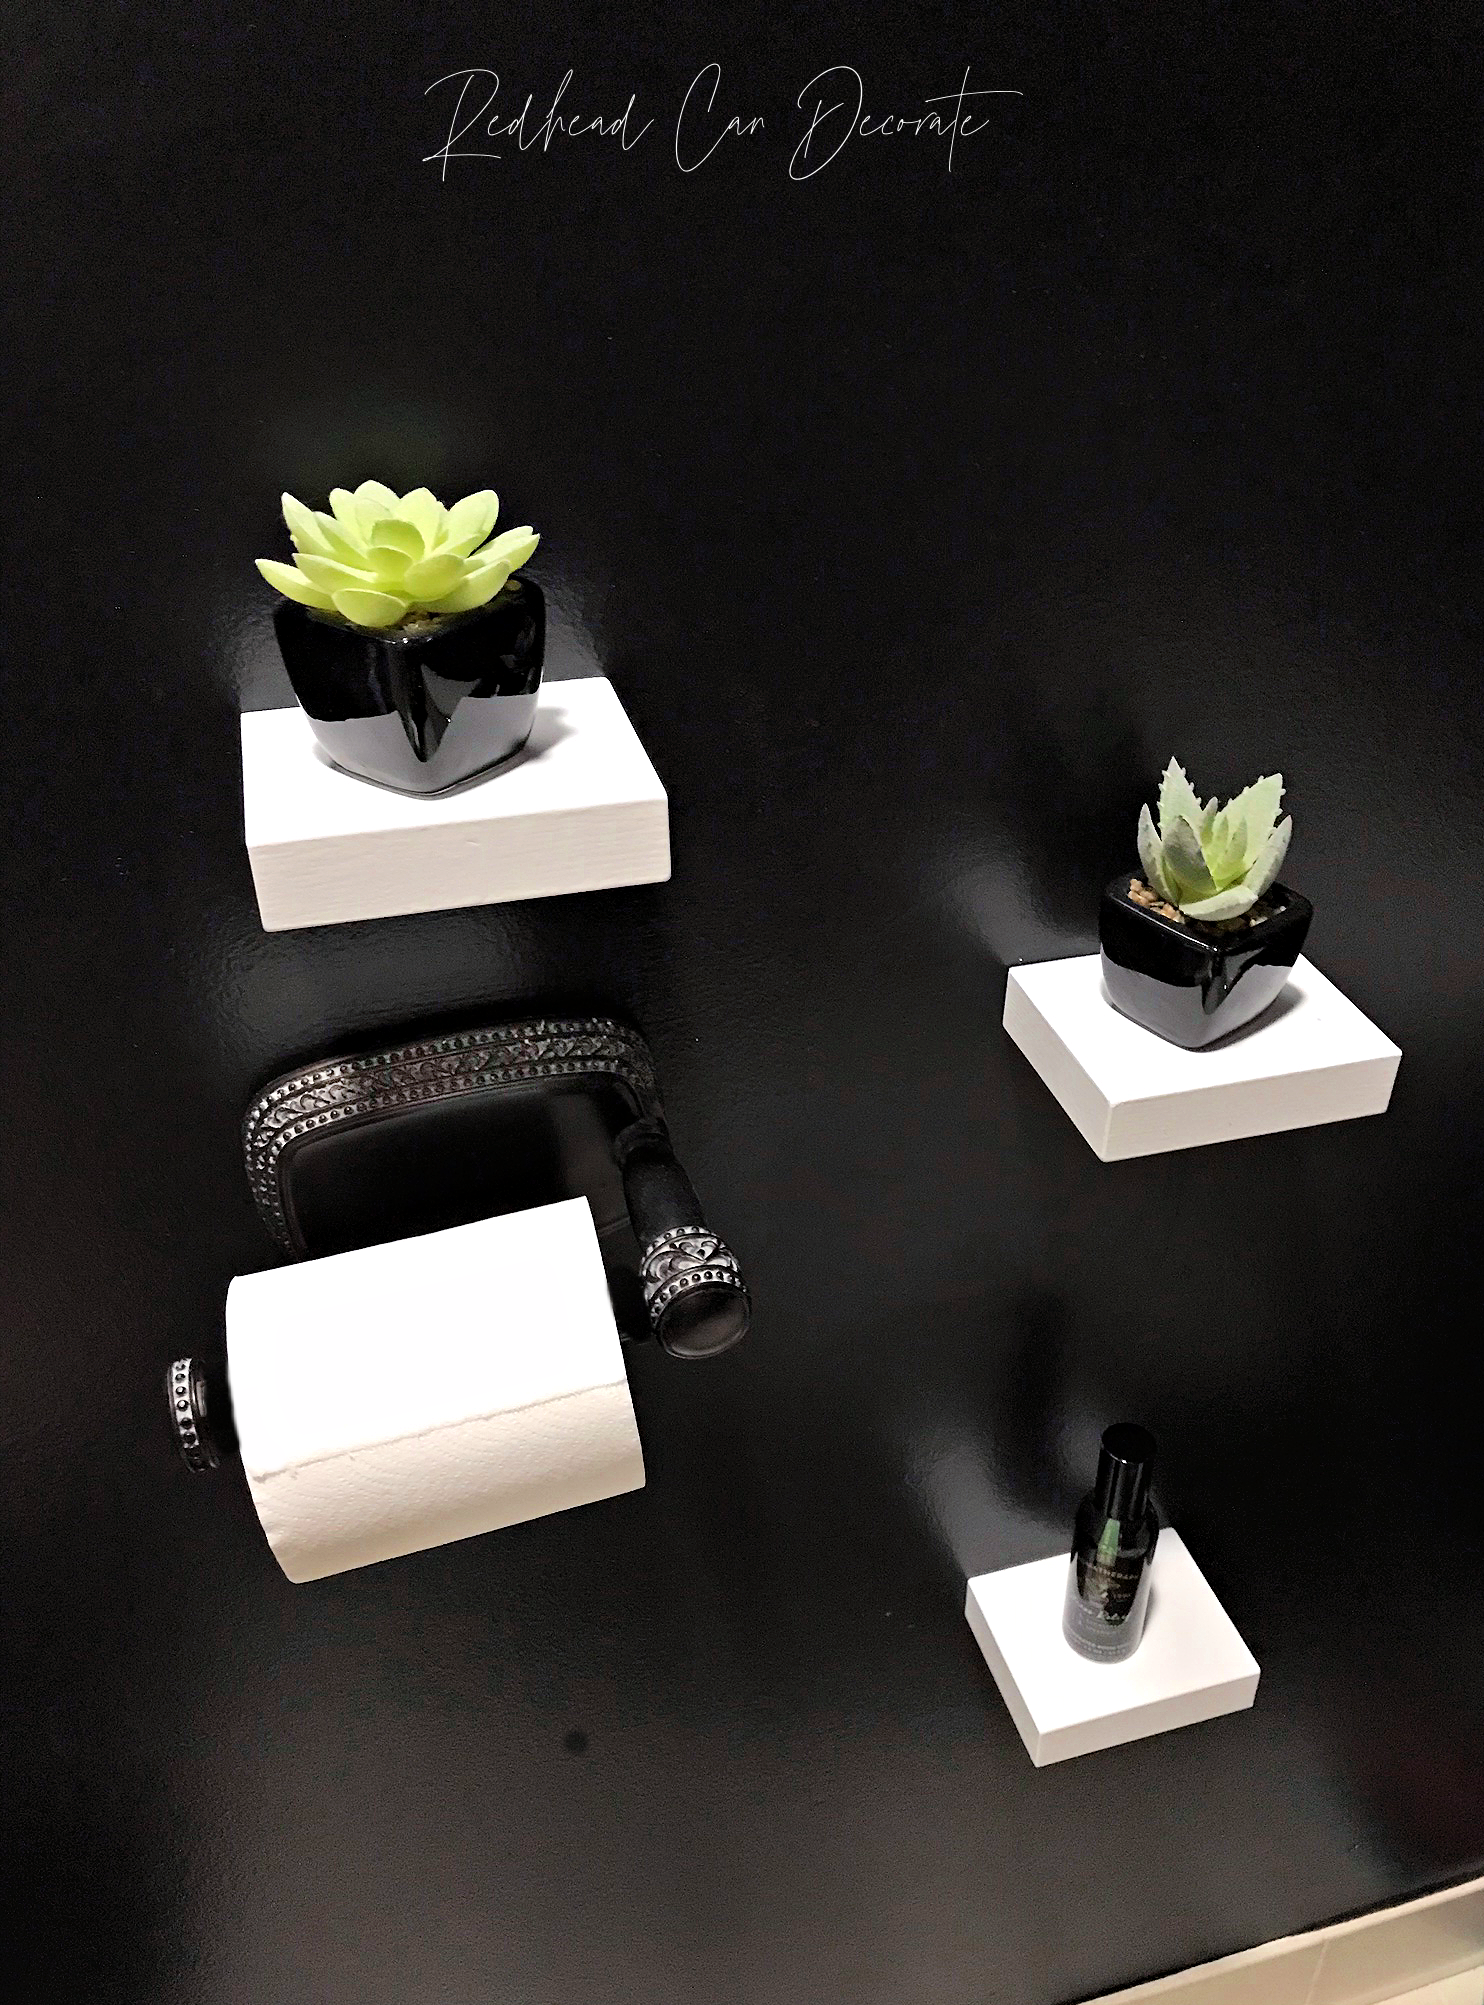
Another helpful organization trick that also doubles as decor, are little shelves like this wood one with hooks for jewelry below. You’ll also notice I added little white shelves to the toilet/shower area for whatever the kids need them for (think phone, air freshener, toiletries, etc..)
While we are over here in the private shower/toilet area, I may as well tell you that the botanical canvases are located in my source list if interested 🌱, along with a back scratcher which is a must have in any bathroom, don’t you think? We have one in every bathroom 😂.
Oh, by the way, that garbage can comes in a million colors and was a bargain…
I have a few more tid bits to tell you to update your dated bone tile bathroom and then I need to go take a bubble bath because this was a long one, wasn’t it? I hope you enjoyed it though…
The sheer black curtain panels are strictly for decor purposes, but really add depth, and softness. I hung them easily with little black hooks (found in my sources) after I clipped on little black circle clip ons on the curtains.
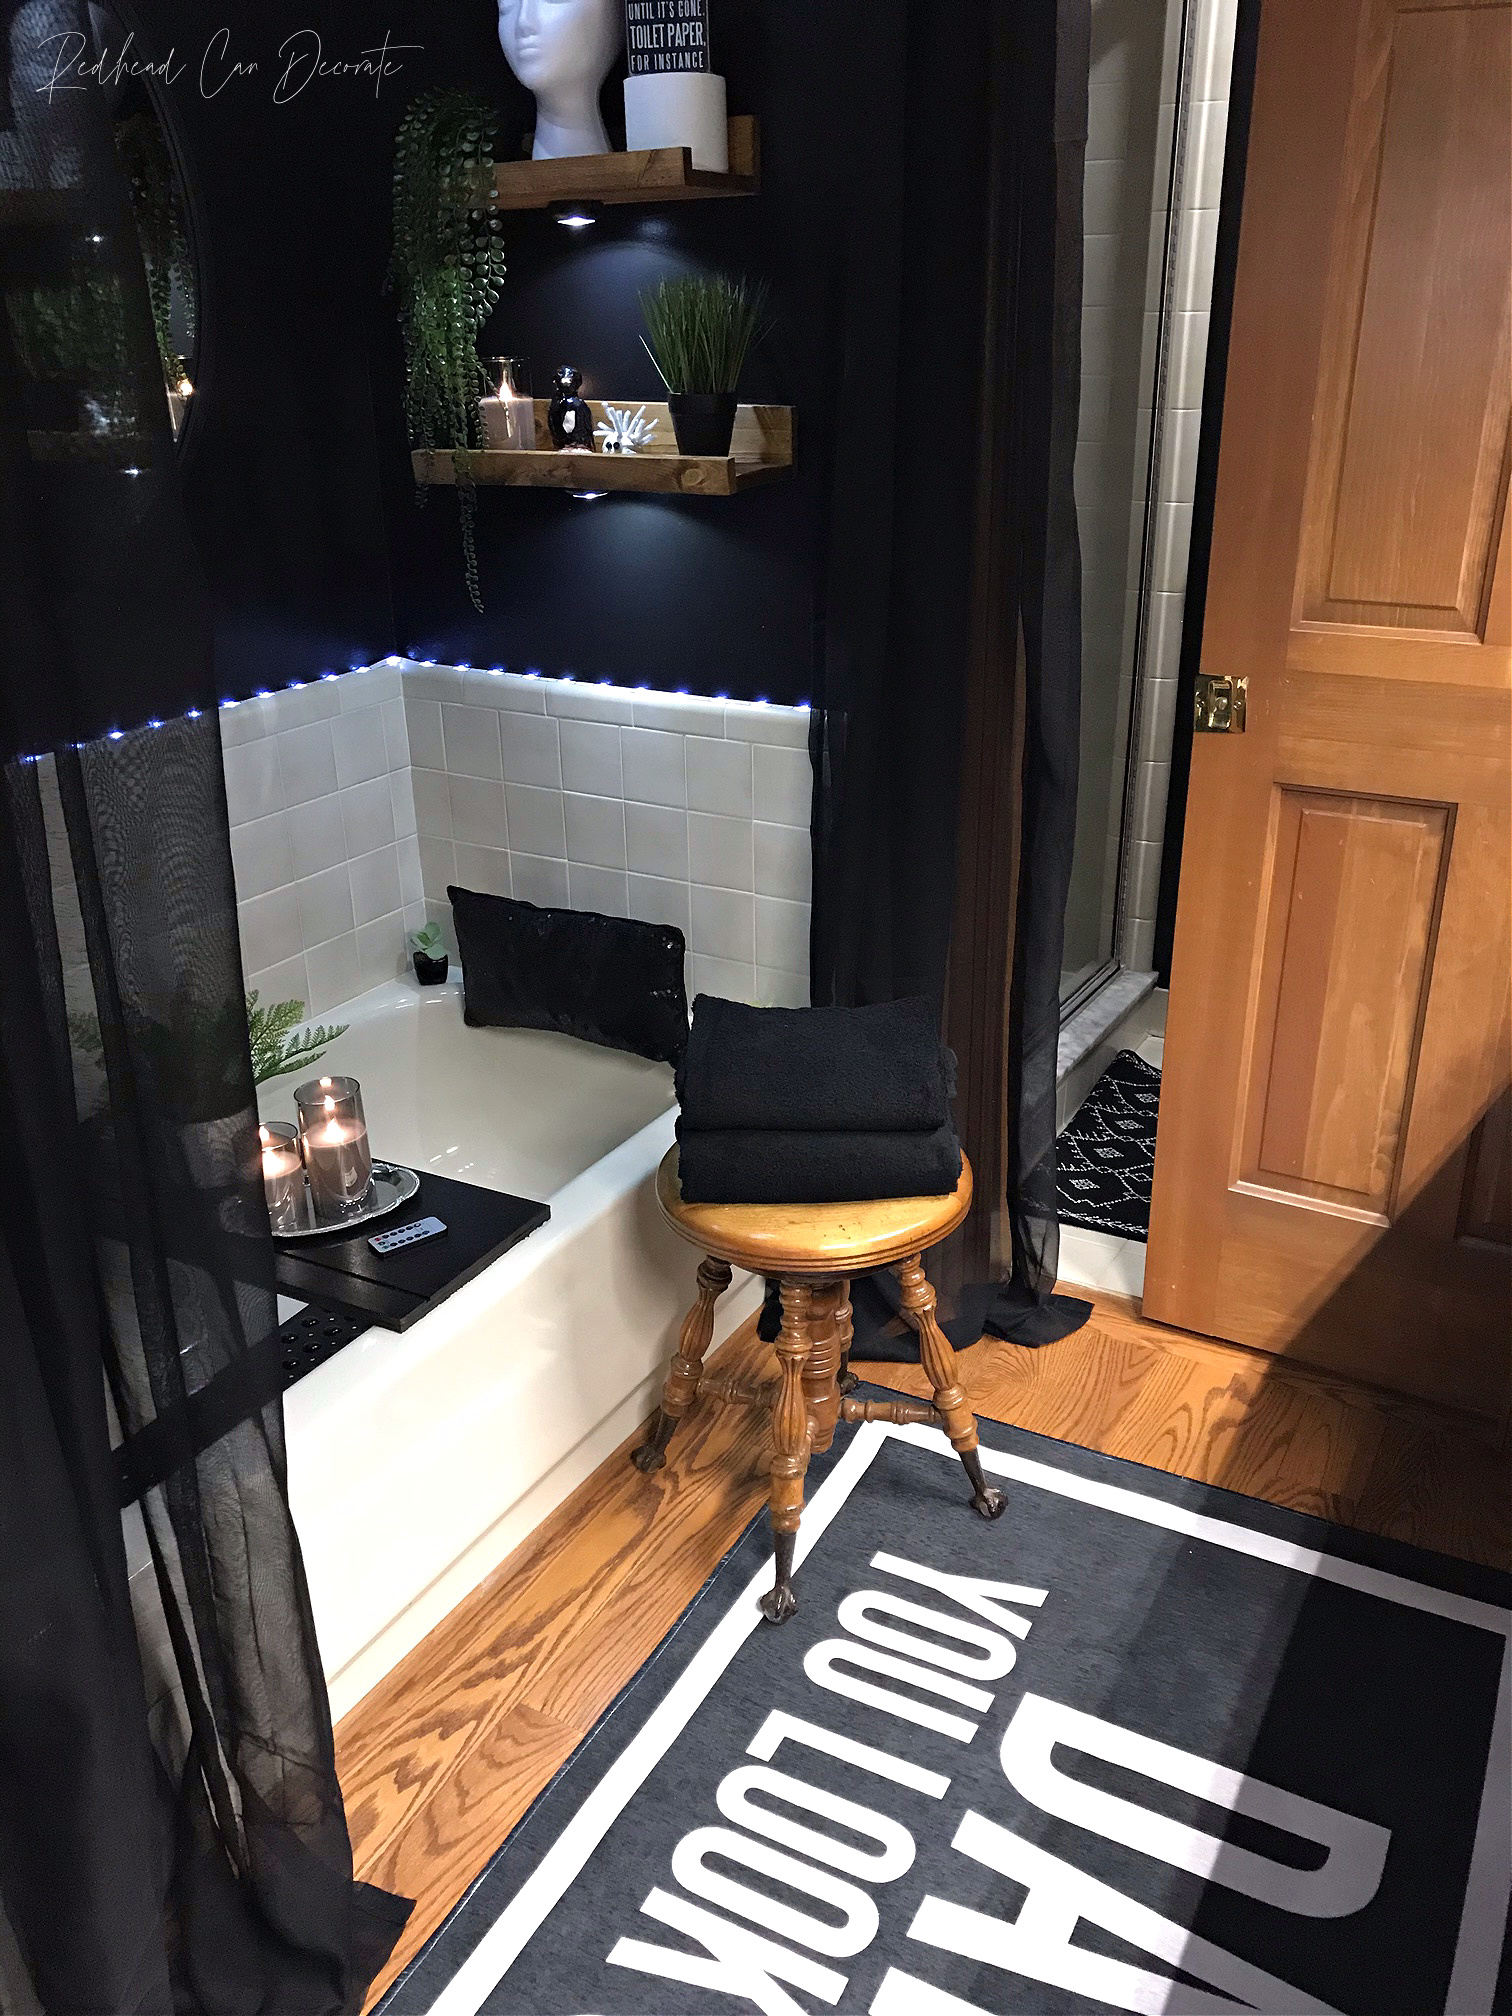
Lastly, the cute black sparkly lumbar pillow is just something I added for fun with velcro, and the black tray across the tub is actually one of our old shelves from our living room. I saved the shelves when I added new stained shelves to our built-in units that surround our fireplace. My husband just gave it a quick coat of black spray paint and trimmed it to fit the tub just right. It kind of reminds me of our romantic master bathroom tub tray!

I promise this is the last tid-bit to update your dated bone tile bathroom and I was so excited to share it with you here…the antique stool was my grandfather’s whom I never met because he passed a few years before I was born, but I’m told he loved to decorate. I know he would have loved this!

BLACK PAINT: BEHR ULTRA BLACK in SATIN
SCREW IN HOOKS TO HANG CURTAINS
WOOD SHELVES: WAYFAIR
DANG YOU LOOK GOOD RUG: ETSY
BOHO BLACK REVERSIBLE RUG WITH TASSELS
BEST AREA RUG NON-SLIP GRIPPERS
GREEN VASES: THRIFT STORE
TISSUE DISPENSER: THRIFT STORE BOWL (tutorial coming soon)
FRESH GREENS IN VASES: LEFTOVER FROM ROSES
WHITE TOWELS: OLD
ANTIQUE WOOD STOOL: MY GRANDFATHER
HAND SOAP: HOMEGOODS
PENGUIN & CREATURE: KIDS ART


WOW! I was shocked that it worked out so well. You rock! It was truly amazing!
Me too!! I was shocked too, Kyle!
Striking! The emerald greens are perfect highlights! Lucky D & L!!
Those kids definitely inspire me!!! Thank you, Sue! I know you love your green ☘️ ♥️
This is the prettiest bath room ! I love it!
Aww, thank you Patricia!! I love going in there, now!! Before I was scared 🤣
Wow, lot of Work, and Thought, Great Job, Great imagination. love to all, Dad in NY.
Beautiful bathroom. I have a question. The glass ball feet of your grandfathers stool,
do you have any idea where I could find a replacement glass? My son has a stool,
very similar to yours and it’s missing one marble foot. I have looked at flea markets, etc. ,
but with no luck. Thanks Sherry
Hmmm… that is a very good question. Last night I remembered when we moved from Michigan to Florida and the moving co broke the seat! They took it to a furniture repair shop and fixed it. I would Google furniture repair shops and get their advice. Jewelry stores are also very knowledgeable. Let me know what happens!
Wow! Love, love, love the update! And for teens it is perfect! Score again, Julie! Love your fabulous ideas 😊
Thank you so much, Leah! I appreciate you stopping over and leaving a comment 🥰
This is absolutely stunning Julie, I’m ready to do mine now!!!
Candice… you have got to do it!! I cant get over how nice the tile looks now. Have fun and let me know if you have any questions!
Great job, Julie. You kept your clients/kids in mind when you designed this project. The fact that no sledge hammers were involved deserves you major kudos.
This is one of my favorite make-overs to date Sis! The black goes perfectly with the green accents and the lighting and all of the little touches are off the charts! I need to get some of those adhesive bathroom lights for my bathroom. D & L are lucky ducks to have such a creative mom. I know they appreciate you! Love that you incorporated the antique stool from Papa. He passed along the decorating gene to you and it’s so sweet that you include your roots in so many of your posts. I love that!
Thank you, Dido! Love you! XO
Hi Julie:
I’m back! OMG you are amazing. That is probably one of the best makeovers you’ve done.
I love the adhesive lights around the tub and the DANG carpet is so unique.
Out done yourself this time girl.
Cheers, Bette
I am so happy you are back! I was so hoping you would enjoy this, Bette! I had so much fun doing it for the kids. Guess you can tell how much I love them ;). Stay warm,…oh my goodness this cold weather needs to go bye bye!
I don’t think I have ever responded to a blog before but your bathroom re-do is so inspiring that I felt I should tell you so. Love it! And I love all the black you have used all over your house. I get tired of seeing all the white and neutrals in other blogs.
I am so happy to know you are out there, Tee! I need to put a post together on just black. I think I have enough now 😉
Julie, the bathroom looks amazing! I’m headed over, well, when we can travel again .
I’ve been thinking about you and your mom… xxoo
What a gorgeous and dramatic makeover! Green is my favorite color so I’m smitten!!!
Daphne hates green, but loves the bathroom… at least I think! Thank you, Christy!
What a knock out bathroom remodel job! It is gorgeous. I get a “Jungle Chic Vibe”.
Love it! You are so talented.
Suzanne
Love that!! Welcome to the jungle!! 🤣
My, what an amazing transformation! You nailed it again. So many wonderful ideas I got frim your makeover. Thank you for sharing. I am so happy you mentioned that fabulous stool, because I’ve been looking fir one exactly like yours, so I was going to ask you where did you get yours from
Julie,
So many things! Creative, inviting, relaxing, and Earth friendly too by working with what you’ve got. Impressive. The saying on the towel at the end…loved it.
Melanie
:
I love it! The greens and wood tones pop with the black. I just love your blog. You are so creative and show so many of us that you don’t have to be rich to make your place look great!
Thank you, Karen! I wish this was my bathroom now ha ha
[…] it ended up in our kids’s bathroom and they used it for makeup storage. Well, if you saw the big bathroom makeover, you would know that it doesn’t really fit into that botanical theme. It was time to either […]
3 words…TO DIE FOR!!!
[…] upstairs bathroom makeover. If you haven’t seen that shocker, you can see it in full here: Modern Botanical Bathroom Makeover. It literally took me 2 seconds to stuff the tissues […]
In a word–FABULOUS!!
[…] I bet the first thing you noticed (besides all of the fun wigs 😆) were the black walls. Yes, I know everyone always says that dark walls will make a small room, look smaller. I just happen to disagree with that. I think the kid’s adjacent bathroom below is proof. If you missed our huge bathroom transformation a couple weeks ago, you can take a look here: Modern Botanical Bathroom. […]
[…] vibrant colors up against a very green botanical/neutral backdrop (did you happen to see our Modern Botanical Bathroom Makeover yet?). I began with searching for affordable water-proof sheer linen curtains and I found some with […]
[…] Modern Botanical Bathroom Makeover […]
This remake is what we all talk about and on our wish list. Just a beautiful job! Every detail shown to get us more inspired to try at list one thing.
Thank you, Cathy!
[…] UPSTAIRS BLACK BATHROOM MAKEOVER […]
[…] You may recall I painted the bathroom upstairs black, too! View it here! […]
[…] Upstairs DIY Bathroom Makeover […]
[…] bathroom on the first floor. I went for the gusto and went completely black which you may recall I have done before in this bathroom and I absolutely love it. Black paint does not scare me, how about you? Take a look, and tell me your thoughts at the end of […]