
Here we are talking kitchen again.
You think I’m obsessed with my kitchen,
don’t you?
That’s okay…
my family feels the same way.
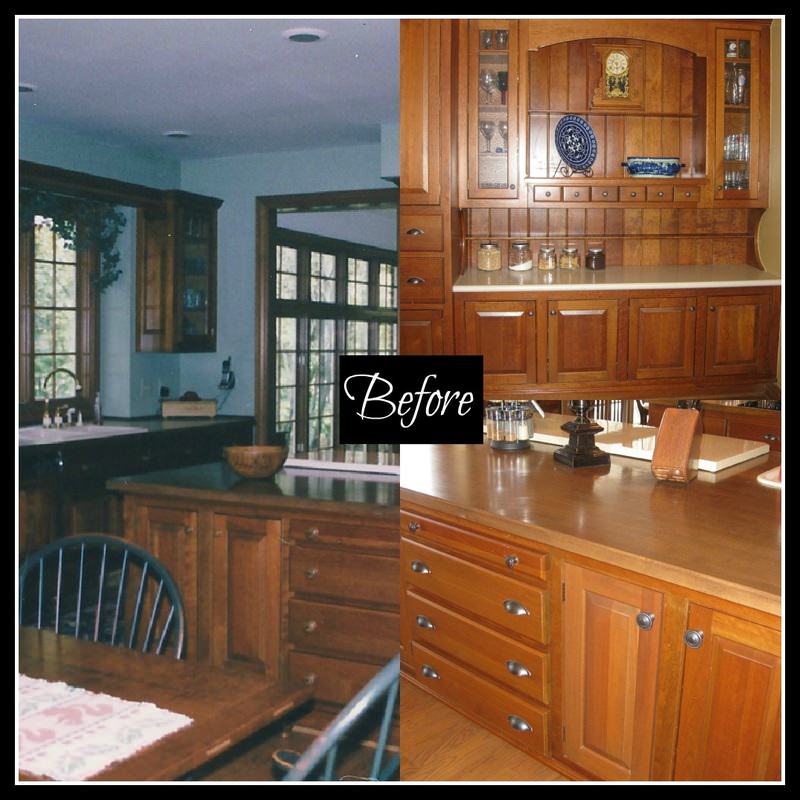
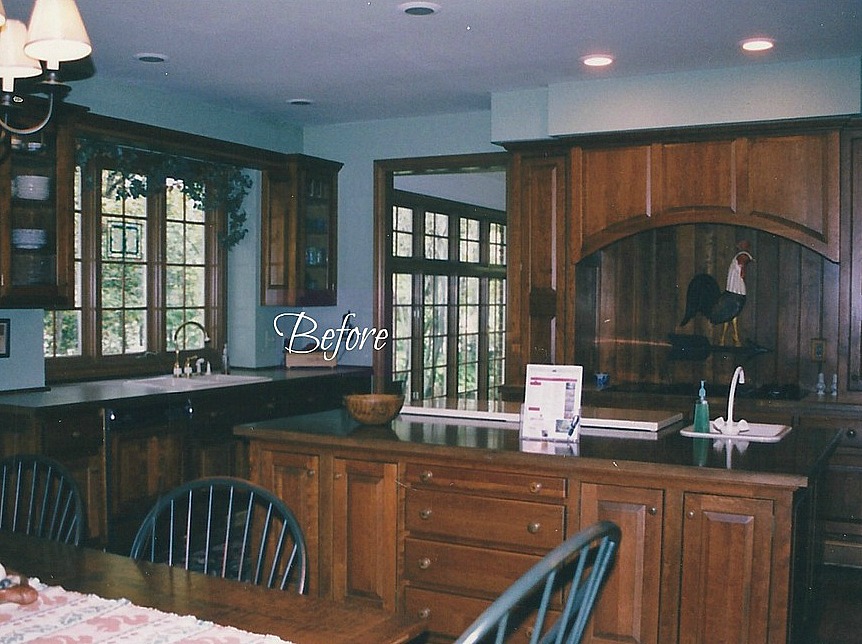
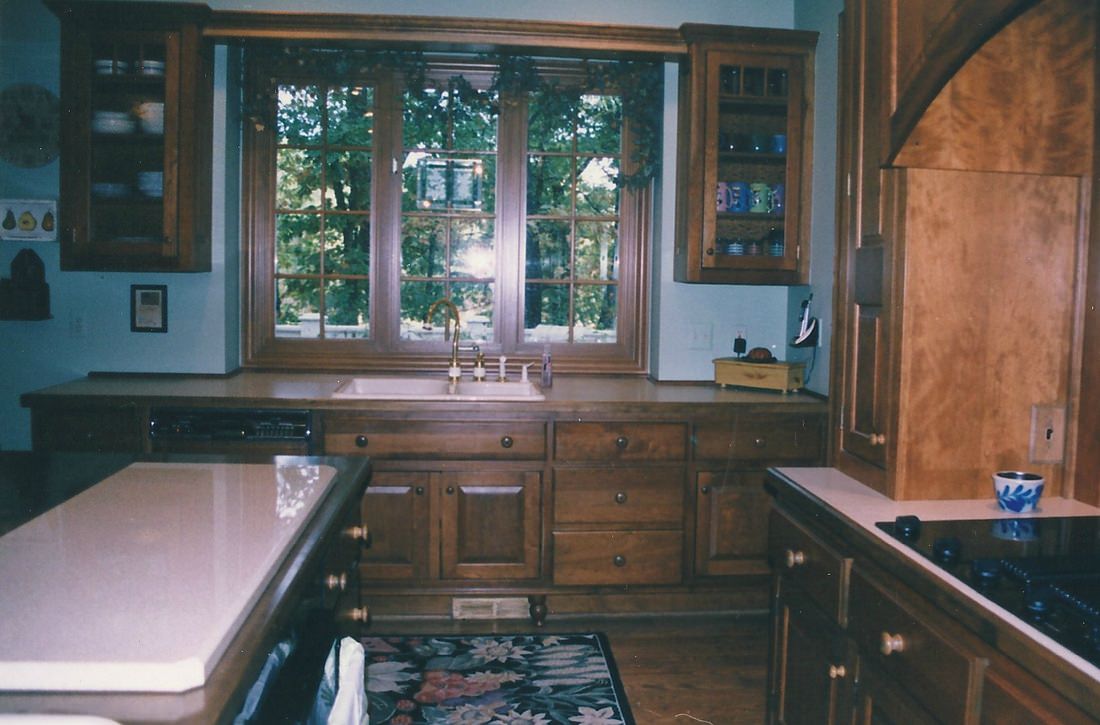
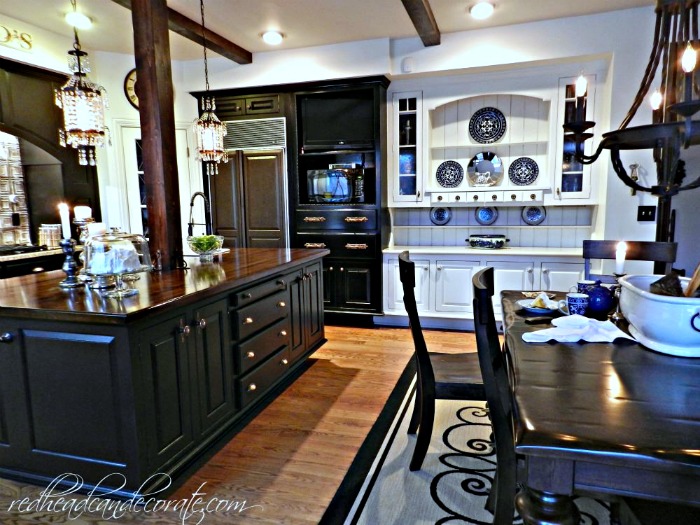
Welcome to our “DIY Kitchen Makeover Part 3”.
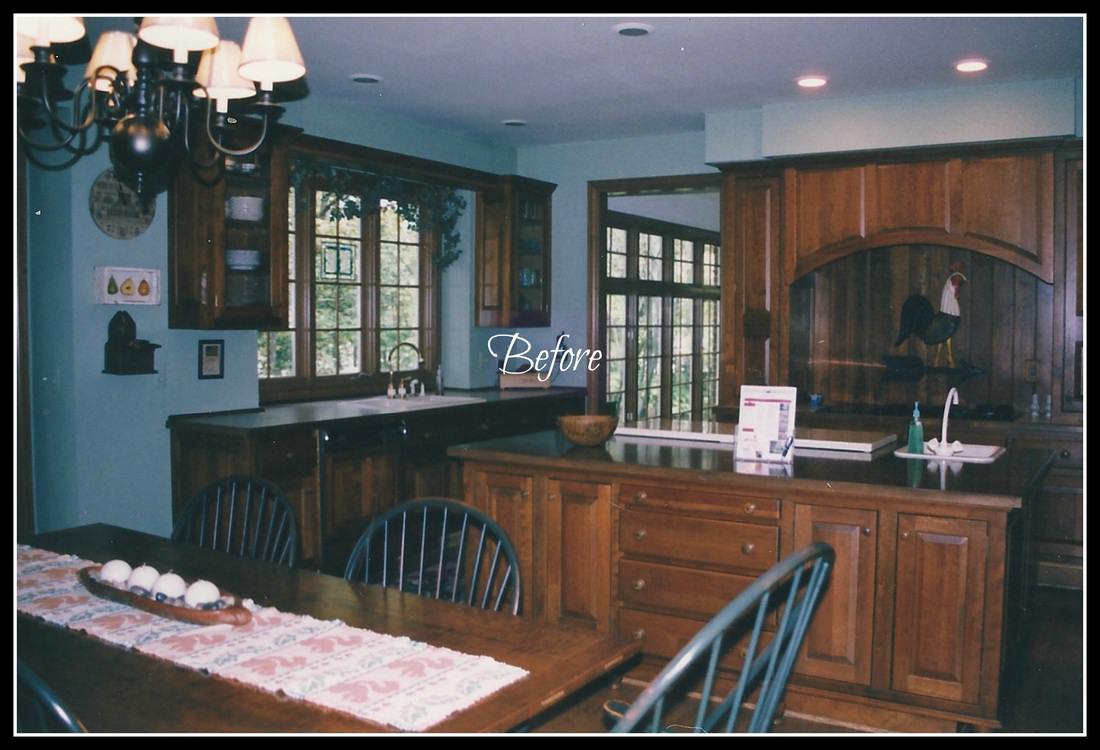
Here’s a little reminder of the before…
this was 4 years ago:
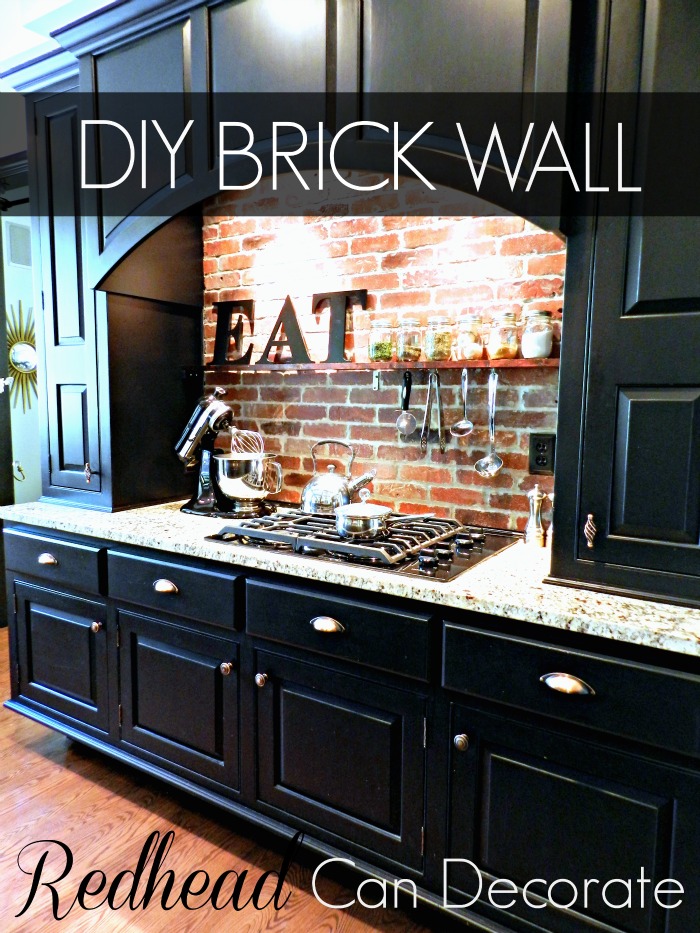
UPDATE>>>>>>>>>2016 Updated Photo of our DIY Brick Backsplash:
And the rest of our kitchen still looks the same:
*** Some of the links in this post may contain affiliate links for your convenience. Read full disclosure policy here.
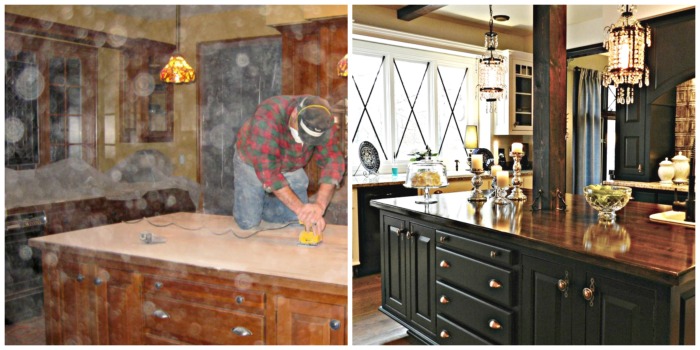
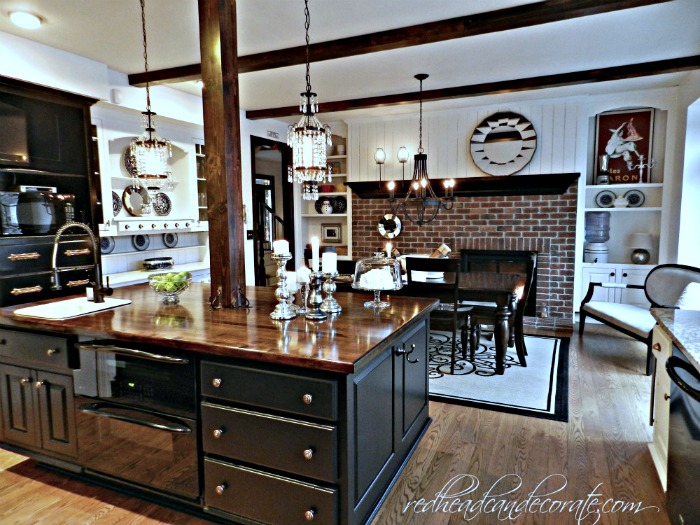
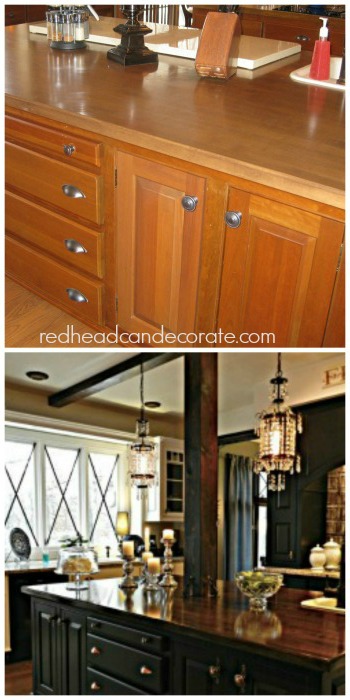
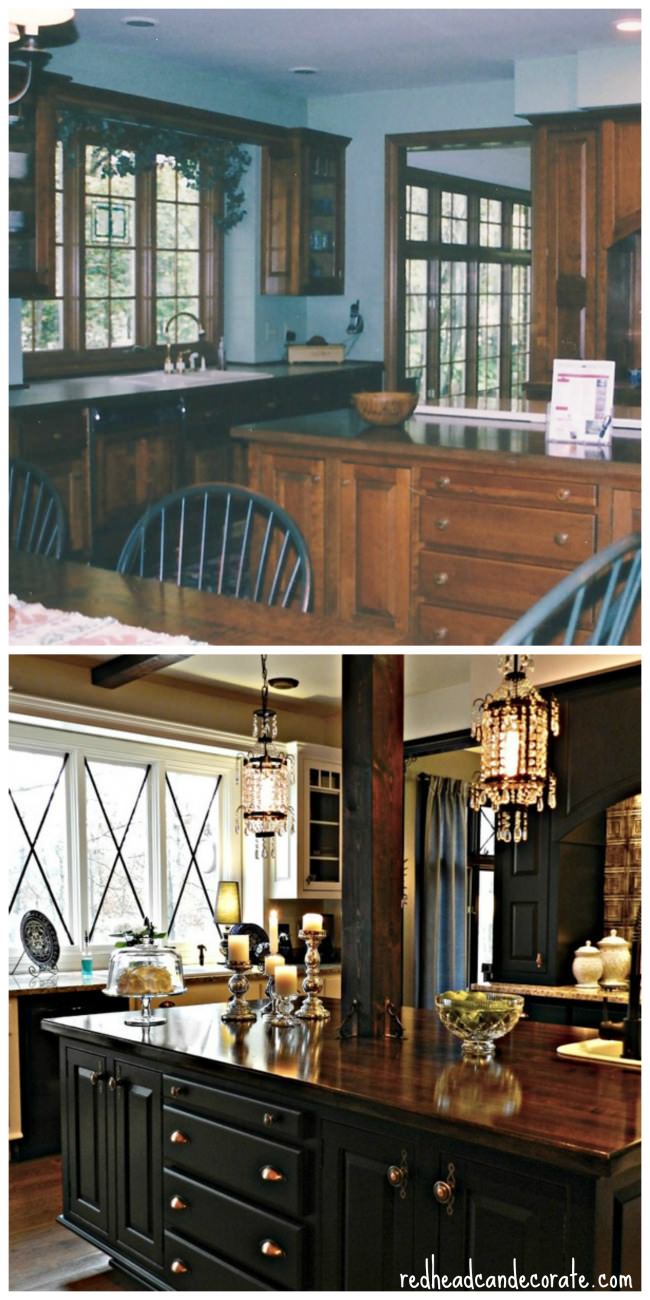
Here’s a gentle reminder of what we had to do. That’s my husband sanding the coating that the previous owners used to cover up the beautiful Oak island top with. We couldn’t believe they covered it up.
It was like finding gold.
After the coating was removed in it’s entirety, we stained the Oak by hand with a brush and Minwax Mahogany Stain, then wiped it off with a rag with . Then we put about 3 coats of Minwax Polyurethane in semi-gloss on top with a very high quality brush. Each coat had to dry completely before the next. You can not rush this.
*Secret: before we stained the wood, we added our own personal touch by beating up the wood a little with hammers. We had a blast making the wood look used, and you could actually put your initials or name if you want.

Between you and I,
when I first gained the energy to dive back into this,
I painted the island white.
My poor hubby came home and was in semi-shock, but held his composure.
I knew it was a huge mistake.
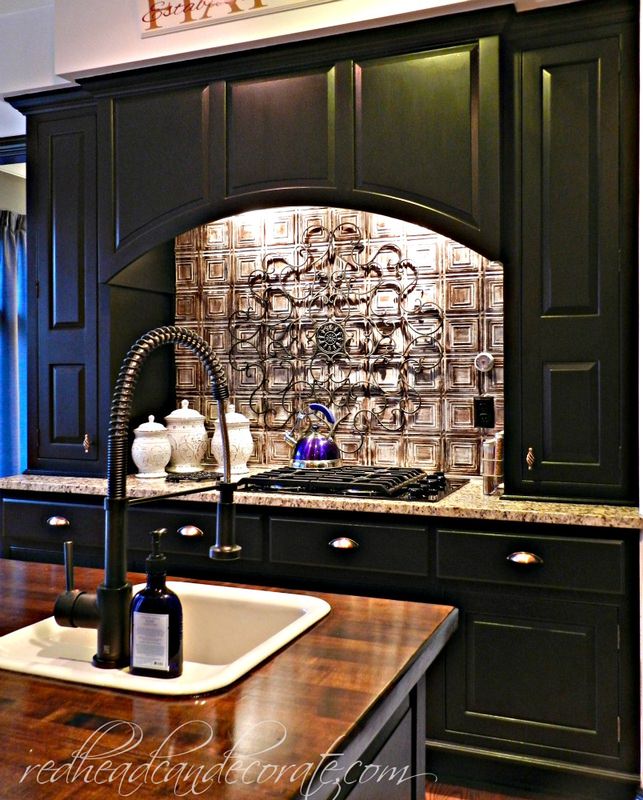
So, then it went back to black.
(I used Behr Ultra (satin) in Black from Home Depot)
(All the white you see in the kitchen (walls/cabinets) is Behr Ultra in Swiss Coffee)
How many coats of paint can my cabinets hold?
I guess I’ll have to let you know.
By the way, all of the cabinets were painted while they were on the hinges, and I did not sand them before because the wood was very dry.
I kept it very simple.
I used a 2 1/2 inch angled Purdy brush.
We also opted not to distress this time around.
The armoire is the only item distressed in our kitchen now.
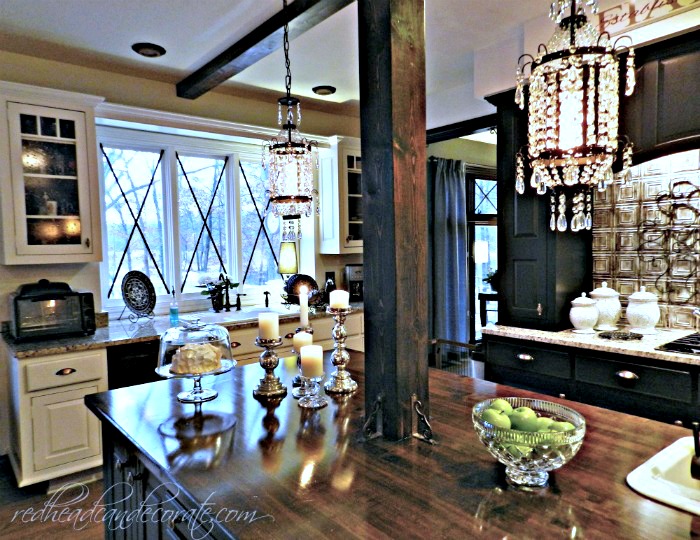
Then there’s the tin backsplash.
I loved the original (tin) copper we installed,
but it said “flashy” to me.
I wanted more of a distressed, white washed look.
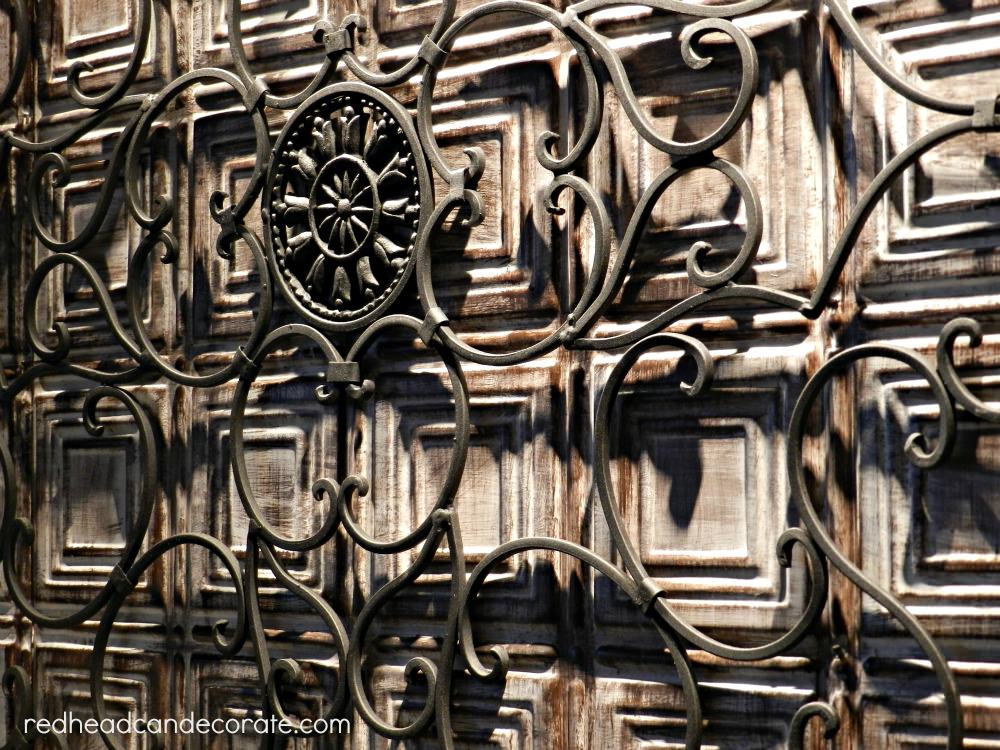
I originally painted it white and didn’t like it.
Once again, huge mistake.
Then I started thinking…
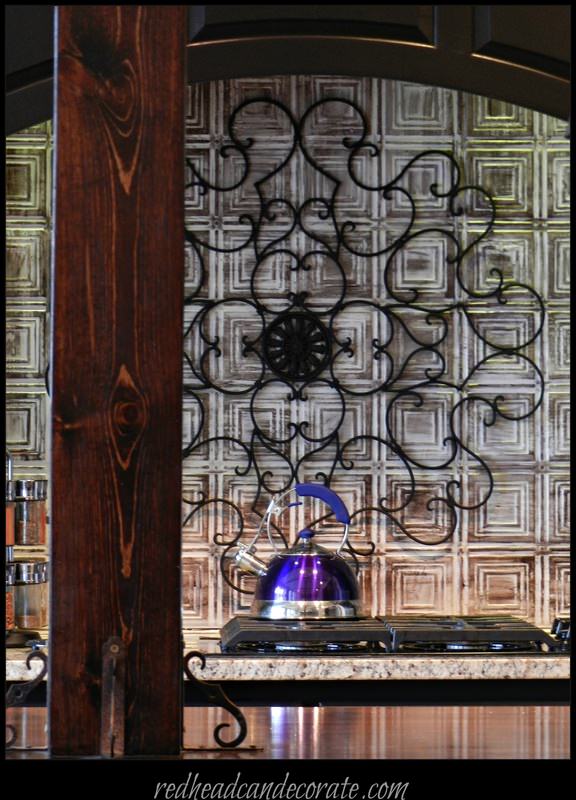
I took a rag, dipped it in some brown paint I had left over from moldings,
and rubbed it over the white painted tin lightly, and wiped off the excess.
Reminds me of when you put a penny under a piece of paper and you scribble pencil over it to bring out the lines of the penny.
Same effect here.
You can find the “swirly iron decor” HERE.
SEE UPDATED DIY BRICK BACKSPLASH HERE.
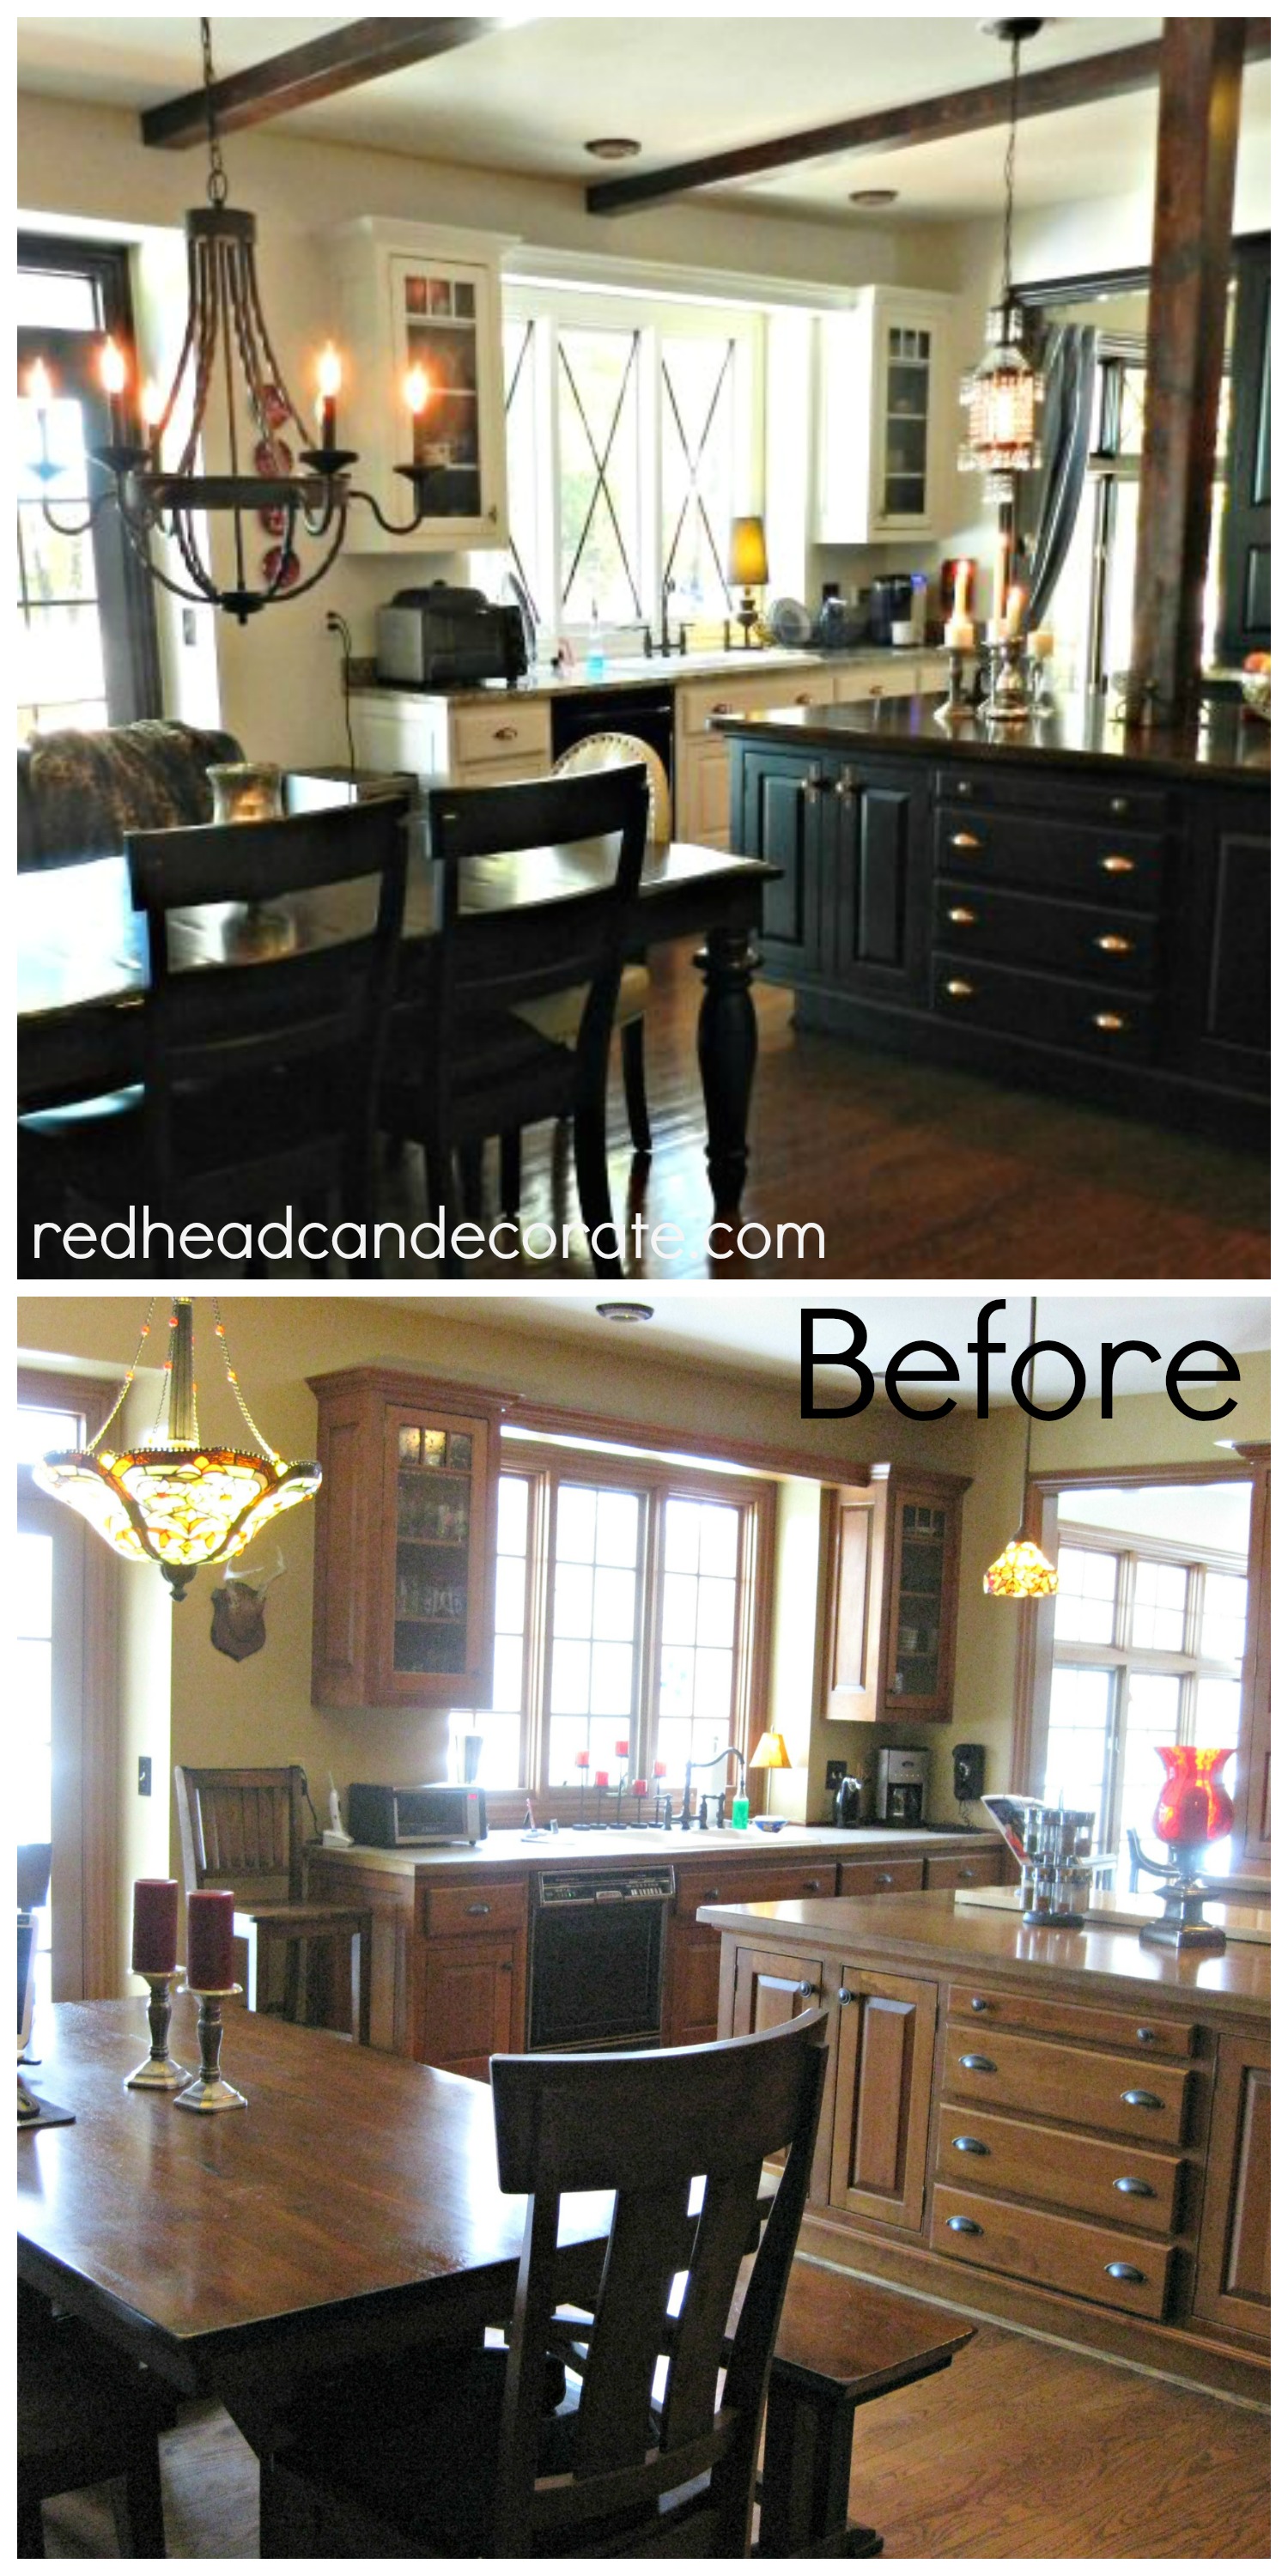
Here’s another before, after…after.
This one is a shocker.
You will note how the cabinets disappear here and that’s why I didn’t keep them black:
Here they are saying,
“Well, hello there. Welcome to our kitchen.”
You can actually see the fine workmanship that went into the cabinets.
Much brighter, and feels cleaner to me.
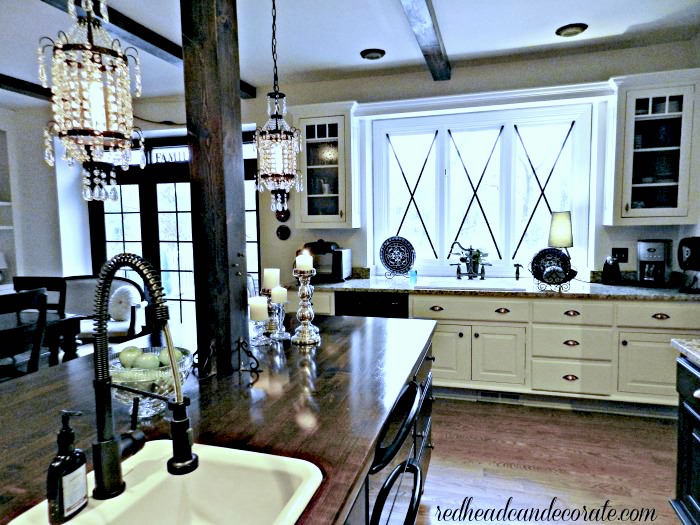
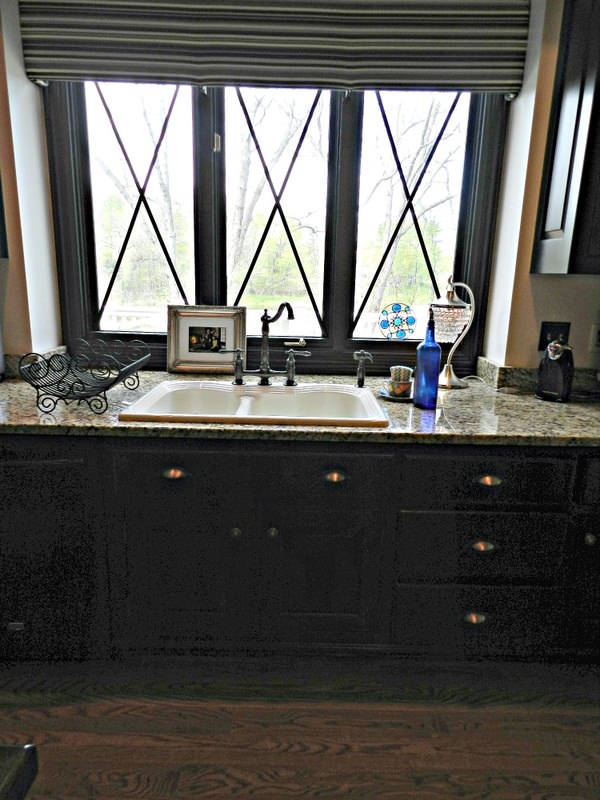
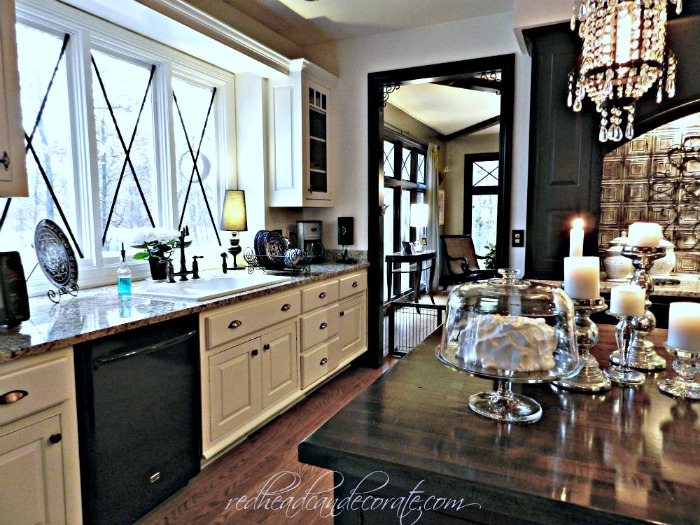
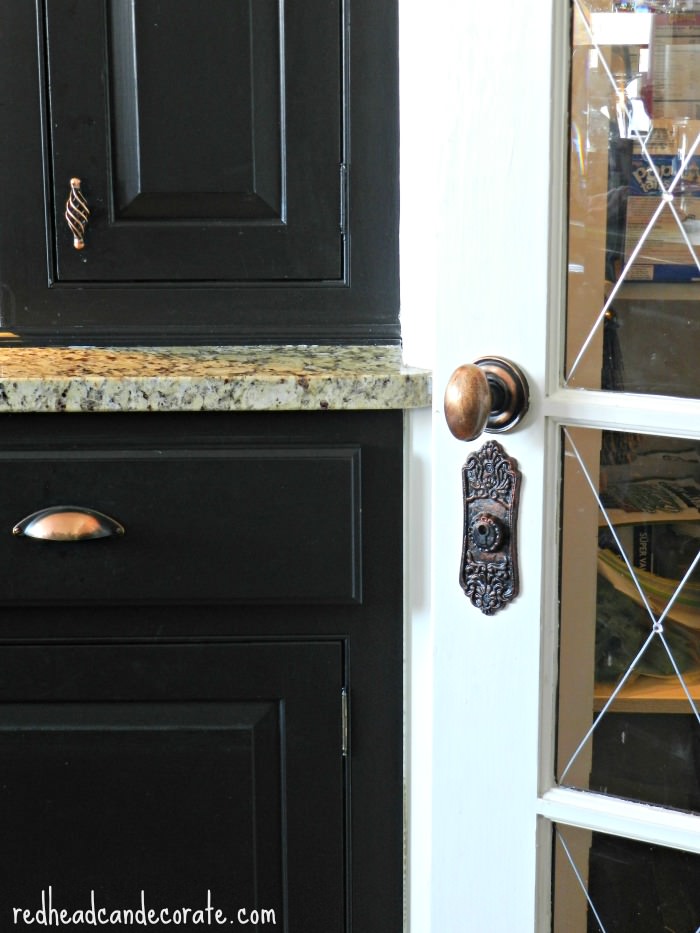
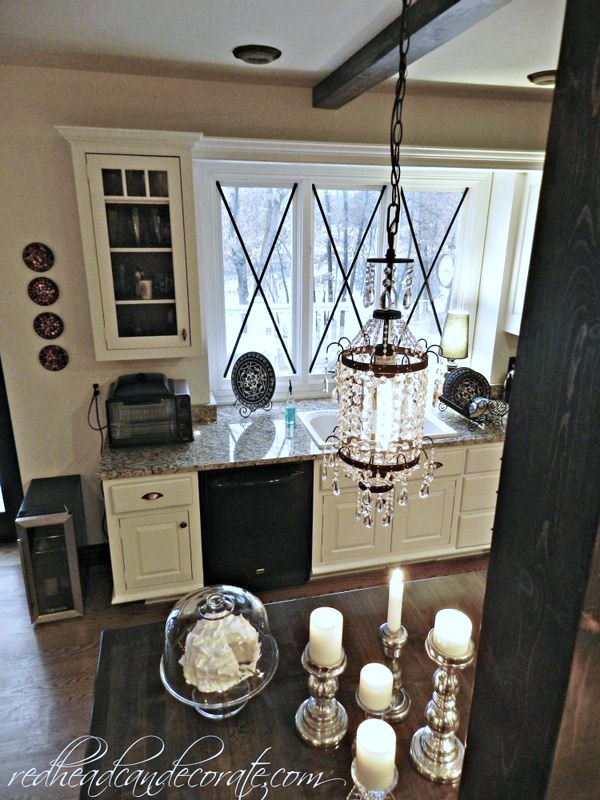
I kept the X ‘s in the window black, although I did try white first.
They really stand out in the day light.
To make the “X” moldings, I measured from corner to corner and had the man at Home Depot cut the moldings for me specifically to those measurements. Then I wedged them in. Very easy.
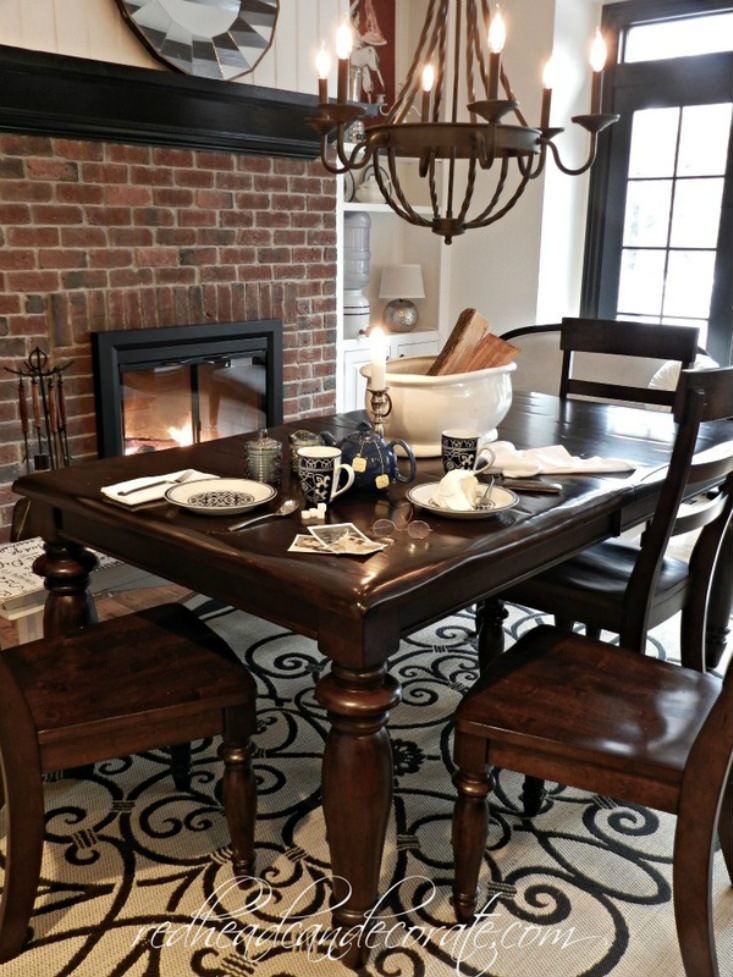
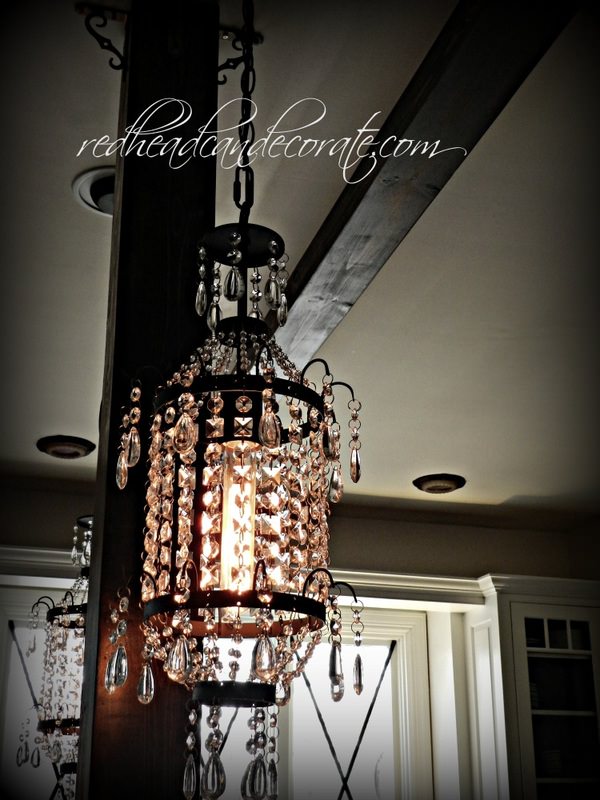
The pendants I found online and on sale at Pottery Barn for under $100 ea.
Here are some pretty mini chandeliers I found on line… MINI CHANDELIERS.
FYI-I used “Beacon Tube” bulbs.
and they really brought out the true beauty of the glass.
I strongly recommend trying these bulbs.
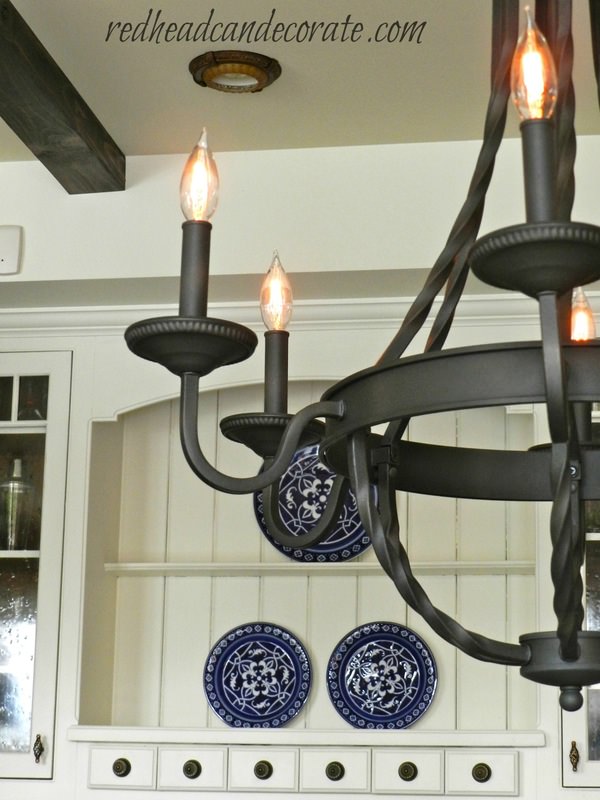
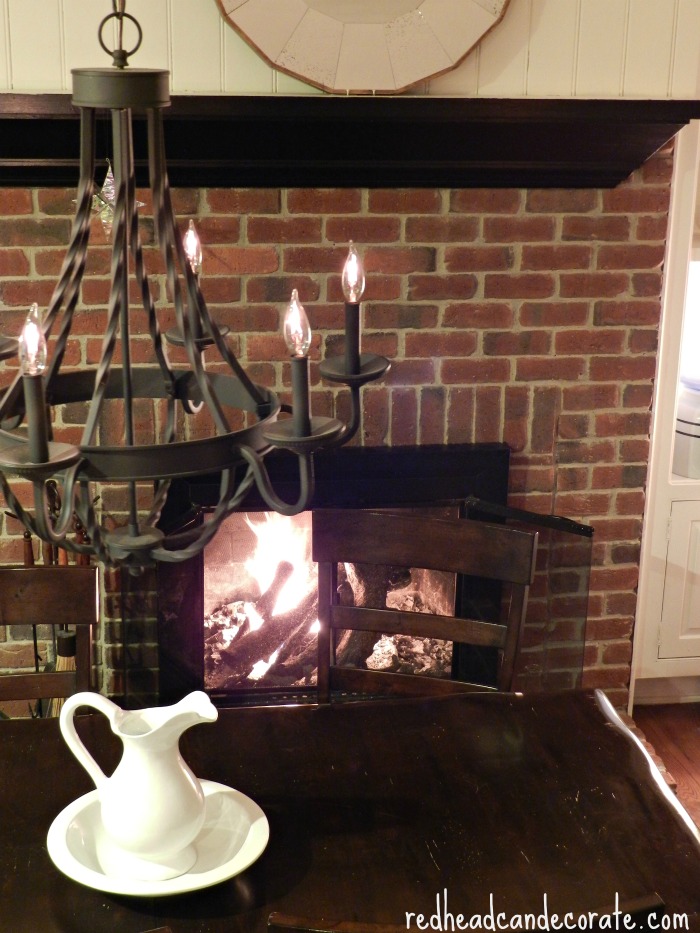
We decided the green bottle chandelier had to go as well.
It was fun for a while, but I grew tired of it.
I found this baby at Home Depot for $159.
She is a dream.
I removed the valance and can’t believe the difference it made in the windows.
I am a firm believer in “less is more” with window treatments.
Of course we need privacy, but the only guys in our back yard are
the ones with feathers, gills, or antlers.
They could care less about us.
There is a much better balance between white & black now.
You didn’t think I would go all white did you?
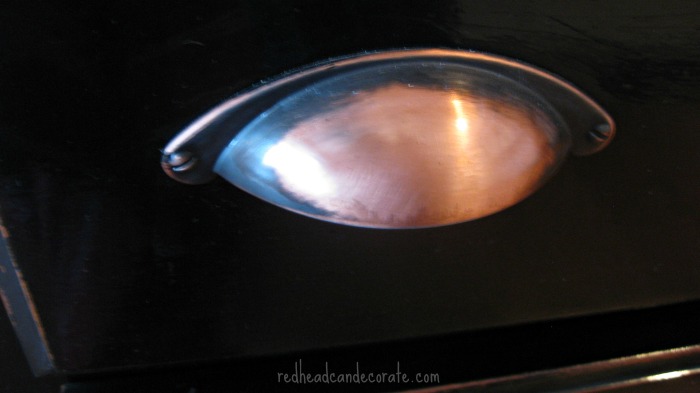
Can’t forget to mention the knobs/pulls.
My husband and I realized that if you sand oil rubbed bronze down to the copper, it’s gorgeous.
After sanding the knobs and pulls down (it was super easy), I put a coat of poly over them so they won’t fade back to dark.
More info on that here: “where I found my antique hardware“.
I sure wish my kitchen was clean like this all the time…

I hope you enjoyed the ride.


Your kitchen is stunning!
I never get sick of looking at your kitchen, Julie. It’s so fabulous!
This kitchen is fabulous! All the details are awesome, and I love the dark colors! Also, what is the name of the font that you used for your watermark on all the pics! It’s one of my fav, but I can’t find it anywhere! Thanks!
Hi Julie! I just came across this post on Pinterest and had to write you! I love your kitchen!!! I’ve been toying with the idea of painting my cabinets black but haven’t done out of fear! You’ve inspired me to rethink “again”! One question…..I love your canister light covers. Where did you get them? Thanks! Absolutely adore your blog!!!~~Angela
I love the combination of white and black. Looks very classy.
Are the window “x” moldings made out of wood? How do they fit together where they cross?
Very inspiring pics!! Absolutely LOVE your kitchen!
I love the wood counter tops…are they wood or painted to look like wood??? also…what color black did you use…thank you
Do you have the name of the Pottery Barn pendant lights? They’re not on their website any more…
Love the black! I’m planning a kitchen redo for my home very soon and I’m planning on using black too.
Your kitchen is off the chain amazing! The new pendants totally transformed a beautiful kitchen into a stunning kitchen.
I have totally enjoyed touring your kitchen redo! Thanks so much for linking up to Throwback Thursday so I could see this!
Your new kitchen is absolutly beautiful. What a joy it must be to walk into that space each day and view what you have acomplished. Kudos to you!
You kitchen is always great to revisit! Thank you for sharing at Throwback Thursdays!
xoxo
Denyse
God damn fabulous!!! absolutley STUNNING!!!
Absolutely beautiful!
Your kitchen is what first drew me to your blog, friend! Love everything about it!
Can you please tell me what stain was used on the counters? Just love your makeovers. Many thanks!
Hi Karen…It was Minwax Red Mohagany from Home Depot.:)
Love the kitchen makeover and your fearless approach to trying everything. I’m trying to talk my hubs into some black in our kitchen, this just might convince him. I love all the details, especially the white bench in the dining room. I would love to include my kids in a project like that. Can you please share what you did?
Thanks Patti! The “Doodled Bench” is found here…sounds like you have a great idea! http://redheadcandecorate.com/4/post/2012/09/inspiration-cafe-15.html
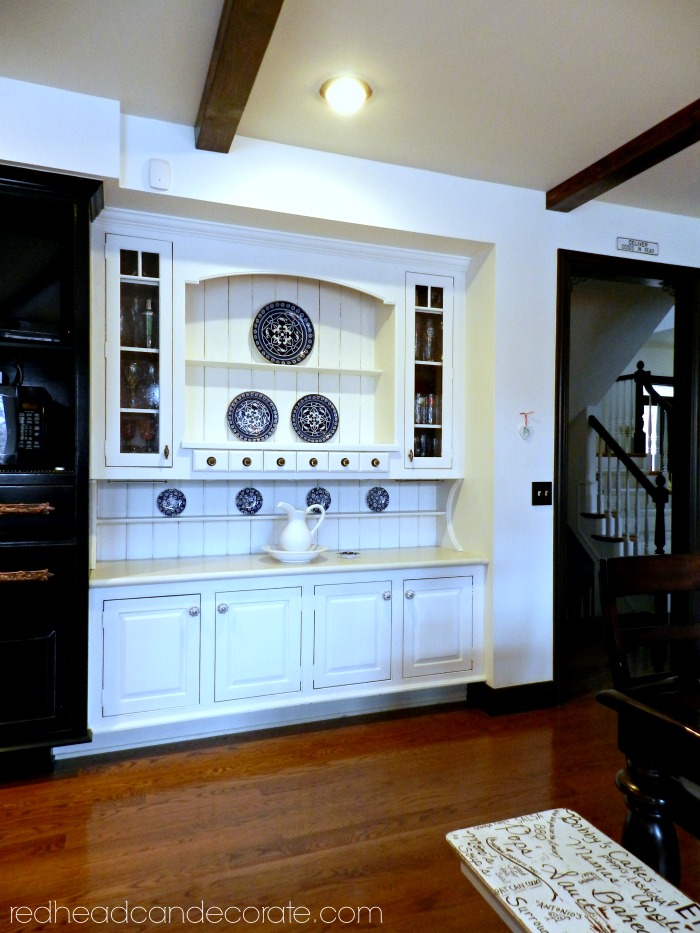
Love, love, love the kitchen. I have to say my favorite part of your genius is that water cooler tucked away on a shelf in the dining room. I’m taking pictures of this to convince my “I love wood grain” husband to let me paint my cupboards!
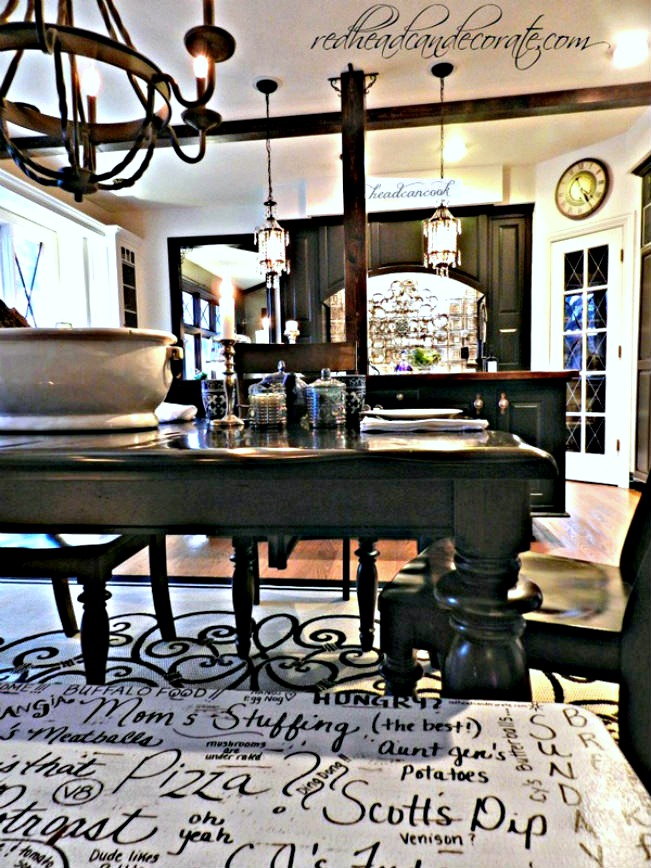
I love the light fixture over your dining table but I can’t tell if it is black or oil rubbed bronze. We are remodeling our whold house and I am looking for a light fixture like this but my door knobs, faucets, etc are the bronze. Your kitchen is beautiful, I love the black. I decorate with a lot of black too.
From one design-freak redhead to another, this is quite possibly my favorite kitchen, ever! I am a lover of high contrast, & this has just the right balance. Well done!
Love your space!!! Saw your video, too. I am wondering about the rug that shows up over and over, natural with black swirls. Where did you get that or did you make them?
Love your ideas!!! Beautiful! Where does one find the rug w the swirls on it? Is that also something you made?
It’s from Home Depot Laura! It’s an outdoor rug. Not sure they sell it any more though.
Thanks!!
Another question….the door that you did in your office that has the somewhat “leaded” look, how did you do that?
Your kitchen is AWESOME!!! What brand/color did you use for the white cabinets?
For the white we used Swiss Coffee Behr Ultra, and the black is Black in Behr Ultra.
Amazing transformation. I love your courage! Just paint over it if you don’t like it, right?!
Did you use wood for the window x’s? I have been wanting to do this with two of my windows.
Thanks for your inspiration! I had my pickled pink cabinets painted white and I love it. Now I want to add some black!!!
Where did you purchase you table and chairs? Thank you.
Art Van Furniture about 4 years ago.
Saw your kitchen it’s great! I want to paint my maple cabinets white and my island black. Did you brush paint or have them sprayed? Thanks kim
I hand painted them with a brush.
This is unreal!!! What a DREAM kitchen! Sigh *someday* What a beautiful space.
Such a lovely kitchen! We painted or kitchen cabinets a year ago with “reclsim” and have issues with the paint chipping off in heavily traffic areas. Are you having any wearandtreat issues? Just plain paint or did you add anything? varnish? wax? Thanks.
No chipping here Karen. We used paint with primer in it. That’s it.
Hi your kitchen (before) really resembles mine. I stare at it everyday wantig to paint those cabinets white! Can you tell me what color you painted the walls?
Hi Annette-the walls are the same as the cabinets…it’s my favorite go to color…its Home Depot’s Behr Ultra in Swiss Coffee. I used satin sheen.
I LOVE your kitchen,Julie! It’s Unique,Elegant & almost a touch of Rustic Goth! Fabulous!
-Paige.Rose
http://www.quaintsanction26.blogspot.com
You’re right! Never thought about the gothic part!!!
How beautiful – I love the entire space..
Great job…
Rose
Did you do the “leading” on the french doors/windows? If so, how and what did you use on the kitchen window x’s? Beautiful kitchen! Wow!
Hi, Brandi! Yes, I did the French doors…here are the details: http://redheadcandecorate.com/4/post/2012/07/my-way-leaded-glass-french-door.html
I just saw your kitchen at Kim’s and had to stop and tell you it is gorgeous and I am your newest follower via email and I am following you on Pinterest. I would love for you to follow back and come with us on our new move. You can see our home build on the blog right now and we are moving next week. The projects, unpacking, and eventual baking and cooking will begin. Thanks.
Cynthia
Julie what a stunning makeover — it’s amazing and so beautiful !!
Thank you, Sandy! 🙂
Hi Julie, WOW your kitchen is stunning! You are so talented. I am drooling at those windows. Black window grilles have been on my wishlist for years! This is probably a dumb question, but what department at Home Depot would I go to for moldings?
Thank you for your time.
Sarah
The moldings are in the back usually, by lumber. So…the lumber section would be the place! 🙂
Love your kitchen! What type of flooring is in your kitchen? Hardwood or laminate and what color?
It’s hardwood, Michele. Here’s more on our floors:http://redheadcandecorate.com/4/post/2013/10/sanding-non-toxic-wood-floor-refinishing.html
This is lovely!!! I noticed in your comments you said you left the hinges on when painting…Can you give a quick synopsis of how you painted? Sand grit, primer, paint, dry time, etc? Thank you!!
No sanding, primer in the paint (Behr Ultra from Home Depot), let each coat dry a couple hours. Be sure to get a good brush.
No sanding??? Even when you went from wood to paint??! You’re making my day and giving my inspiration to “just do it” and paint the damn cabinets that I hate!!
Yes…just make sure you get paint with primer or prime first. Paint those damn things!! 😉
I hopped over from Cedar Hill Farmhouse, I am an interior design blogger living in New Zealand. This is one of the best kitchen makeovers I have seen whereby the existing kitchen has remained but been painted and re-styled. I love the style, the colour, everything about this shows your flair for design….well done!
What a wonderful compliment…thank you so very much, Lee!
Oh my Gawd!!! Absolutely stunning kitchen:) What type of wood did you use for the top of the island? The hue and grain are beautiful. I just found your site and I’ve been looking at everything, loving it all! Redhead Can Decorate is certainly accurate!
Thank you, Melissa…it was oak sanding down and stained with Minwax Mahogany stain. Then polyurethaned with high gloss several times.
Your home is beautiful. The change in the color of the cabinets just makes your kitchen look elegant. Love the back splash detailing.
I just did a redo on my kitchen cabinets in a color similar to yours. I can’t decide to go with a white or off white for the window/baseboard trim. What color did you use?
It’s a little off white. More like a creamy vanilla. Swiss Coffee-it’s all in the post. Good luck!
My biggest question is.. what did you do with the trim? I have oak trim all over my house, want to paint my kitchen cabinets and don’t know what to do with the trim. My kitchen is open to my family room. Did you paint just the kitchen trim? or stop at the kitchen and leave wood trim in the rest of the house? This is my biggest obstacle that stops me in my tracks when Im ready to paint. Thanks@!
Kelly
We painted it, Kelly. I know…once you start, you pretty much have to keep going. We went with a dark brown through out the house, including our doors. Here’s a link to the color, even though this post is on the stair case makeover: http://redheadcandecorate.com/4/post/2014/05/staircase-makeover.html
any idea the name of the chandier from
Home Depot? Trying to find one just like that!!
No, Lisa, I’m sorry. They had it on display, just last month. Check in the store. Good luck!!
There.is.hope for my kitchen! The prettiest kitchen I have seen! I showed it to my husband and said, “this kitchen has attitude!!!” He agreed! When we moved into our home three years ago, the mid-grade maple cabinets had been recently installed. Replacing is not an option and I’ve been very concerned about painting do to future chipping, etc. Since it has been a few years since you restyled and painted, could you give me an update on wear and tear? Thank you.
They are doing okay, Terri. No chipping, but they do get dusty!!!
Love, Love, Love your kitchen makeover! It’s absolutely gorgeous and I am totally inspired to paint my cabinets! Did you paint the inside of the cabinet and and shelves as well or leave the orginial wood grain?
I left them alone, Danette.
i love your kitchen and have been using it as an example for my own redo. Did you refinish the island counter top? I am building my own and am curious about using resin finish or poly?
We used Minwax Polyurithane.
I love your kitchen, especially the cabinets and brick by your stove. I wanted to see how big is your island and how long is the area where your stove is. Thank you and I am so glad you invite us into your home to see your house
Heather Vitry
your kitchen is to die for! i just love it…i always wanted black cabinets..but i’m in a rental, so i have to be satisfied with a black island on wheels…maybe someday..you did a fabulous job!!
I SO want to do to my kitchen what you did to yours but my husband is balking. Hopefully the pictures of your before and after kitchen will make him see how beautiful black trim is. Do you have black trim in the rest of the house?
We actually used very dark brown for the trim, Kim.
Julie, this kitchen is so amazing! This it totally my style (Rustic Elegance) but I’m better at copying someone else’s ideas instead of creating my own. It has the right amount of contrast, textures, and interest……. the touch of country rustic and topped off with that elegant bling sparkle! One thing that I didn’t hear you talk about was the beams. I wondered what material you used for the beams and what dimension of square you went with, and how those were installed and fastened at the ends. I see there are 3….how did you determine how many are good for the size room you have? I was considering putting some beams in my diningroom but my ceilings are only 8ft. Do you think that is too low for beams? Maybe if I cut them thin so they look like they recess into the ceiling? Help!
We built the beams in our garage, however I haven’t written a tutorial yet. I just pictured 3 beams in my head. Our ceilings are 9 ft., so 8 would be fine.
Yes, I’ve commented on your kitchen before, but each time I need to get ideas or just to become motivated to finish projects I am doing in my kitchen, I just click onto your stunning kitchen and I am up and doing. Thank you so much for posting your gorgeous kitchen.
Thank you, Ivory! I hope the banana trick works for you!
What a transformation!
OKAY! Where have you been hiding my whole blog surfin’ life???? We just started our kitchen remodel (Yes…2 weeks before Christmas Ö) and I’ve been teetering on two tone cabinets. After wanting all black and seeing your half ‘n half black/white cabinets, SOLD! It’s the perfect balance of not too white and not too dark. I can not wait to go over the details on your blog because it is e-x-a-c-t-l-y what I want. You’re a DOLL! Subscriber and wish I had found you sooner. THANKS!
I really like the balance of black and white. I like everything you have done. It also helps me know that “doing over” is perfectly okay if it doesn’t sit right at the first attempt. I have two projects I am pondering, but I think I’ll just go ahead and see what happens. I could detail everything I love, but I’ll just say, I love it ALL. Nice job.
Thank you, so much, Debbie! This post is about 4 years old…I hope you will stop by for recent updates! Have a great day fellow redhead 😉 ~ Julie
The Show Stopper Kitchen is my all time favorite. the kitchen is the heart of the home & just brings so many good times
Hi Cindy! Thank you so much my friend! I appreciate you stopping by! ~ Julie
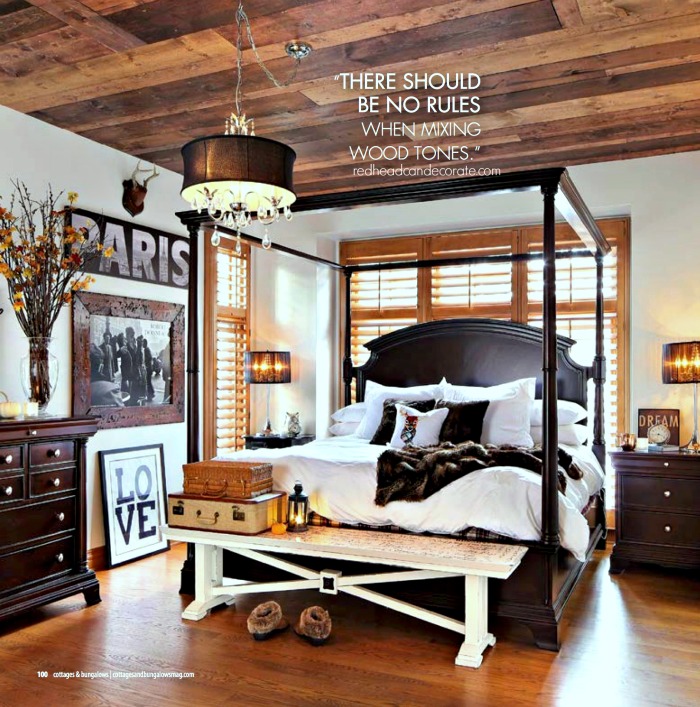
Hi Julie, I really love all three, but I remember when I first saw your kitchen, I was amazed. Since I spend so much time in my kitchen, I guess that is my favorite room in my house, and definitely yours. However, i absolute adore your bathroom too, so cozy:-)
Hi Julie, I really love all three, but I remember when I first saw your kitchen, I was amazed. Since I spend so much time in my kitchen, I guess that is my favorite room in my house, and definitely yours. However, i absolute adore your bathroom too, so cozy:-)
Thank you, Ann! The kitchen is my fav, too!! I basically live in there. All i need is a bed ?
Hi Julie,
Your brick wall , hutch, cook top area was the inspiration for my new kitchen. We had an old “shotgun” house rehabbed. When the contractor mentioned that we should have a focal point on a certain wall, I knew exactly what I wanted. Ours is a coffee/wine bar. It and the lower cabinets are painted navy blue. The upper cabinets, in the rest of the kitchen, are white and the countertops are walnut butcher block.
I always enjoy your posts. Sending a picture in a separate email ( since I don’t know how to attach it to this)
Janet
Can’t wait to see it, Janet! ?
This kitchen is the best ever! Can I make a few queries?
Approx demensions of kitchen, and of hutch? And of Island ?
Besides the sink,does the island contain any appliances?
Is the wooden pole on the island solid or hollow?
We are doing a reno from family beach house to retirement home, and so much of this is perfect. Everbest…
Our Kitchen is approx. 24 ft. X 19 ft. The hutch is 8 ft height x 6.5 ft. width. The island contains the small prep sink only. The full sink is located over by the window. We have a double oven in the island. Believe it or not, it fits! You can see it in the one photo. There is a pull out cutting board as well. The column is solid. Good luck, Mary! ~ Julie
I absolutely love your kitchen, did you happen to paint inside your cabinets or did you just leave them the way they originally were?
Great question! I left them. Just got tired. What you could do is paint just the inside door and leave the rest! Up to u ?
Hi again, thanks for the reply. I ended up painting my cabinets with the behr ultra satin paint and it seems they might be easy to scratch. Did you ever put on a sealent coat to your cabinets? If not do they seem to scratch easily? Thanks again
Hi Ashley, No I didn’t put anything on them. Mine have held up fine.
Just wanted to say your kitchen took my breath away, its everything I want in my kitchen! My kitchen is much smaller but I’m going to try to incorporate as much as possible into it. Thank you for showing off your beautiful work and giving such great ideas!!
Thank you, Jenne! We still love it after 7 years! Good luck w your kitchen!!
Awesome ? very impressive
Love the kitchen sink!
Thank you, Jan! Those photos are from the beginning of blogging, so they aren’t too clear. I do love our sink. Took a chance with that one! Thanks for stopping over! ~ Julie
Is the wood on the island water repellent?
Yes! It repells everything. I even cut on it ?
I LOVE your kitchen. I have seen it many times but looking at the before and after together at the same time I realized how much bigger the kitchen really looks in the after. Amazing what some paint and a few tweaks can do. I almost have the nerve to do mine. LOL. And I cannot believe how gorgeous the island countertop is, my heart. What a wonderful surprise to find. Thanks again for the inspiration.
Hi Stacy! Can you believe they covered that up? I was shocked!! ?
Hi again. I forgot to ask you. What product would you recommend to clean my cabinets before I paint them. Food stains grease stains, 5 kids stains. LOL. Thank you.
Hot soap and water. ?
I love your kitchen! So much that my white kitchen I painted my Island black and the area cabinets around my stove black to make it look more like a piece of furniture. With new wood floors, it looks great!
Would love to see photos, Chrystal!
First off, Black and white are my all time favorites! So it is a win win for me! Second, your selection of which ones would be black or white was spot on! You are blessed to have a large kitchen to work with. I have the same colors in my kitchen as well. All my cabinets are black and the island is a creamy white with the island top being wood we removed from our horse barn and repurposed for the top. I have a room inside my kitchen that was a bathroom and I hated that so it got turned into a walk in pantry. The bathroom got moved into the hallway where it should of been. I think the black and white base for a kitchen is so gorgeous when planked oak colored or cherry colored stained wood is the focal point. What I notice about your kitchen regardless of what you are showing us for the time being, is that lovely countertop on our island against that black cabinet and brick stove area. I croon!!! That mercury glass and other glass you use with it just drives the point home. I am in love with your kitchen. Your home is perfect. You have done a fabulous job!
Thank you for suck kind words, Pamela! Your kitchen sounds beautiful! Would love to see that island!
I absolutely love your kitchen. You’ve done a perfect balance of light and dark so it’s not too heavy and dark. It’s elegant, tasteful, and sooooo welcoming. Excellent job!
Love your kitchen. The more I see it, the more I love it. Bring me a cot or sleeping bag and I would sleep right there.
Have mentioned to my husband many times; ‘if you want breakfast in bed, sleep in the kitchen.’ :}
Colleen, You are so funny! We actually had an ice storm 2 years ago on Christmas! No power in -3 degree weather! 5 nights on the floor in there in front of the fire. It was fun at first,but then Rick turned into some pioneer guy monster and was so crabby from cutting wood, tending to things. It was so crazy. My bones ache thinking about it. We actually moved our king size mattress in there ? Quite a story now ?
Your kitchen is stunning. I did not think it could get any better, but you did it again. I love all the fabulous changes you made over the years. I’ve been trying to get my kitchen to look as close as possible to your gorgeous kitchen.
[…] DIY Kitchen Makeover […]
Where did you get the black scroll and tan rug under the kitchen table?
Thank you
Home Depot, but it is discontinued.
Hi Julie:
Wow! That change in the cabinets and island top is stunning.
I have some of the same black paint and intend to paint my oak bathroom cupboards, at least my wonderful son is.
Just love all your emails, so much fun.
Cheers, Bette
[…] Kitchen Makeover […]
[…] I missed getting a photo of the staining, but he used a rag…always apply stain with a rag and when finished dispose of it properly because it can combust and cause a fire. He applied 1 coat of Minwax Wood Finish Stain in Red Mahogany which is my go-to stain for everything. Our kitchen island is also done this way. In fact, the island is done EXACTLY THIS WAY. See island HERE. […]
Hi there!
What is the name of the black chandelier you purchased at Home Depot?
I do not know, but do you want to buy this one? I’m serious!
You guys did an awesome job remodeling your kitchen. I noticed in the before picture, there wasn’t a post, but the after picture shows a post in the middle of your island. Is it decorative? load bearing? And the wood beams on the ceiling, are they decorative?
All decorative!
[…] Absolutely breathtaking! This is one of the most beautiful kitchen conversions I have ever seen! They have to be presented in a magazine. Here you can see how color and talent can transform an old-fashioned kitchen with oak cabinets into a beautiful, modern-looking room with minimal effort. See more Here. […]
[…] with all of the DIY woodwork and painting. If you would like to see the kitchen before, just click here. Here’s our island transformation, and our DIY Brick Backsplash, […]
[…] Bathroom”. To be honest, this could be the most shocking makeover on this blog besides our DIY Kitchen Makeover. Here’s a few before photos to start us […]
[…] is really interesting to study. If interested, the original kitchen makeover can be found here: DIY Kitchen Makeover. I also have all my kitchen projects located here: DIY Kitchen Projects. Anyone want a homemade […]
[…] See kitchen “before” photos here. […]
[…] Absolutely breathtaking! This is one of the most beautiful kitchen conversions I have ever seen! They have to be presented in a magazine. Here you can see how color and talent can transform an old-fashioned kitchen with oak cabinets into a beautiful, modern-looking room with minimal effort. See more Here. […]
[…] Absolutely breathtaking! This is one of the most beautiful kitchen conversions I have ever seen! They have to be presented in a magazine. Here you can see how color and talent can transform an old-fashioned kitchen with oak cabinets into a beautiful, modern-looking room with minimal effort. See more Here. […]
Julie! You don’t know who I am, but I’m so excited to tell you I’m finally remodeling my kitchen and can use your rustic elegant kitchen as inspiration! I’ve had the picture of your kitchen earmarked in my dreams seriously for over 10 years! Thank you so much for keeping an archival of your previous house. It’s the kitchen of my dreams, but…. I have a galley kitchen. My only challenge is determining where the white vs black will go on my cabinets. I think each side will have black on the lower cabinets and white on the upper cabinets. But….my kitchen cabinets will extend (same wall) unto the family room with a brick wood-burning fireplace. The family room cabinets will definitely need to be all black. With my sincerest gratitude, thank you for your creative masterpiece! Wish me luck! Scared but excited at the same time!
Hi Juel!!! And we share the same name almost!! I am so excited for you…please send me photos if you can. Keep in touch!!! Made my day!!!!!
This is so sweet!!! Thank you for your kind words, please send photos!!