{This is a sponsored post for CeCe Caldwell’s Paints and don’t miss the *giveaway at the bottom of this post.}
Shut the front door.
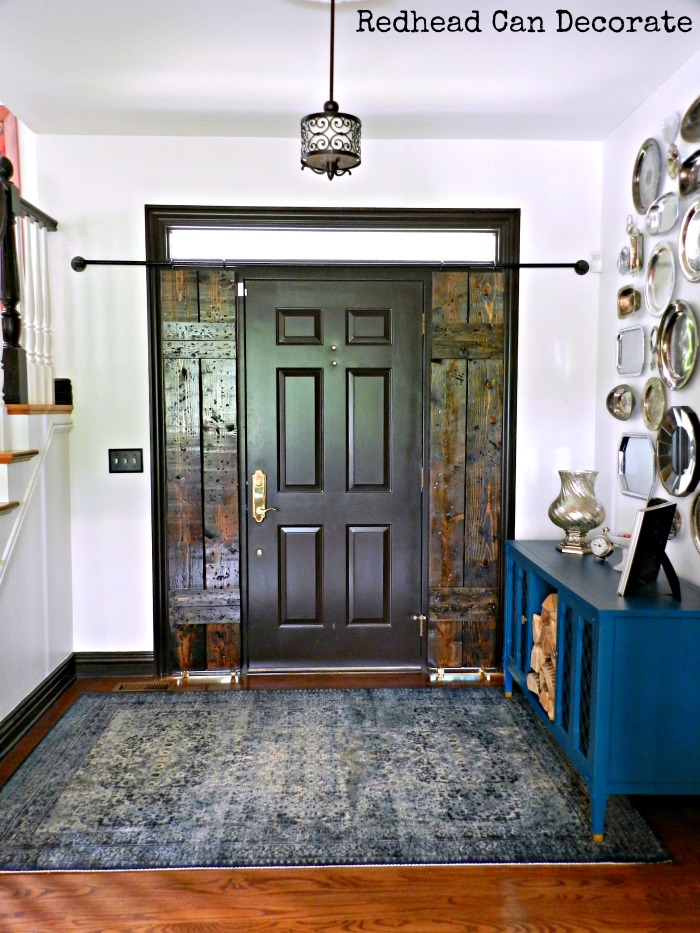
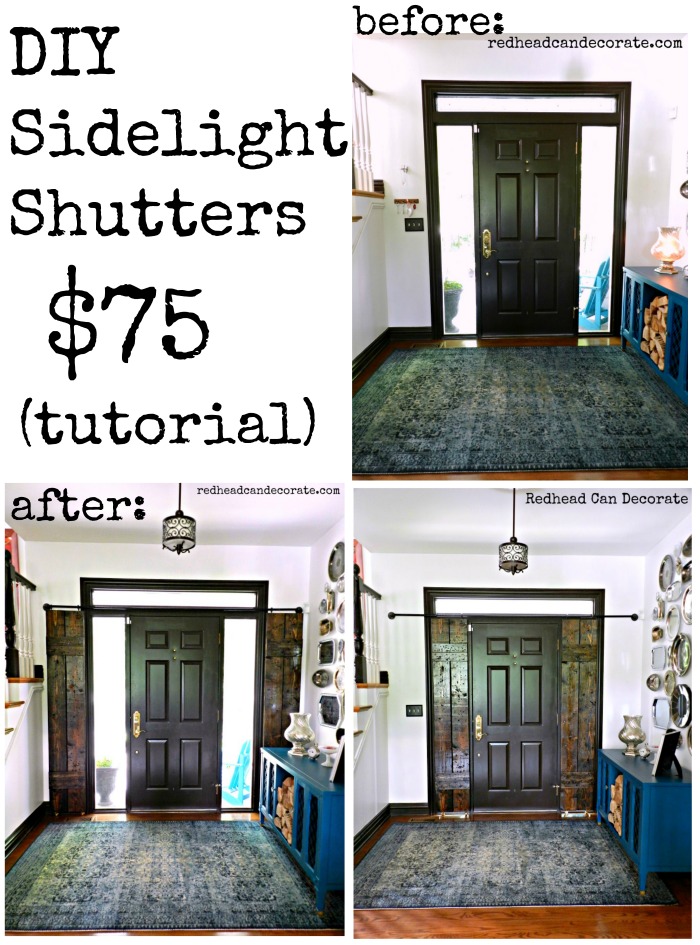
I can’t believe it, but we now have front door DIY Sidelight Wood Shutters (all for under $75)!
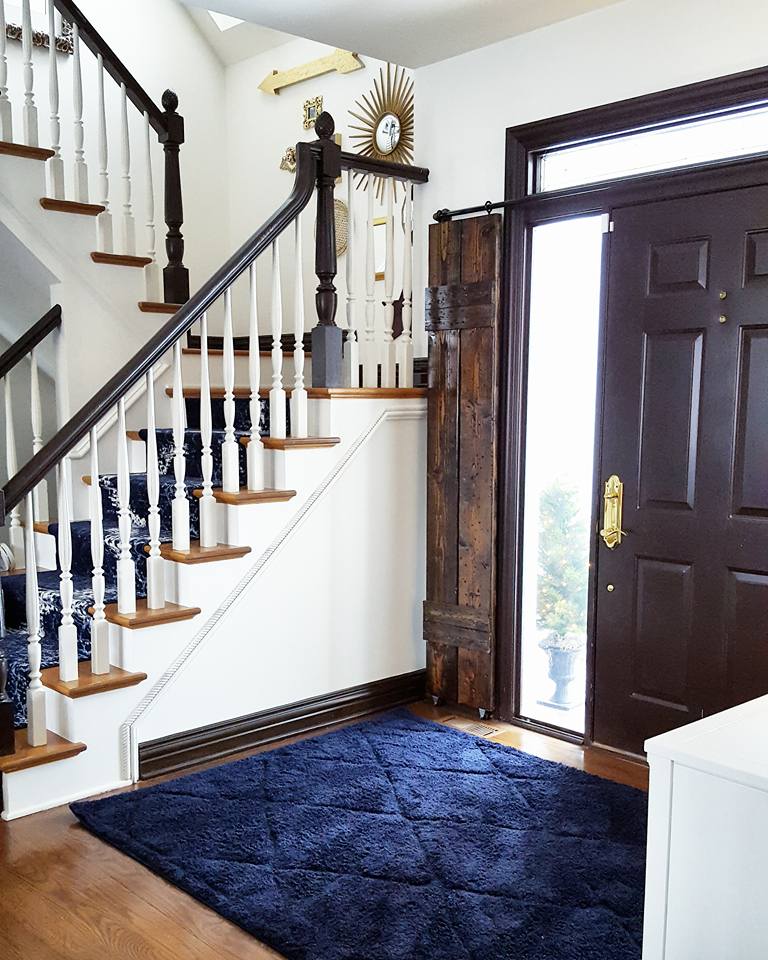
For years I’ve been wanting to add a sliding barn door somewhere in our home, but all of our closets are wired with an automatic light that turns on & off when we open and close the door. So, that doesn’t leave me with many doors left. Until I thought of this idea. At first, I thought swinging shutters would be cute, but then I realized they would bump into my console. So boom. “DIY Sidelight ‘Sliding’ Wood Shutters” were born.
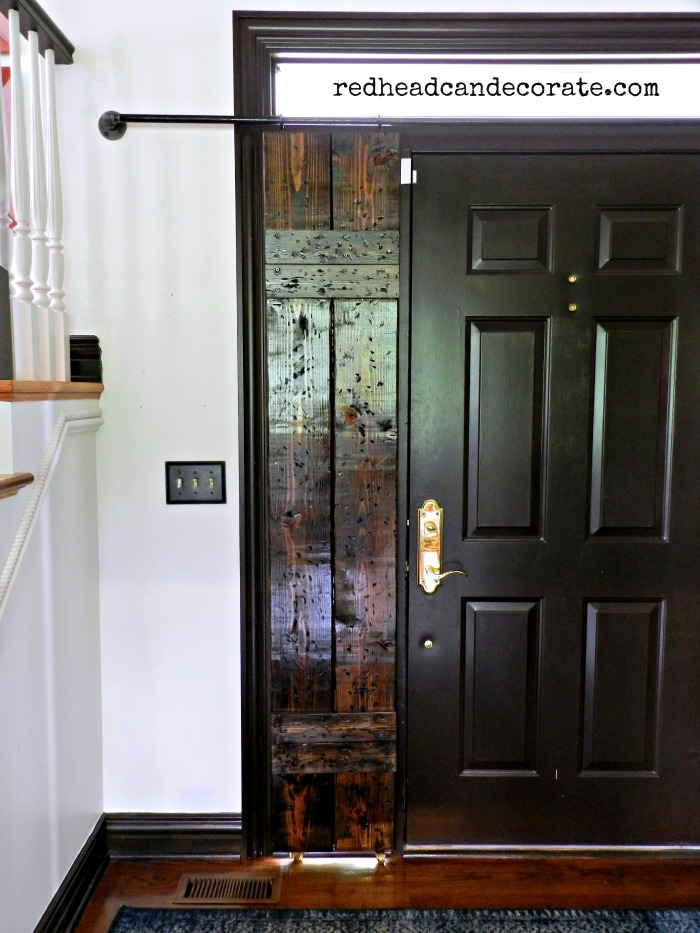
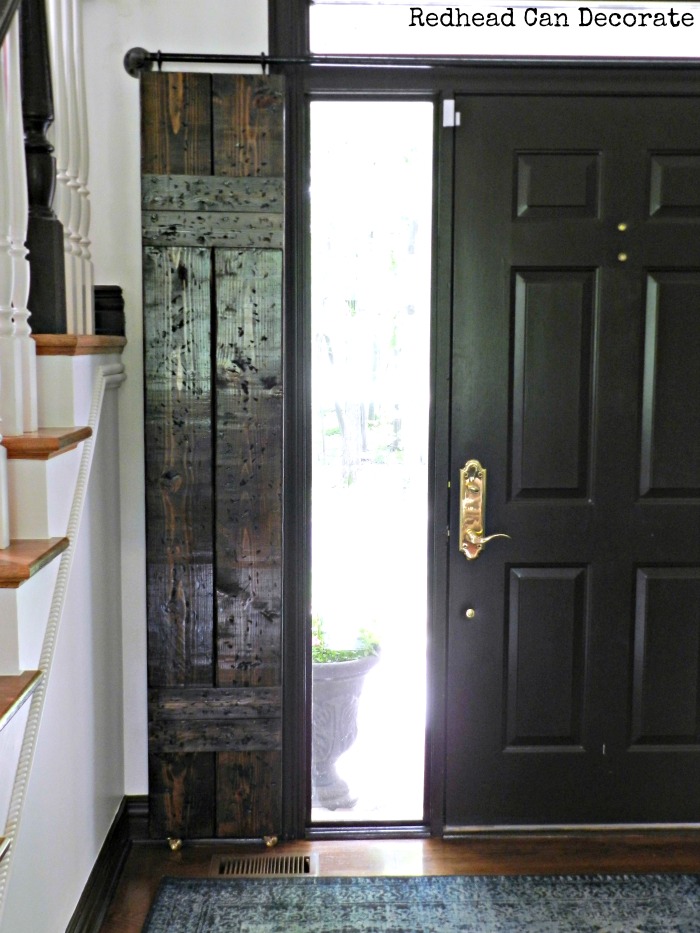
Here’s the one to the left closed so Phil the UPS guy can’t see me…
and to the right it’s open…
I love how it flirts with the “Thrift Store Silver Platter Wall” & “Stereo Console”…
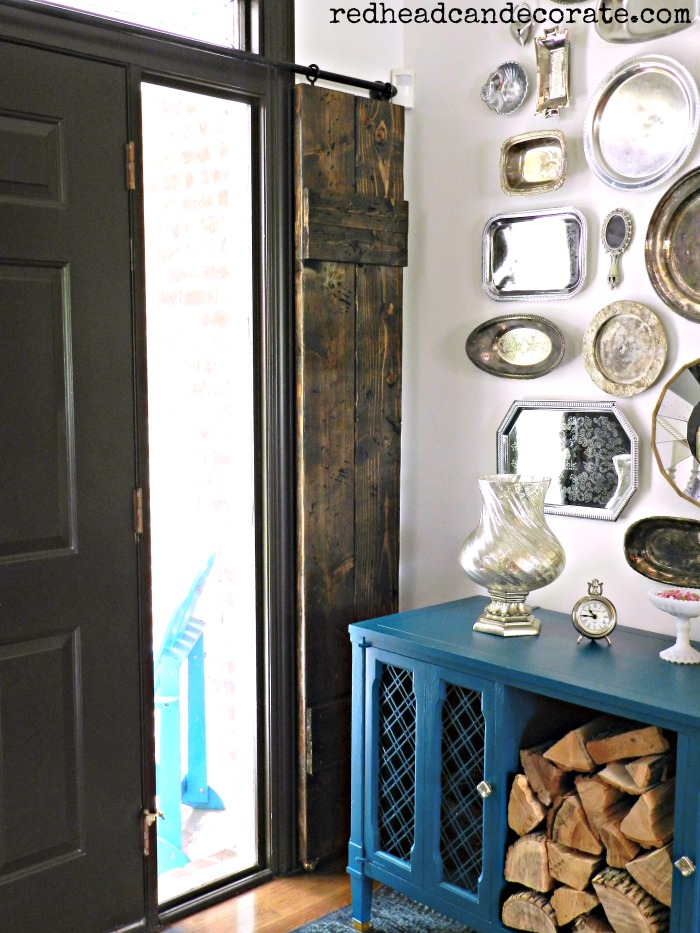
back to the left…hello world.
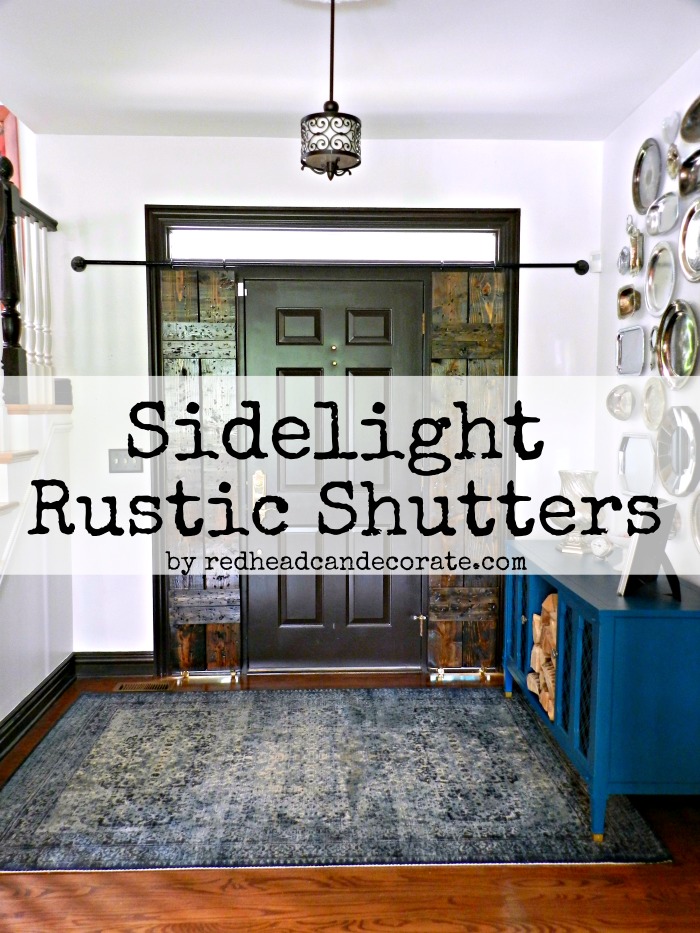
Pow! Both open and they look FABULOUS.
Just look at how they add that rusticity & charm that we all love. They also make our foyer look twice as large. Had no idea that would happen.
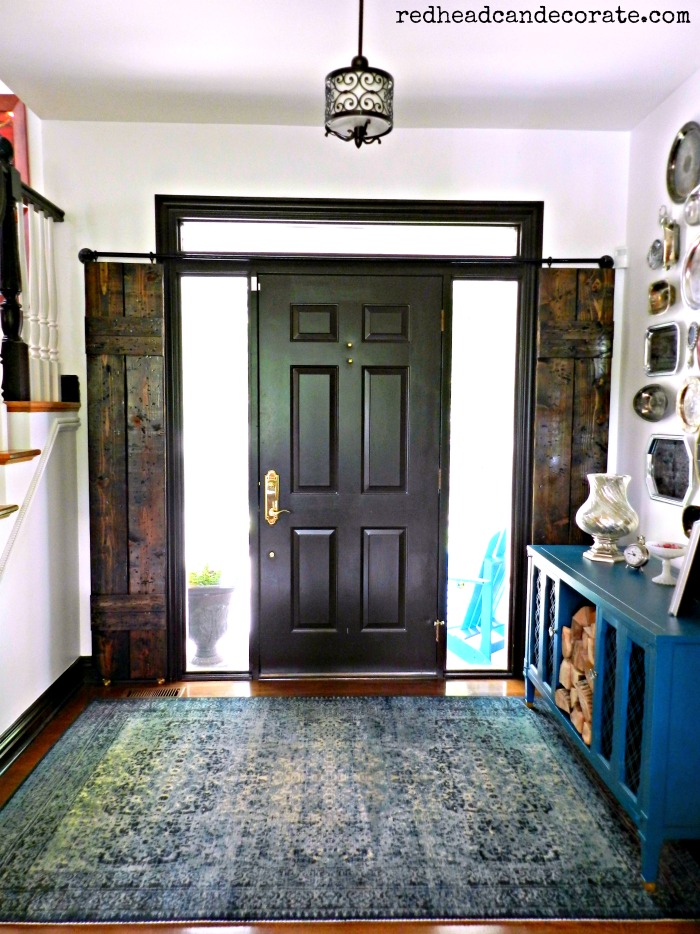
{rug information can be found here}
For 7 years we had a coating on our sidelight windows that I thought was fun at first. Then the years passed and I was tired of not being able to see my garden out front. You see, we don’t have many windows out front. Most of them are on the back side of our home. I have my hydrangeas out there right now and I love being able to see them.
Here it was before (after we took the coating off the windows):
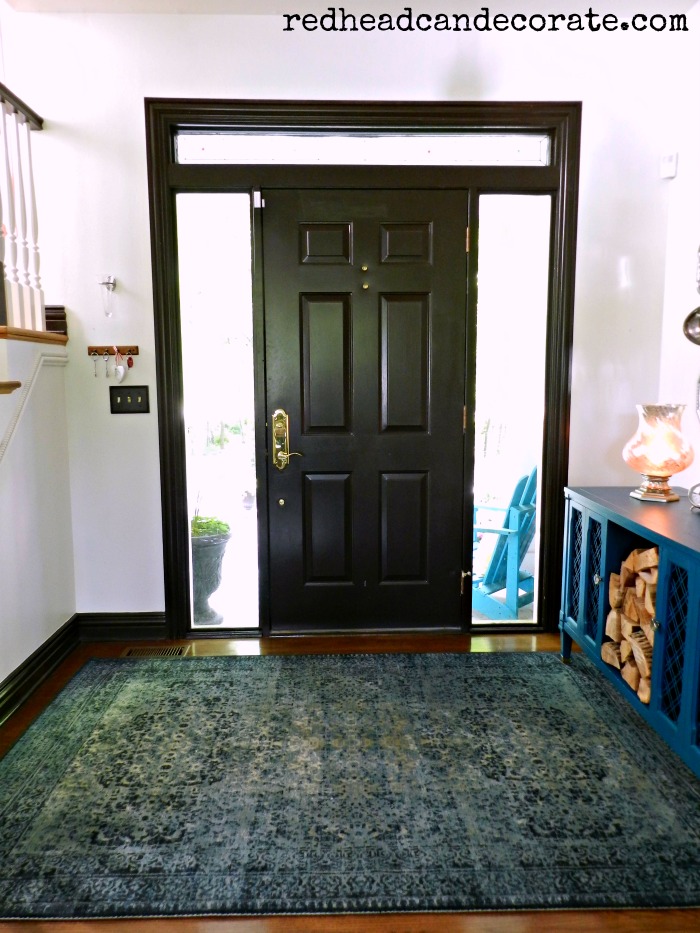
Here’s it is now after I slide the shutters open…
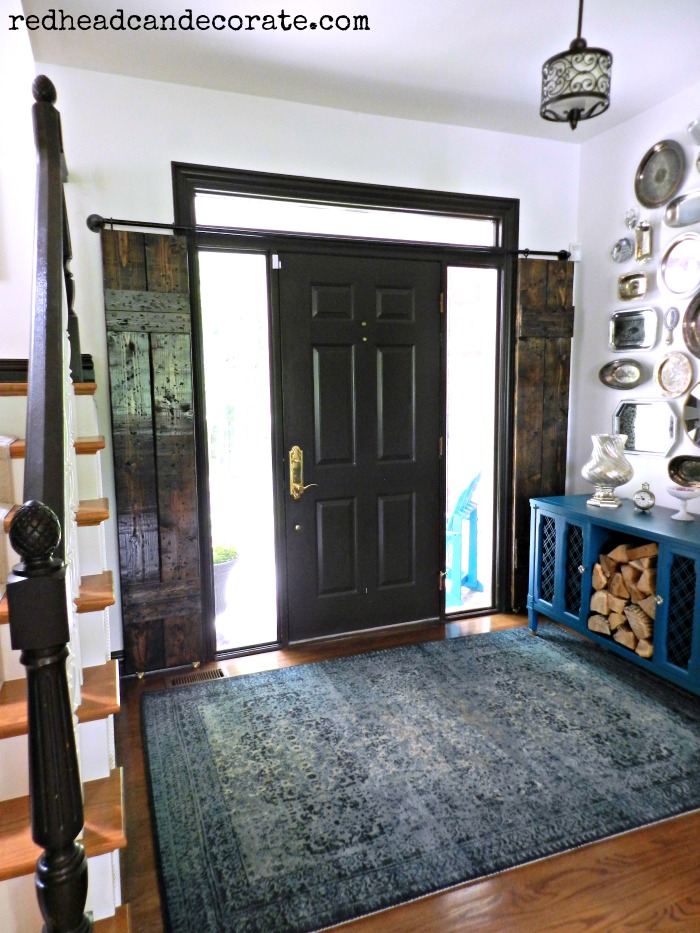
here it is now when I slide the shutters shut at dusk…
From a scale from 1-10 on difficulty, 10 being the hardest to 1 being super easy. I give this a 7. This took us a couple days to complete and you can find the full tutorial my husband wrote at the bottom of this post. I could not have done this without him. He is the muscle, and the measurer.
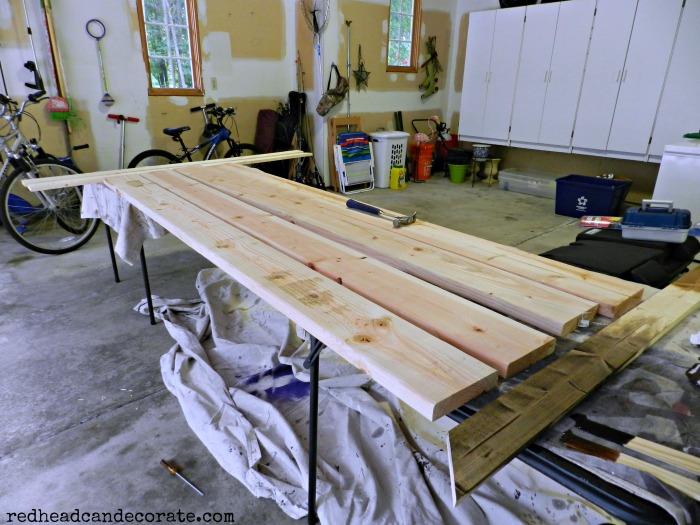
We used pine boards from Home Depot and we also found all of the hardware there, too. They even custom cut the pipe for us right then and there.
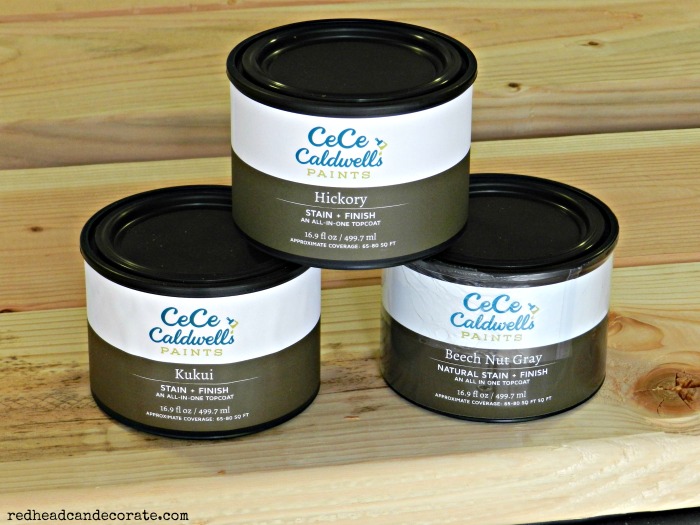
While in the middle of planning our shutters, lucky for us, CeCe Caldwell’s Paints contacted us and wanted to know if we were interested in reviewing their paints and/or stains. I jumped on that rustic wood band wagon quickly after I researched the gorgeous colors of stain they offer.
Then I found out that their gorgeous stain has no smell. Trust me, after all of the staining we have done in our home, that was music to our noses. To be able to stain with no smell is a dream. All of CeCe Caldwell’s products are Earth & people friendy.
We used Cece Caldwell’s Kukui stain, and we only had to use 1 coat. Isn’t that amazing? It’s absolutely gorgeous stain! I used a brush to apply it to the boards after we beat them up, and sanded them a little. Then I wiped off the excess after a few minutes of letting it soak in. This stain looked beautiful without a top coat, however we opted to add a top coat of high gloss spar varnish so the sheen matched up with our other stained wood.
{Don’t miss the *giveaway at the bottom of this post!}
*Giveaway at bottom of post!
So, tell me your thoughts. What do you think? Would you do this to your sidelights?
DIY Sidelight Wood Shutters Tutorial
Supplies:
(4) 2X8 pine boards 8 feet long
(2) 1×4 pine boards 8 feet long
(2) back iron floor plates ½ inch pipe diameter
(4) black Iron connecting nipples ½ inch pipe diameter (You will need to measure area to ensure molding clearance-see below.)
(2) black iron pipe connection elbows ½ inch pipe diameter
(1) Black iron pipe ½ inch pipe diameter, cut to length (You will need to measure area to ensure proper frame length-see below.)
(4) 3/8 inch eyelet screws (Ensure eyelet opening is larger than the ½ pipe to allow the eyelet to glide over pipe freely. We sprayed our black.)
(4) non swivel-caster wheels
Measure area including sidelights and doorway to determine width and length of the shutters and length of pipe that needs to be used to construct pipe frame. (Note our sidelights were approximately 14 inches wide. Your sidelights may be wider or narrower. If wider, use wider base boards for your shutters like 2×10 boards. If narrower, use 2×6 boards if appropriate.)
When measuring the sidelights to determine shutter size, be sure to account for the length of your casters and eyelet screws as well as size of the frame hardware, i.e. floor plates, connecting nipples, to make ensure you construct the shutters to the proper width and length.
Allow for the correct connecting nipple length when measuring to ensure for proper distance of the pipe frame from the wall, so that your shutter freely glides past any moldings around your sidelights as well as open completely by sliding freely past the sidelights.
Cut 2 of your 2×8 pine boards to the proper length to form the base of your shutter. Then cut your 1×4 boards into 4 pieces so that they are the same width as your shutter.
You will use the 1×4 boards to bind the shutter boards together. Measure from the top and bottom of your shutter equal distances where you would like to fasten your 1×4 boards and attach the same to shutter using decking screws. We used #8 screws 1 5/8 inch long.
Attach 2 casters to the bottom of your shutter. Then attach two eyelet screws to the top. Your shutter is now complete. Repeat for second shutter. Then construct the hardware ends by assembling the floor plates to the connection elbow using the connection nipples.
Once the shutters and hardware ends are complete, you will need at least two people to install the shutters to the frame.
Place the each shutters in front of the sidelights and have each person hold one of the shutters in place. While standing on a step stool or small ladder insert your black iron pipe frame through the eyelets at the top of your shutter. Repeat for the second shutter.
Then install the hardware ends onto each end of the pipe frame. Attach the assembled frame to the wall. If you are able to, attach each floor plate into a wall stud using screws. If no stud is available, use toggle bolts to install the floor plates to the drywall. Each toggle screw should be rated to hold 150 pounds and can be found at any hardware store.
Your shutters are now installed.
*Cece Caldwell’s Giveaway ends July 22, 2016: One lucky reader will be chosen to receive one half liter of paint, one half liter of stain, and a half liter of finish all in the colors of their choice! This giveaway is for US residents only. To enter please follow these steps and you will be automatically entered. Winner will be notified by e-mail:
- Visit CeCe Caldwell’s Facebook Page.
- Visit CeCe Caldwell’s Website to pick your favorite colors.
- Leave 1 comment on my post telling us your favorite color(s).
Good luck!


Girl these are amazing! I had side windows like that in my last house and tried just about everything from curtains and blinds. Hated both! So much so that I refused to look at a house with them. This is the perfect solution. Great job!
Thanks, Tammy!! I know, it’s a big issue for a lot of folks. Have a great weekend~ Julie
Oh yes!!! I definitely would want these!!! I’m creeped out by doors where someone can see me (when home alone for days on end I wanted to put foil over the glass in my doors!!!!). This looks trendy industrial farmhouse yet allow daytime light too!!! It’s great you had the room to do this on either side of the doors. Thumbs up????
Thanks, Gwen! It’s a classic look that will never go out of style 🙂 ~ Julie
You got me giddy when I saw these. So much so I had to show Mike. We have wood blinds on ours that I hate because they get so darn dusty! This is an awesome project.
You should do it, Debbie!! If you have a questions, let me know. Have a great weekend! XO
I don’t have anything to stain, but I liked the paint colors. I need the Carolina Sun Yellow, and I really like the Spring Hill Green.
This is one of the best ideas I’ve seen in a very long while. I, too, love barn doors and yours are beautiful. Makes me wish I had windows on either side of my front door.
Wow! Thanks for that nice comment, Judy! ~ Julie
Julie, these are great!! You have opened the door to SO many creative opportunities for using these in different applications. 🙂 Yay!!!
Thanks, Christine! 🙂 ~ Julie
We don’t have side windows but sure do like what you done with yours. Love the sliding window cover doors.
Favorite colors;Newport Navy
Blue Mountain Sky
Simply White
Thank you for this giveaway opportunity
Love the doors! Such a great idea, and they do make the entry seem wider! When open, it’s arm are thrown open wide, saying a big hello! LOL -also, I checked out those paint colors, would love to try Emerald Isle or Newport Navy for a couple of bureaus that I’m going to refinish!
I love your idea! It looks amazing! I’ve used their paints and the aging wax. Would love to try the stain, beachnut gray!
I love the Hickory stain color!
And the sliding shutters work perfectly over your sidelights! I have to admit I love the sliding barn doors, but I feel like they look off center or one sided when they are closed, but since you are cover 2 windows and have that perfect amount of space for them when they are open–the symmetry makes them feel so much better!
Thank you, Susan!
I really like the Blue Montana Sky paint — a gorgeous shade of blue.
Thanks for a chance at the giveaway.
What a fantastic idea and a great look! Thanks for the pictures and the easy to follow instructions. One quick favor, when you have a moment, could you include a picture of what it looks like from the outside looking in! Thanks again for sharing another great idea!!! ~ Linda
Love love the barn door effect!
I love the silverhill fog color! Thanks for the giveaway!
It turned out great! It really opens up your foyer!
Thank you, Julie! I agree. I had no idea it would do that. Have a great Sat.! XO ~ Julie
Blue Montana Sky for paint, Walnut Grove for the stain, and Endurance for the finish. Thanks for the chance
Love the Newport Navy paint, Kukui stain and finish.
Now you make me wish I had sidelights! I have wanted a sliding barn door somewhere in our home before they became popular. Hubby is still trying to figure out which one we could do it on without it being a problem (not a lot of open walls in our house). I love the paint color Thomasville Teal, the stain Walnut Grove, and the finish endurance. Thank you for the chance to win!!!
the doors are cute and a very good idea. my color choice is blue montana sky. i have been looking for a great color for a project.
What a great idea – sliding shutters – very clever!! But we would expect nothing less from you, Julie! I the love colors Chesapeake Blue and Vermont Slate. Keep the ideas coming, girl!
Love the Doors!
The Cece colors I love are:
Beech Nut Gray
Eldorado Gold wax
Windsor Blue Paint
That looks great! I would also like to know how you attached all the silver trays to the wall? I love and collect them and some I found are very ornate. Thanks
Hi Karen! Command Strips! They work great.
What an awesome and inspiring idea!! Our house does not have many areas for such improvements (waahh). I don’t even have windows that I can put my plants under. Thank goodness there are big skylights in my kitchen where I can have some low-light plants. So much light comes thru that visitors try to turn ‘off’ the lights!! Maybe one day I’ll have my little bungalow on the lake that I can decorate the way I’d like to live: simply and homey…
These are really cool and different. I like t he look they add to the door and when open these are super cool. I see what your mean the silver platter wall.
Cindy
Oh my goodness I love Seattle Mist! Perfect for a Seattle girl! Haha. Great post, lovin’ the creativity!
What a fantastic idea. When I first saw the photo, I thought the shutters were old and antique. They are a beautiful stained color. They really turned your foyer into eye candy. Never in a million years would I think of barn doors on side windows. Again I say “Fantastic Idea, BEAUTIFUL”
Thank you so much, Bonnie!! 🙂 ~ Julie
I love the shutters!!! You are amazing, all the ideas and projects. I enjoy following you to see what new. Your home is so beautiful. Thanks for all the ideas .
Thank you, Erma! Such a sweet comment!! XO ~ Julie
I enjoy your blog and style very much but I don’t usually comment. However, this is one of the best things I have ever seen…It is just stunning! Love it! Just the most creative and best idea! You are great to share it and the tutorial!
Thank you, Leigh! I love comments so much. They keep me going!! XO ~ Julie
I love the sutters. It’s give me an idea for my whole side lights and front door. If I have to pick just one color, it will be Sky Mountain Blue but I really like them all. Love the blues, yellows, reds, and whites. There’s a store near me so I’m going to check out the paint.
Very nice. It may help keep someone from breaking in.
I would use Beckley Coal paint on my China cabinet which hasn’t been painted since 1988 when it was purchased from an unfinished wood furniture store.
By the way I love the way your shutters turned out and the products you used on them and the no smell and natural ingredients is just the inspiration for using CeCe Caldwell’s products.
I forgot to tell my favorite colors. They are Santa Fe Turquoise,Metallic Wax Sierra Silver.and Kukui
Girl, you are a DIY decorating inspiration! I absolutely LOVE your take on the sliding barn door for this application! :)))
I’ve never had the pleasure of trying any of the CeCe Caldwell line. I’d absolutely LOVE to try them on some of my signs I’ve been making. Here are my favs: Beckley Coal paint, Sierra Silver Metallic wax, and the Kukui stain! I’m a sucker for the dark stains!
Thanks for such an awesome giveaway chance! Fingers (and paws) crossed here in our house! Have a great weekend!
Hi Julie,
I don’t have sidelights, but I love yours. That said I’m looking to build a pantry in what my original back door area, off the kitchen. It’s kind of a quirky space with brick on one wall, a window, etc. I was hoping to find gray barn board for the shelves. Now I’m thinking that Cece beech nut gray stain (maybe 2 “coats”) could be just right. Very cool to find this out 🙂 Not sure about clear gloss on top. Maybe that’s a good idea….. Thanks!!
Hi…I love those sliding barn style doors!! What a great idea! I have sidelights just like those and now you have given me a wonderful idea to copy!! woo hoo!
I went to facebook and looked at Cee Cee Caldwell and then at their site…looks like some great paint, etc…I would choose a paint in the color…vintage white and a stain in Walnut Grove…I am torn between the Bauxite beige and Eldorado Gold…what fun!! thanks, Diane
Santa Fe Turquoise for sure! It’s gorg. Thanks.
Kailua Coral is my favorite chalk paint color!
I would love to try the Destin Gulf Green…although it would be a tough choice! They are all very pretty.
What an awesome transformation! You and your husband are so talented. Thanks for sharing about Cece Paints. I even signed up to receive their newsletter. I was delighted to discover that a retailer is only ten miles from me. I will definitely be checking out beech nut gray and spring hill green.
Awesome, Anita!!
Love this Julie and Rick! I have side windows on my doors but only half way up. Do you think doing half way shutters would look good?
Great question, Rose. How about shutters attached with hinges instead. So they would open up like a cabinet. You could add a long piece of wood to the side and attach the hinges there. I think sliding ones would look awkward on 1/2 sidelights, but I could be wrong!!
Love love love!!!! I am crazy about the Savannah praline stain. I am thinking of doing this on my back French doors. You are so clever! Thanks for the great idea.
Loving this look and can’t wait to show hubby the next project! This is exactly what I need for my sidelights! I’m thinking of the beech nut gray stain. I already have used and love CeCe Caldwell paints and waxes. Can’t wait to try out the stain!
Love the beech nut gray and walnut grove! We’ve got a baby on the way and the husband is building several pieces so stain is needed!
Oh, goodness, all the colors are beautiful! I think I would choose Newport Navy. It would be perfect as I was considering painting some of the wood pieces in my bedroom! Thank you for this opportunity! #AmongTheTreasures of loving our hearth and home
I love your shutters! They turned out very nice. My favorite colors are Jersey Tomato and Santa Fe Turquoise.
Oh Ya I’d do that!!! Looks awesome. Another great job!!
Yippee!!! I was waiting to hear your response!!!! 🙂
Impressed as usual! Favorite color: Pittsburgh Gray. Think it would be great on cabinets.
Thank you, Laurel! 🙂 -Julie
Luv this!!! Mini barn doors?Just adds more beauty to your gorgeous home!!
?Found you right after you were highlighted in Detroit Home Magazine–what a gorgeous house you and your husband have made into a beautiful home?
So sweet, Jennifer! Thank you. Good luck with the giveaway! XO ~ Julie
Oh I forgot to tell ya what color–Young Kansas Wheat
Emerald Isle
Those doors are truly amazing!…What a terrific idea and a most incredible job! Glad that you can see your garden now!
Thanks, Shirley 😉 🙂 🙂
I m sooo jonesing for that RUG!!!!
Plz share info on that Baby!?!?!
Hi Tani! All of the info on the rug can be found here: http://redheadcandecorate.com/2016/06/new-kitchen-runner-foyer-area-rug/
Julie,
What an ingenious idea! I love barn doors used in decorating but to use them for sidelights is brilliant. Bravo!
Thank you, Valerie! 🙂 ~ Julie
I really love Sedona Red Paint and the Walnut Stain. Thanks for the giveaway!
Love that Hickory stain over at CeCe’s and LOVE your barn door shutters!
Love the look of your shutters! Really like the Tahoe Taupe paint of CeCe’s.
I love beech nut gray. I also love those beautiful shuttles.
Metallic wax in beuxite beige, vintage white, Pittsburgh grey and pepper red.
That’s a great idea, makes me wish I had windows on the sides of my door. I really like the Chesapeake Blue. Thanks!
I wonder how these would look painted. We do not have any stained wood in our home.
They would look great painted, too!
This is so pretty, you guys did and amazing job!
Just finished my project like this. I had to tweak mine because I don’t have the space that you did in your entryway. Great idea thanks for sharing!
That is great, Jessica! Can you send me a photo? I would love to see them! My e-mail is redheadcandecorate@live.com if you decide to. Enjoy! ~ Julie
Thanks for this great idea! While I like the light our sidelights provide in our entryway, I hated feeling like everyone could see directly in our windows at night. This was the perfect solution. Your instructions were great. The shutters are a beautiful feature when open during the day and provide great privacy at night.
The only mistake I made was not clamping the two pieces of wood together enough. I only bought one clamp and really should have bought at least two. It left a gap between the planks of wood that allow the sunlight to shine through in the daytime.
P.S. I tried to include a picture of how mine turned out on this post, but it won’t let me.
I would love to see it! Can you caulk in the crease? My e mail is redheadcandecorate@live.com
[…] DIY Wood Sidelight Shutters & DIY Stair Runner/Gallery Wall […]
[…] room. The foyer is there to the right where the dark navy rug is. You can see our homemade sidelight shutters there, […]
[…] DIY Sidelight Shutters […]
[…] DIY Sidelight Wood Shutters from redheadcandecorate.com […]
Awesome approach to a problem many endure. I love the barn door look….your idea is excellent and works wonderful…..quick access to gain light and close quickly for privacy…..plus an awesome wall…..at all times. Your detailed instructions make this a great project.
Thank you, Betty!
Love it! What would you recommend for one inset sidelight that is 10.5 wide? Wall between inset side window and door is only 9 inches 4 cm wide, so not sure a barndoor would work?
How about a barn door on hinges like a regular door?
[…] I may have failed to mention that I enjoy decorating thrifty style. My husband and I made those sidelight wood shutters for $75 […]
[…] added the glam factor, so I had to tone them down a little with some chunky real logs to match the DIY Sidelight Shutters, and then soften the blow with my family in several silver frames “sledding down” the […]
[…] down in the basement. You can see the wooden shutters we built for cheap to take their place here: Wooden Sidelight Shutters. The shutters offer […]
[…] DIY Sidelight Wood Shutters […]