I’m just going to give it to you straight.
This was a tough one folks.
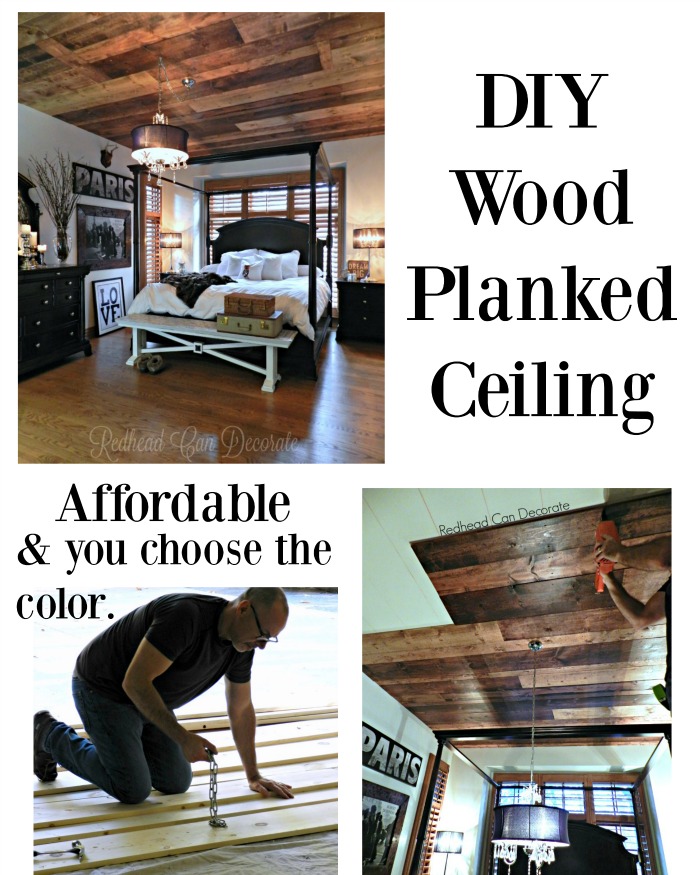
“DIY Wood Planked Ceiling” is officially in the books, it’s gorgeous beyond my wildest dreams, but it was a big job.
I’m not talking about buying the wood, staining the wood, or even figuring out where to put what piece. Those were the easy parts. What’s difficult, is lifting that many boards over your head in a brief amount of time. This took 2 weekends. (I suppose you could do it in one, but staining takes time.)
Was it worth it? Absolutely.

Isn’t it cozy? Romantic? Rustic? It’s even quieter in there, now…
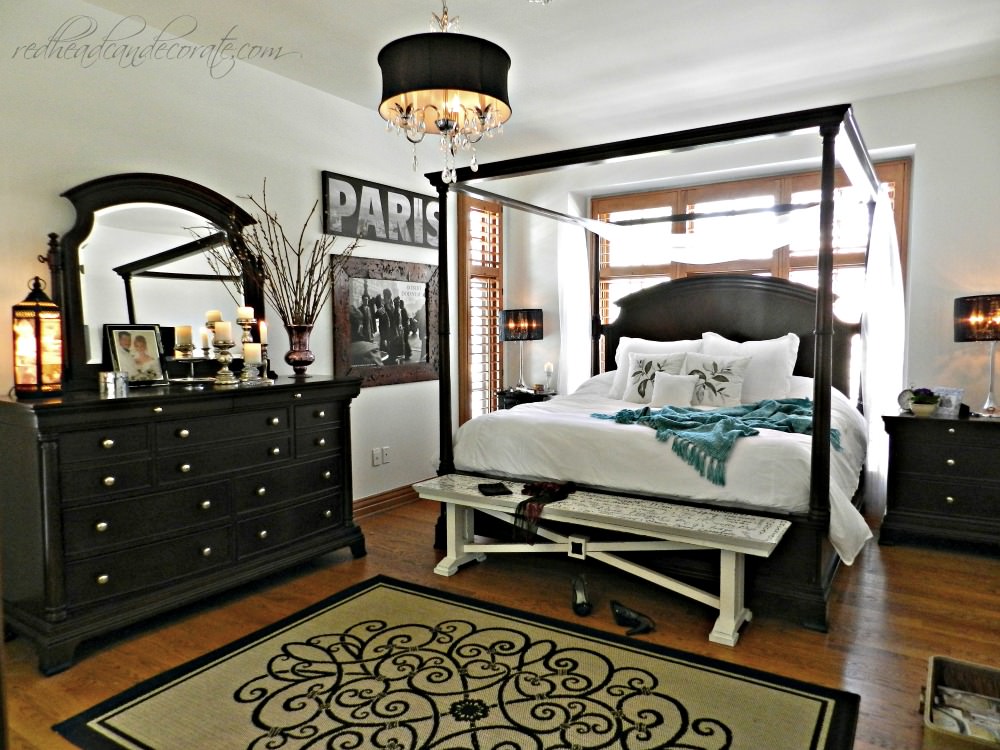
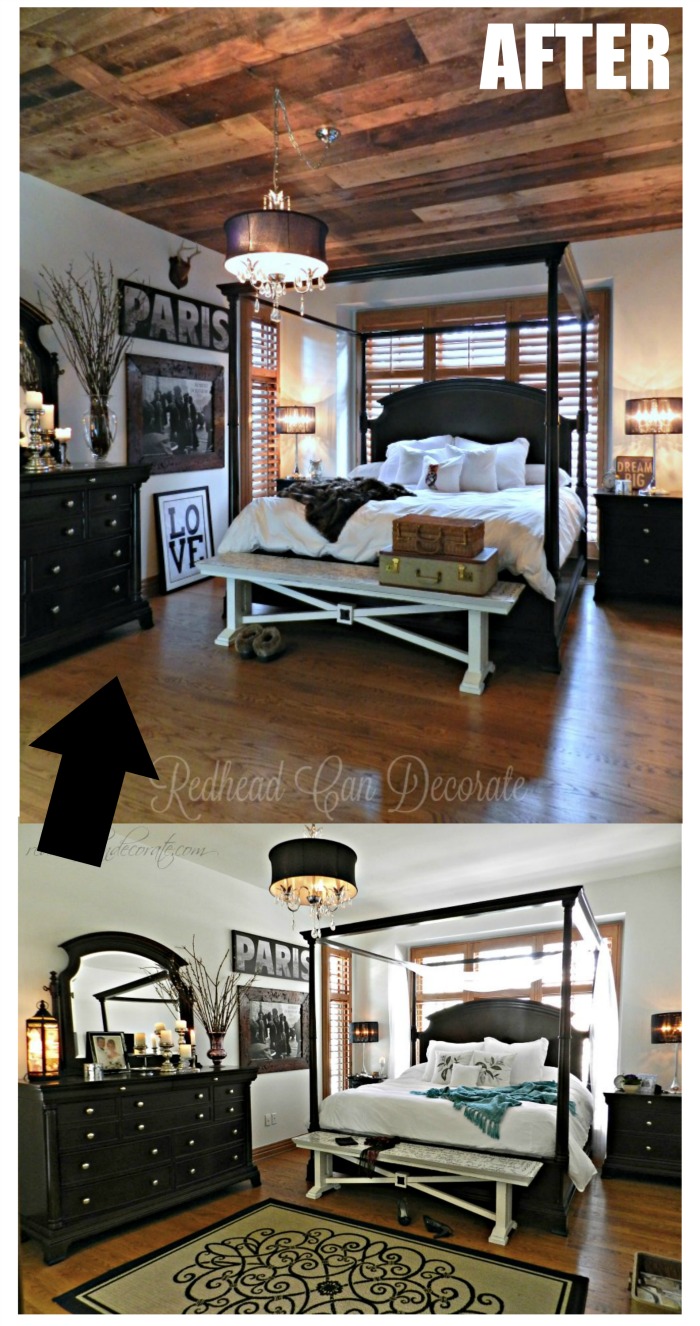
We wanted rich warm tones that would tie in our “orange-y” colored wood floor, plantation shutters, and dark furniture pieces in the room. I think it worked. In turn, we created a rustic nest that is like a retreat away from the craziness. I could live in there.
Just look at those wood tones. Pure yummy for this lady.
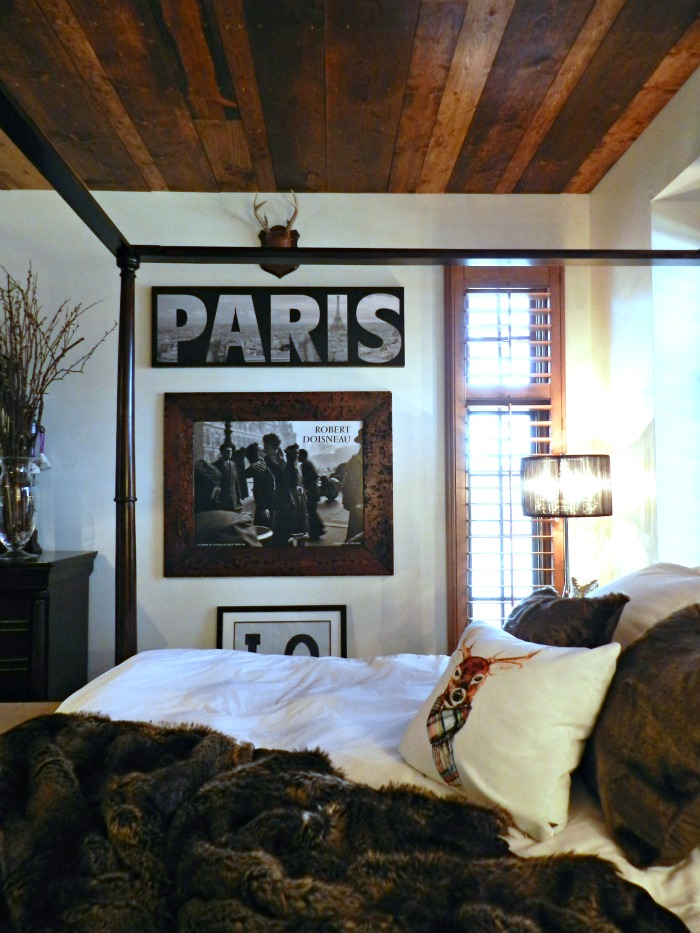

It’s kind of like crawling into a cabin every night in the middle of the woods.
I get that feeling so much, I even purchased flannel sheets! (I’ll be posting this room all decked out for Christmas soon, including those sheets, but you can get a sneak peek here: Flannel Plaid Sheets.)
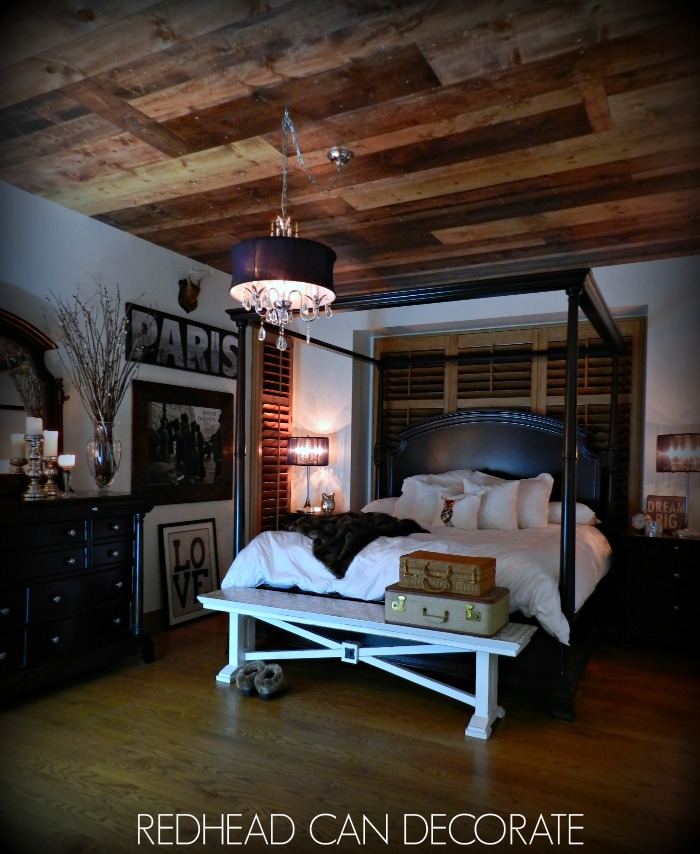
Here it is at night…
*** Some of the links in this post may contain affiliate links for your convenience. Read full disclosure policy here.
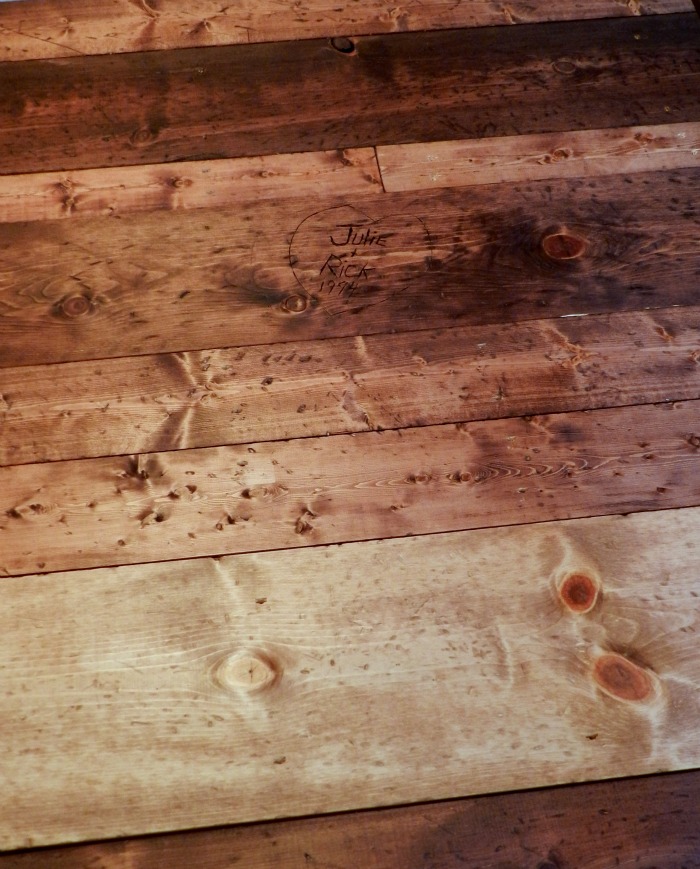
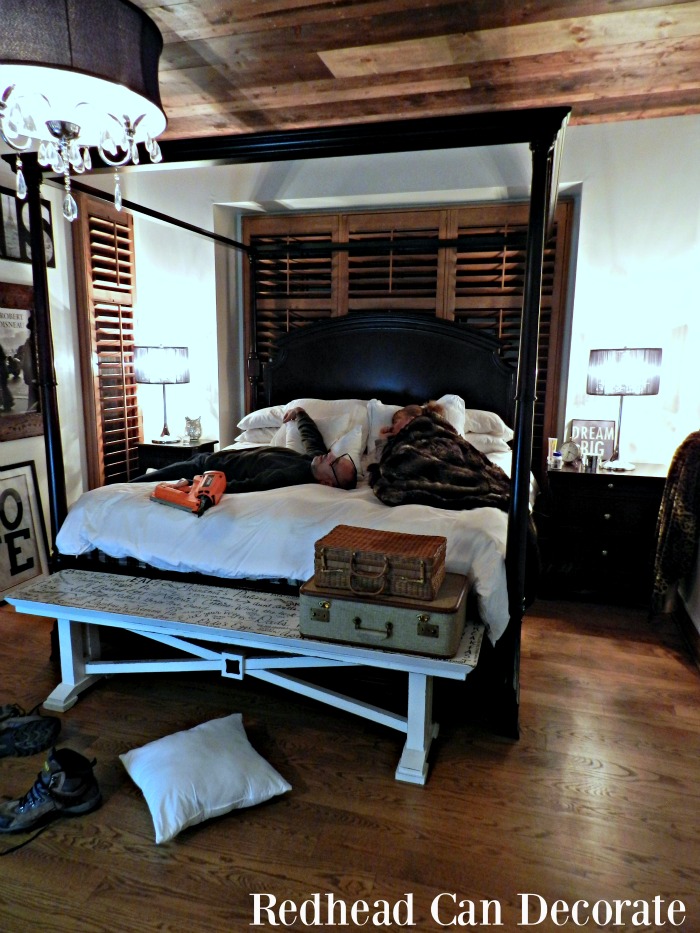
When I look up, this is what I see…I used this wood burning tool to engrave our names into the wood before we stained. It was super easy just with free hand. It’s very discreet if you don’t know it’s there. I bet the next people that live here won’t even notice it until years go by, lol.
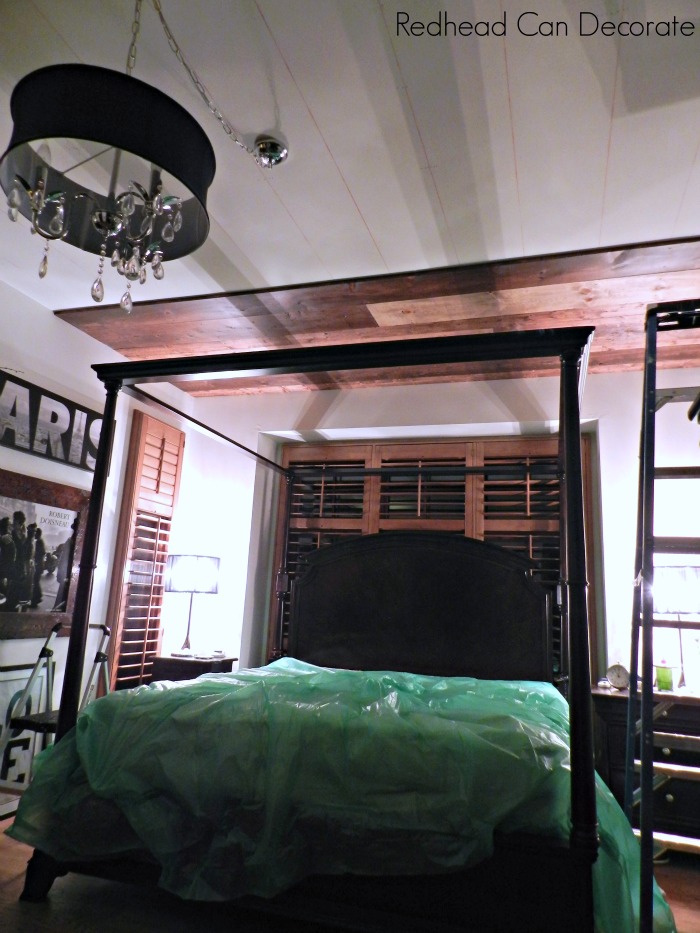
This is what the room looked like with out the “Wood Planked Ceiling”…
***My “Doodled Memory Bench” is still one of my favorite pieces. The DIY Wood Frame around the poster is pretty cool, too.
So….lets get to how we did this.
It’s pretty basic, but as I mentioned earlier, it involves strength. You will need at least 2 people and 2 weekends. Oh, and the stain makes the bedroom smell for about a week, so you won’t want to sleep in there until the smell is gone.
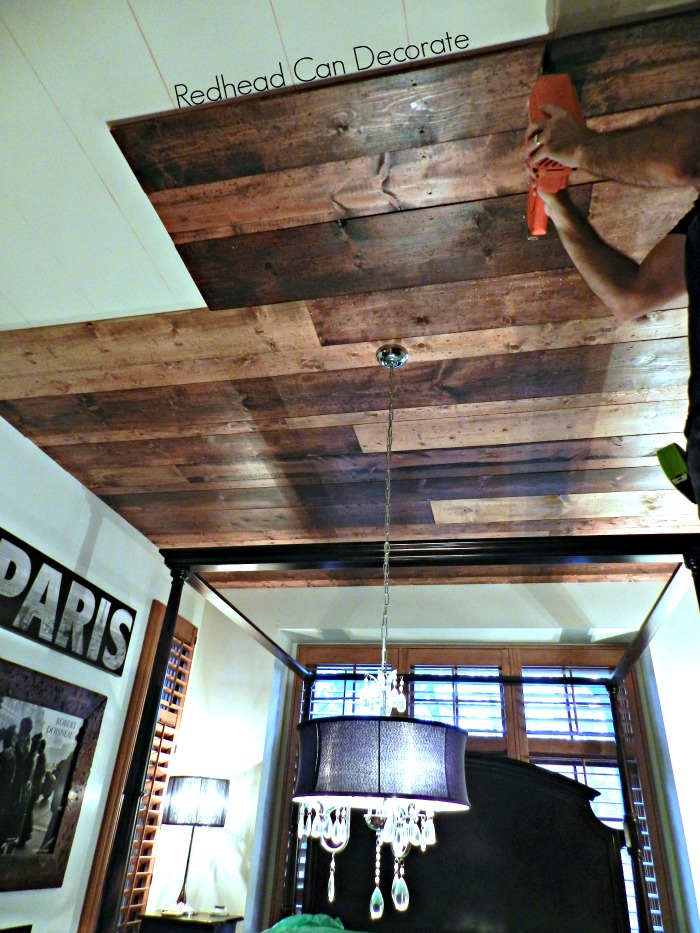
After we measured the room, we figured out roughly how much wood we would need. Then we went to Home Depot and bought pine boards in many different widths (1 inch thickness, 4, 6, 8, 10, and 12 inches wide). We didn’t want this to look manufactured. We wanted it to look rustic with random sizes. Also…we hand picked each board carefully so there were lots of knots and no cracked/warped wood.
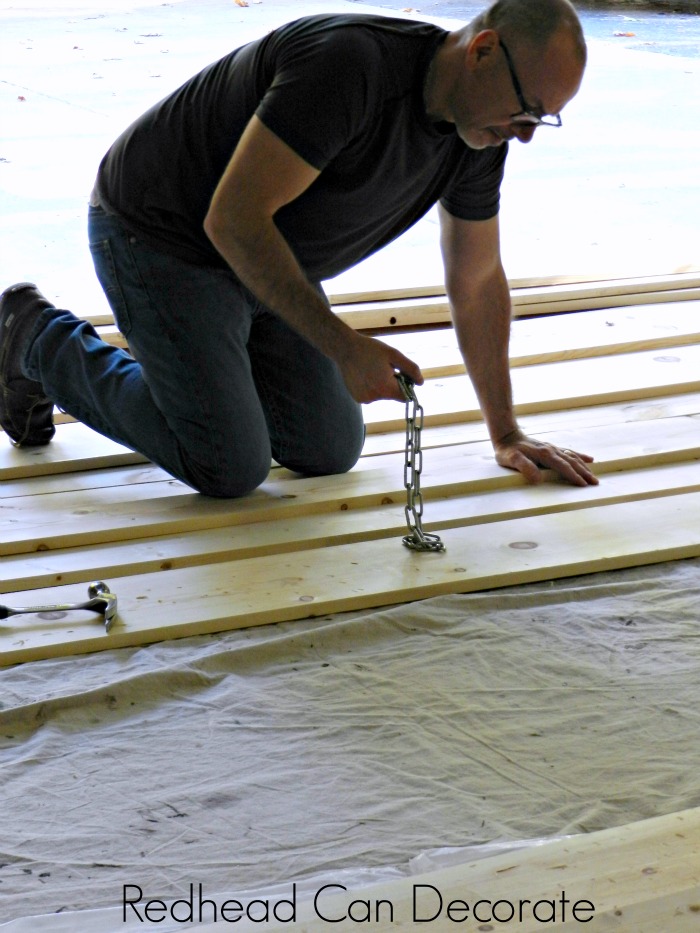
When we got home, my husband and I beat each other up the wood with a hammer and chain. This took a while. The patience this man has is amazing.
Next came the staining…we used 3 different colors:
3. A mix of the 2 (just for fun)
We used rags to apply it (wear rubber gloves). It may appear that there are more than 3 shades of stain. That is because you can adjust the color by how much stain you actually let soak into the board. The heavier coat you put on, the darker it will be. Remember to dry between coats. We only did one coat on each board. Then we put one coat of polyurethane (satin sheen) which will help with he stain smell, too. Be sure to let all stains dry.
IMPORTANT: Stain is highly flammable, and can combust. You must use a very ventilated area (outdoors is best), and never put stained rags together. Let them dry flat outside. We also took our boards out of the garage to dry. We are very cautious about fires.
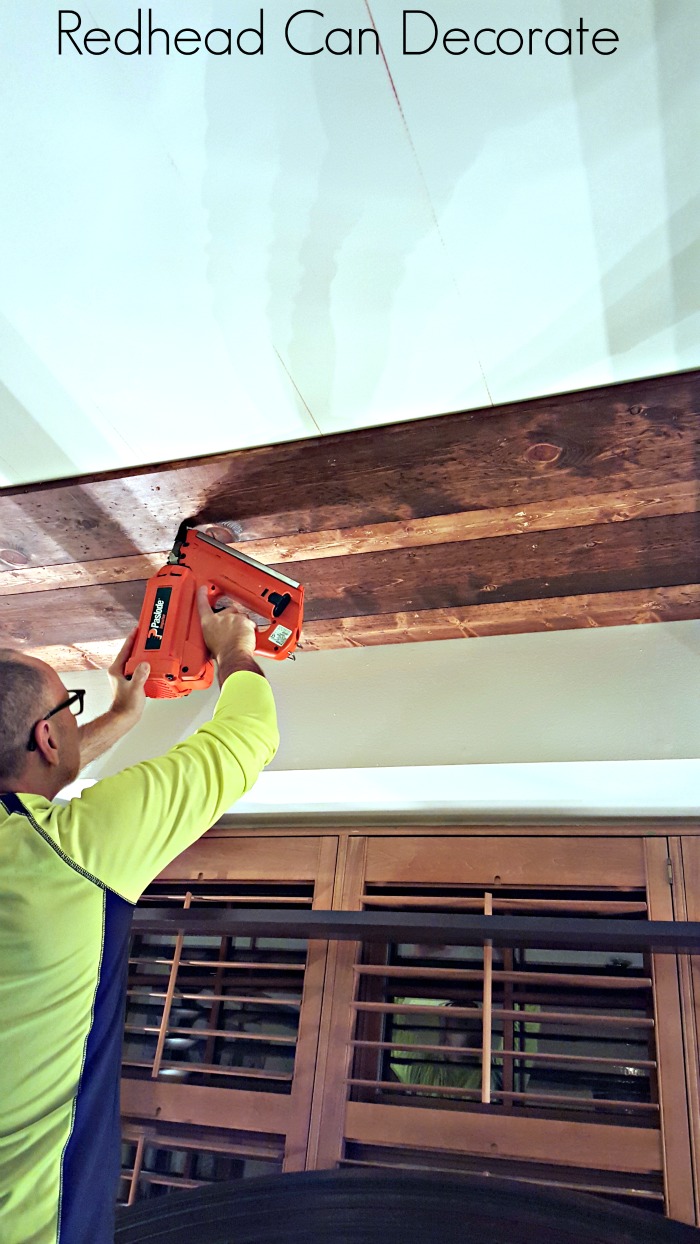
Before you can start attaching the wood, you need to prep the room. We covered our bed with a big plastic tarp. You must also locate the floor joists (in the ceiling) so you know where to put the nails. You must do this, or the wood will not be safe. If you look above, you can see we used red chalk lines. I do not recommend doing it this way because chalk got everywhere. Just use a pencil or marker.
We used this nail gun Paslode Cordless Framing Nailer (you will need nails and fuel) to attach our boards, and let me tell you…it is a power house. We put the nails in the same spot on each board. It made it look really cool.
You can paint your ceiling black first if you want to be sure that you won’t see any white cracks between the boards. We chose not to because we are lazy. That would also change our floor joist system mentioned earlier.
We had to drop down our light fixture (keeping wires in tact), and my husband cut a small square hole in the board that went there. If you like our chandelier, you can find it here at a great price.
When choosing your wood pattern, do what suites you best. Have fun with it! We did it random, but we also wanted contrast. So, if we went dark, the next one was lighter. You will need to measure each row because your house is most likely not even. We had sometimes a 1/2 inch difference.
You can also cut the boards at different lengths so they don’t all line up at the same point. We also threw in 2 “patches” that went the opposite way. It’s basically just a really heavy puzzle.
Don’t forget to let the room air out at least a week before you sleep there.
Candles help reduce the smell, too.
We chose not to do trim around the edges because we are too old. We like it without.
I’m really sleepy now, so I’m going to go take nap. Good night.

*Products for Wood Planked Ceiling are highlighted above.
Please pin this photo:
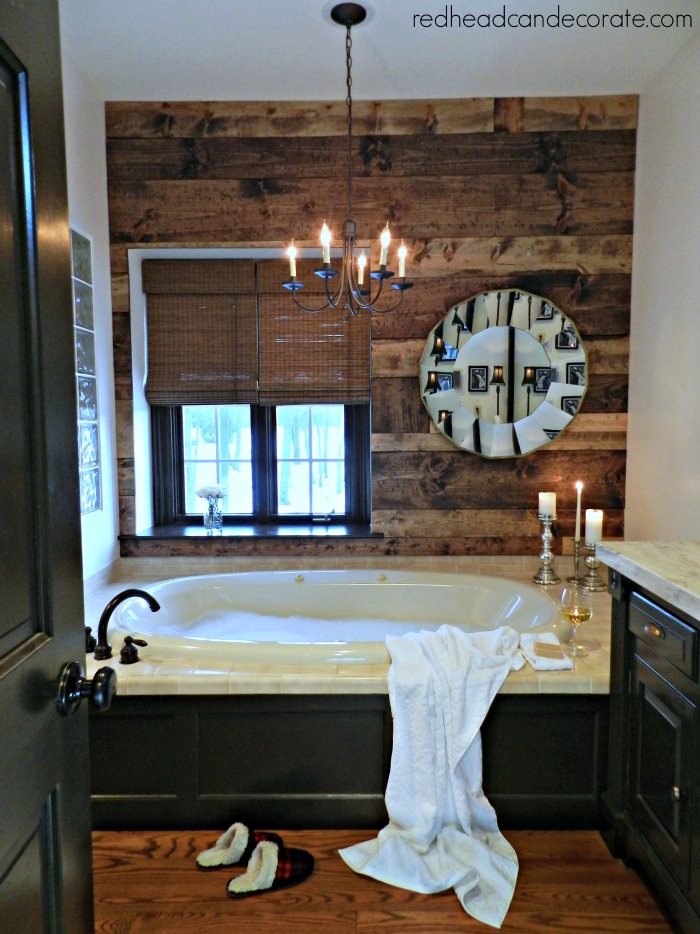
You may also like our “DIY Wood Planked Wall” in the adjoining master bathroom…
If you like my ceiling, you will also like this Distressed Wood Ceiling by The Heathered Nest.
Sharing here:
Designer Trapped in a Lawyer’s Body


OHHHH JULIE…..
Your DIY wood ceiling in your bedroom is just beyond fabulous!!! IT is even beyond gorgeous!!! I totally LOVE it….problem is…I would want all rooms to have that gorgeous, warm, look!! Wow…I sure wish I was young again….:)
Thank you for sharing…it is just SUPERB!!!
Dolores
Oregon
Julie, it’s absolutely gorgeous! I can tell how hard it was but, man, the end result was so worth it. I love lots of color and texture in my rooms and this is such a beautiful way to accomplish that! I’m going to show this post to my husband and hope he gets inspired to start a project in the house. I have a list 🙂
I hope he tries it, Val!!
Absolutely gorgeous! Saying ouch to all of the overhead work. I’m pretty sure I wouldn’t last for a whole project! But so beautiful. I do have a question. It looks like a couple boards are perpendicular to the rest. If I am seeing that correctly, was that for interest?
Yes…just for fun. Thank you, Terri!!
This is stunning. We bought 1” x 10” boards for our ceiling recently, but have started second guessing they may be too heavy for a ceiling. Did you have any issues with the weight of them?
I’m not sure what you are asking, but ours were heavy to hold while installing. It took 2 of us, and we ached pretty bad after it all. Make sure you are hitting the studs in the ceiling with your screws so the boards don’t fall out.
Absolutely stunning, Julie!! I want mine to look like this!
Can’t wait to see, Christy!
FINALLY getting around to reading!! Oh Julie, I LOVE LOVE LOVE it! The tone is perfect. And I LOVE your woodburning touch. That’s the cherry on top to me. You guys did SUCH a lovely job. Someday, we’ll have a visit, and we can both check out each other’s planked ceilings, and the guys can swap DIY horror stories 😉
You inspired me!!! XO
All your hard work was SO worthwhile ! It’s just fabulous! Merry Christmas.
Gorgeous!!!Your hard work shows. It’s fantastic. Hugs
P.S. I hope you will share at the Thursday hop ( you can linkup through Sat midnight)
I will, Katherine! Thank you!!!
Julie, it is gorgeous!! I love it!
Debbie
Now, that really is a WOW!
Ahhh it’s ADORABLE!! Loved that you personalized it!
This is really beautiful! We painted our ceilings a couple of years ago and I had to rest for a week so I can’t imagine how tired your shoulders got doing this! But it turned out so wonderful! I love it!
love and blessings~
Lynda @ Gates of Crystal
I love this SO MUCH!! Beautiful! 🙂
-Megan
http://www.lifeonshadylane.com
Girl, I know exactly what you went through! Don’t know if you ever saw my post a few years back about the “reclaimed wood on a vaulted ceiling,,,,in a herringbone pattern!” yep I am a glutton for punishment.
I love how your room looks! A friend of mine wants to do this to her wall and I like the idea of your pine boards in different widths. The stain you chose is perfect! Really, really nice job. Thanks for sharing.
I love your bedroom…can you tell me about the chandelier and the size? thank you so much.
Thank you, Connie! Here’s the link to my post on it! http://redheadcandecorate.com/2012/05/bedroom-light-makeover/
Love the wood ceiling. It would be so perfect in our two room bunkhouse! Please continue to share your inspirations!
The ceiling is amazing. And yes I can imagine it would be hard to install but so worth it.
Oh my gosh Julie, I love this! nice work. And I love the picture of you and your hubby exhausted on the bed!
Hi Suzanne, We were so tired out. I could hardly lift my arms, lol. Worth it thought! Have a great night! ~Julie
Maye it’s a redhead thing, but girl we have the same style. I LOVE IT!!!
This is so pretty and makes such a difference! How cute is the engraving. I’ll be honest though, my neck hurts just thinking of Rick’s poor neck while installing lol.
XO
My neck, too, sister. Actually, it was my arms and back. It went away though. Thanks for stopping over, Kristin XO
Wow, wow, wow! This planked ceiling is gorgeous. Your hard work definitely paid off. This is the crown jewel for the room!
This is stunning! How tall are your ceilings in this room?
9ft.
Hi Julie, I was looking at the recipe for your chocolate meatballs and saw your pictures on the side! I love love love your bedroom. Thank you for sharing.
Love your site….love your home..would you be able to tell me where you purchased your bedroom ceiling fixture?
Happy new year.
Sue
Thank you so much, Sue! Here’s the link to the one I bought: http://redheadcandecorate.com/2012/05/bedroom-light-makeover/
Just seeing this! But I note it was a Nov 29 post.
Please tell me about your stained shutters in the maser.
Details, details.
Are you referring to the plantation shutters in the master bedroom?
WoW !! The chairs look great… luv pink and black !!
Your room looks so cozy and comfy !!… my neck hurts thinking of holding AND nailing all those boards…!! The reward is the great look you achieved. Thank You for sharing.
The bedroom is indefinably my favorite. If only mine was that big.
Hi Nancy! I think our high ceilings make it look larger in that photo. It’s mostly bed! lol Thanks for stopping by. I love to hear from you all! ~ Julie
This project is my absolute fav! So beautiful and cozy. Love it!
Thank you, Elle! I appreciate your visit & kind words! ~ Julie
oh my … how beyond bea-U-tea-FULL is this lovely bedroom of yours !! … loving the picture of you and your husband at the end of this great project … “brovo”, “brovo” to a job well done ! Thank you for sharing, Jayne
Thank you so much, Jane!! Have a great rest of your day! ~ Julie
You wood ceiling is fanstatic, I love it. Now, you and your other half needs a special treat.
I love all of the DIYs you have done in your home but my absolute favorite is your bedroom ceiling. It’s so unusual and cozy!
Thank you, Bonnie! 🙂 Have a great night! ~ Julie
Absolutely love this ceiling, but could you tell me is it an 8ft high ceiling?
Our ceilings are 9ft. high. I think it would still work with an 8 ft. ceiling as well.
Good to know, its so beautiful, just thought at that height it would feel like the ceiling was on top of you thanks so much for the quick reply love this site!
Thank you, Shelley!
Julie thanks for sharing your wood ceiling project. I love the pieces “patches” you put in the opposite direction, it sure added interest! I do enjoy getting your posts by email! Thanks for all the ideas you share with us renovators who are always looking for new and different ways to update our homes!!!
I can’t believe what a difference that ceiling made in how the room looks. Totally changed the feel of the room. Made is so cozy and warm. Just incredible.
Thank you, Angela!!
Where did u purchase your bedroom table lamps and shades
[…] diy master bedroom decor – Source […]
[…] time visiting our master bedroom my husband and I provide a full tutorial on how we installed our DIY Wood Planked Ceiling here. If this isn’t your first time, then welcome back to my updated chic look. I actually […]
[…] CLICK HERE TO LEARN HOW TO STAIN […]
Love this ceiling, but could you tell me what kind of the bedrooms old ceiling? concrete or woods?
Drywall.
[…] Master Bedroom w/ DIY Wood Planked Ceiling […]
[…] method to stain the wood like we did in the “Wood Planked Wall” post and the “Wood Planked Ceiling” post. It is a very simple process and extremely […]
[…] Master Bedroom Makeover […]
[…] VIEW MASTER BEDROOM TOUR HERE […]
[…] DIY Wood Planked Ceiling […]
[…] Wood Planked Ceiling […]
[…] character. It scared Rick a little, but it ended up being a cool idea. We did the same thing to our master bedroom’s planked ceiling and even added our […]
[…] image source […]
Your planked ceiling and bathroom feature wall are exquisite!
Smile, Donna
[…] Here’s our bedroom also on a really good day… […]
[…] 5. Before and After: Small Master Bedroom Turned into Spacious Cozy Retreat […]
[…] DIY Rustic Romantic Retreat Bedroom Makeover […]